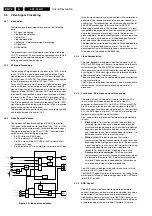
Service Modes, Error Codes, and Fault Finding
5.
period. When doing this, the service-technician must know
exactly what he is doing, as it could lead to damaging the
set.
•
Or via ComPair.
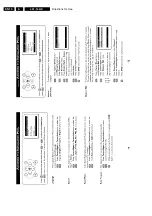
After entering SDAM, the following screen is visible, with S at
the upper right side for recognition.
Figure 5-1 SDAM menu
•
LLLL. This is the operation hours counter. It counts the
normal operation hours, not the standby hours.
•
AAABCD-X.Y. This is the software identification of the
main micro controller:
–
A = the project name (L01).
–
B = the region: E= Europe, A= Asia Pacific, U= NAFTA,
L= LATAM.
–
C = the feature of software diversity: N = stereo non-
DBX, S = stereo dBx, M = mono, D = DVD
–
D = the language cluster number:
–
X = the main software version number.
–
Y = the sub software version number.
•
S. Indication of the actual mode. S= SDAM= Service
Default Alignment mode.
•
Error buffers. Five errors possible.
•
Option bytes. Seven codes possible.
•
Clear. Erase the contents of the error buffer. Select the
CLEAR menu item and press the CURSOR RIGHT key.
The content of the error buffer is cleared.
•
Options. To set the Option Bytes. See chapter 8.3.1 for a
detailed description.
•
AKB. Disable (0) or enable (1) the “black current loop”
(AKB = Auto Kine Bias).
•
Tuner. To align the Tuner. See chapter 8.3.2 for a detailed
description.
•
White Tone. To align the White Tone. See chapter 8.3.3
for a detailed description.
•
Geometry. To align the set geometry. See chapter 8.3.4
for a detailed description.
•
Audio. No audio alignment is used for NTSC.
How to navigate
•
In SDAM, select menu items with the CURSOR UP/DOWN
key on the remote control transmitter. The selected item
will be highlighted. When not all menu items fit on the
screen, move the CURSOR UP/DOWN key to display the
next / previous menu items.
•
With the CURSOR LEFT/RIGHT keys, it is possible to:
–
Activate the selected menu item.
–
Change the value of the selected menu item.
–
Activate the selected submenu.
•
When you press the MENU button twice, the set will switch
to the normal user menus (with the SDAM mode still active
in the background). To return to the SDAM menu press the
OSD / STATUS button.
•
When you press the MENU key in a submenu, you will
return to the previous menu.
How to store settings
To store settings, leave the SDAM mode with the Standby
button on the remote.
How to exit
Switch the set to STANDBY by pressing the power button on
the remote control (if you switch the set 'off' by removing the AC
power, the set will return in SDAM when AC power is re-
applied). The error buffer is not cleared.
5.2.2
Customer Service Mode (CSM)
Purpose
When a customer is having problems with his TV-set, he can
call his dealer. The service technician can than ask the
customer to activate the CSM, in order to identify the status of
the set. Now, the service technician can judge the severness of
the complaint. In many cases, he can advise the customer how
to solve the problem, or he can decide if it is necessary to visit
the customer.
The CSM is a read only mode; therefore, modifications in this
mode are not possible.
How to enter
To enter the CSM, key in the code123654 on the user Remote
Control.
After switching ON the Customer Service Mode, the following
screen will appear:
Figure 5-2 CSM menu
1.
Indication of the actual mode
2.
Reserved item.
3.
Software identification of the main micro controller (see
former paragraph for an explanation)
4.
Reserved item (for future use).
5.
Indicates TV system and or not receiving an “IDENT” signal
on the selected source. It will display “NOT TUNED”
6.
Error code buffer (see paragraph "Error Codes" for more
details). Displays the last five errors of the error code
buffer.
How to exit
Use one of the following methods:
•
Press one of the buttons "Menu", "OSD", or "Standby" of
the remote control keys.
•
Switch-off the TV set with the AC power switch.
5.3
Problems and Solving Tips (Related to CSM)
5.3.1
Picture Problems
Note: Below described problems are all related to the TV
settings. The procedures to change the value (or status) of the
different settings are described.
No colors / noise in picture
Check CSM line 5. Wrong color system installed. To change
the setting:
1.
Press the MENU button on the remote control.
2.
Select the INSTALLATION sub menu.
3.
Select and change the SYSTEM setting until picture and
sound are correct.
L L L L
A A A B C D
X . Y
S
E R R
X X
X X
X X
X X
X X
X X X
X X X
X X X
X X X
X X X
X X X
X X X
C L E A R
C L E A R
?
O P
O P
T I O N S
>
>
A K B
T U N E R
>
W H I T E
T O N E
>
G E O M E T R Y
>
A U D I O
>
CL 26532046_078.eps
260402
1
C S M
2
3
AAABCD
X.Y
4
AKBS
5
TV
SYSTEM
/
NOT
TUNED
6
ERROR
BUFFER
CL 26532046_002
040402
Summary of Contents for L01.1L AC
Page 6: ...Directions for Use EN 6 L01 1L AC 3 3 Directions for Use 3 1 16 9 Sets ...
Page 7: ...Directions for Use EN 7 L01 1L AC 3 ...
Page 8: ...Directions for Use EN 8 L01 1L AC 3 ...
Page 9: ...Directions for Use EN 9 L01 1L AC 3 ...
Page 10: ...Directions for Use EN 10 L01 1L AC 3 ...
Page 11: ...Directions for Use EN 11 L01 1L AC 3 ...
Page 12: ...Directions for Use EN 12 L01 1L AC 3 ...
Page 13: ...Directions for Use EN 13 L01 1L AC 3 ...
Page 14: ...Directions for Use EN 14 L01 1L AC 3 ...
Page 15: ...Directions for Use EN 15 L01 1L AC 3 ...
Page 16: ...Directions for Use EN 16 L01 1L AC 3 Personal Notes ...
Page 17: ...Directions for Use EN 17 L01 1L AC 3 3 2 4 3 Sets Personal Notes ...
Page 42: ...Spare Parts List EN 82 L01 1L AC 10 10 Spare Parts List Not applicable yet ...
Page 43: ...Revision List EN 83 L01 1L AC 11 11 Revision List First release ...

