Service Modes, fault finding and repair tips
GB 9
L9.2E
5.
5.2.2
Diagnose features for service
L9 sets can be put in two service modes via the RC7150. These
are the Service Default Mode (SDM) and the Service Alignment
Mode (SAM).
5.2.3
Service Default Mode (SDM)
The purpose of the SDM is:
•
provide a situation with predefined settings to get the same
measurements as in this manual
•
override 5V protections in case of short circuiting pin 24
and pin25.0228 and pin 0224 at A7.
•
start the blinking LED procedure
•
Setting of options controls
•
Inspect the error buffer
Entering the SDM:
•
By transmitting the "DEFAULT" command with the RC7150
Dealer Service Tool (this works both while the set is in
normal operation mode or in the SAM)
•
Standard RC sequence 062596 followed by the key
"MENU"
•
By shorting test-point M25 and M24pin 0228 and 0224 on
the mono-carrier ( A7 ) while switching on the set. After
switching on the set the short-circuit can be removed. (
Caution!! Override of 5V protections ).
Exit the SDM:
Switch the set to Standby or press EXIT on the DST (the error
buffer is also cleared).
Note: When the mains power is switched off while the set is in
SDM, the set will switch to SDM immediately when the mains
is switched on again. ( The error buffer will not be cleared ).
The SDM sets the following pre-defined conditions:
•
Pal/Secam sets: tuning at 475.25 PAL (For France select
the L'-signal )
•
Volume level is set to 25% (of the maximum volume level).
•
Other picture and sound settings are set to 50%.
The following functions are "ignored" in SDM since they
interfere with diagnosing/repairing a set. "Ignoring" means that
the event that is triggered is not executed, the setting remains
unchanged.
•
(Sleep)Timer
•
Blue mute
•
Auto switch off
•
Hotel or Hospitality Mode
•
Child lock or Parental lock
•
Skipping, blanking of "Not favourite" present/channels
•
Automatic storing of Personal Preset settings
•
Automatic user menu time-out
All other controls operate normally.
5.2.4
Special functions in SDM
Access to normal user menu
Pressing the "MENU" button on the remote control will enter the
normal user menu ( TV lock, Installation, Brightness, colour
and contrast ) while "SMD" remains displayed in top of screen).
Pressing the "MENU" key again will return to the last SDM
status.
Error buffer
Pressing the "OSD" button on the remote control shows all
OSD (incl. error buffer).
Access to SAM
By pressing the "CHANNEL DOWN" and "VOLUME DOWN"
buttons on the local keyboard simultaneously or pressing
"ALIGN" on theDST
DST, the set switches from SDM to SAM
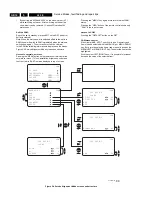
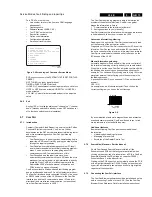
In the SDM the following information is displayed on the
screen:
Figure 5-3 Service Default Mode screens and structure
Explanation notes/references:
1.
(1) "LLLL" Operation hours timer (hexadecimal)
2.
(2) Software identification of the main micro controller
(L90BBC X.Y)
•
L90 is the chassis name for L9
•
BBC is 2 letter and 1 digit combination to indicate the
software type and the supported languages:
•
X = (main version number)
•
Y = (subversion number) BB = (range specification )
3.
(3) "SDM" To indicate that the TV set is in the service
default mode
4.
(4) "OP" Options Code which exists of 2 characters. It is
possible to change each option code
5.
"VALUE" The value of the selected option ( ON/OFF or a
combination of 2 letters )
6.
"XXX" Value of the options bytes ( OB1 .. OB7)
7.
"ERR" The last five detected errors; The left most number
indicates the most recent error detected.
The MENU UP or MENU DOWN command can be used to
select the next/previous option; The MENU LEFT and MENU
RIGHT command can be used to change the option value.
Remark: When the option-code RC = OFF, the P+ and the P-
key have the same functions as the MENU UP/DOWN keys
while the VOL+ and the VOL- key have the same function as
the MENU LEFT/RIGHT keys. When the option RC = OFF it is
not possible to change the channel preset or to adjust the
volume when in SAM/SDM menu. Using a L9 remote control,
option-code RC = ON, the P+, P-, VOL- and VOL+ can be used
to change the preset and/or to adapt the volume, while the
menu-cursor keys are used to select the option and to change
its value.
For an extended overview of the option codes see Chapter 8 -
Options
5.2.5
Service Alignment Mode (SAM)
The purpose of the SAM is to do tuning adjustments, align the
white tone, adjust the picture geometry and do sound
adjustments.
For recognition of the SAM, "SAM" is displayed at the top of the
right side of the screen
Entering SAM:
•
By transmittingpressing the "ALIGN" button command
withon the RC7150 Dealer Service Tool
•
By pressing the "CHANNEL DOWN" and "VOLUME
DOWN" key on the local keyboard simultaneously when
the set is in SDM
•
Standard RC sequence 062596 followed by the key "OSD"
LLLL L90BBC X.Y SDM
OP VALUE
OB1 OB2 OB3 OB4 OB5 OB6 OB7
ERR xx xx xx xx xx
CL 86532104_015.eps
160299
SDM
SDM
TV LOCK
INSTALLATION
BRIGHTNESS
COLOUR
CONTRAST
llllll
llllll
llllll
31
31
31
......
......
......
MENU
Summary of Contents for L9.2EAA
Page 5: ...Directions for use GB 5 L9 2E 3 3 Directions for use ...
Page 6: ...Directions for use GB 6 L9 2E 3 ...
Page 7: ...Directions for use GB 7 L9 2E 3 ...
Page 31: ...Schematics and PWB s GB 31 L9 2E 7 ...
Page 32: ...Schematics and PWB s GB 32 L9 2E 7 ...
Page 38: ...Schematics and PWB s GB 38 L9 2E 7 ...
Page 42: ...Schematics and PWB s GB 42 L9 2E 7 Personal notes Personal notes ...


