S
UNRISE
W
HISPURR
F
AN
C
ONTROL
(ZWHIS)
Installation
Instructions
S
UNRISE
W
HISPURR
F
AN
C
ONTROL
(ZWHIS)
Installation
Instructions
3
2
IMPORTANT SAFEGUARDS
Please read all instructions before installing or using this product.
Retain this guide for future reference.
WARNING! Disconnect power to all circuits in electrical box before installation.
Installation
1. Disconnect power at circuit breaker to avoid electrical shock or damage to unit.
2. Disconnect wires from existing fan wall switch.
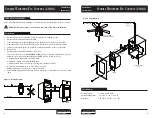
3. Connect BLACK wire from Sunrise Whispurr unit to fan motor lead using wire nut (provided).
4. Connect BLACK wire from Sunrise Whispurr unit to 120VAC hot wire using wire nut (provided).
5. Attach decorator-style faceplate (not provided) to metal strap with two screws (not provided).
6. Restore power.
7. For fans equipped with built-in variable speed devices:
These devices must be set at their MAXIMUM SPEED for proper operation. Adjustments to their set-
tings must only be made with Sunrise Whispurr in HIGH position. Follow these steps:
a. Adjust Sunrise Whispurr slider to HIGH position.
b. Adjust fan's built-in control to MAXIMUM speed.
c. Adjust Sunrise Whispurr to lowest speed setting (first position above OFF).
d. Check fan for minimum speed to ensure fan does not stall.
If further adjustment is required, repeat steps A through D.
8. After installing Whispurr unit and setting motor to highest speed, discontinue use of the fan's pull-
chain.
HOT
BLACK
NEUTRAL
LOAD
GROUND
To 120VAC Source
To Fan Motor Load
ZWHIS
BLACK
BLACK
BLACK
To NEUTRAL
MOTOR LOAD
1.5 AMP MAXIMUM
BLACK
To Fan Motor
LOAD
To 120VAC Source
HOT
BLACK
Faceplate
(not included)
ZWHIS
Figure 1: Wiring Diagram
Figure 2: Installation
Specifications
Operating Voltage:
1.5 Amp, 120VAC, 60Hz
Operating Temperature: -10° to 60° C (-15° to 140° F)
Dimensions:
1.68" (W) x 4.0" (H) x 1.37" (D)


