38
SLEEP
TV/VCR
ON/OFF
POSITION
FREEZE
INCR. SURR.
SURF
SOUND
PICTURE
MENU
CH
MUTE
SWAP
SOURCE
CC
CLOCK
ITR/REC
HOME
HOME
PERSONAL
VIDEO
MOVIES
PROGRAM LIST
OPEN/CLOSE
POWER
A/CH
PIP
M-LINK
VOL
STATUS/EXIT
OK
SOURCE
24
AV3
AV2
ANT 75‰
L
Monitor out
VIDEO
S-VIDEO
SURROUND SOUND
8
8
+ R – – L +
AV1 in
Y
Pb
Pr
AV2 in
AUDIO
R
M-Link
4
CV
I
1
3
2
S-VIDEO
OUT
OUT
OUT
L
R
AUDIO
VIDEO
COMP VIDEO
Y
Pb
Pr
2
1
AUDIO IN
(RED/WHITE)
COMP
VIDEO
(YELLOW)
S
OUND
– U
SING THE
A
UDIO
/V
IDEO
I
NPUT
J
ACKS
(
CONT
’
D
)
DBS, DVD, Video Game, etc.
(EQUIPPED WITH COMPONENT VIDEO
OUTPUTS AND AUDIO OUTPUT JACKS)
NOTE:
Optional video/audio cables (with
standard RCA plug connectors) are available
to complete your component video input jack
connections. Contact your dealer or our Parts
Information Center (1-800-851-8885) to order
any optional accessories.
BACK OF DIGITAL
ACCESSORY
BACK OF TV
S
MART
H
ELP
The description for the
component video connectors
may differ depending on the DVD
player or accessory digital source
equipment used (for example, Y,
Pb, Pr; Y, BÐY, RÐY; Y, Cr, Cb).
Although abbreviations and terms
may vary, the letters
b
and
r
stand
for the blue and red color compo-
nent signal connectors, and
Y
indi-
cates the luminance signal. Refer
to your DVD or digital accessory
ownerÕs manual for definitions and
connection details.
COMP VIDEO
(BLUE)
COMP
VIDEO
(BLUE)
C
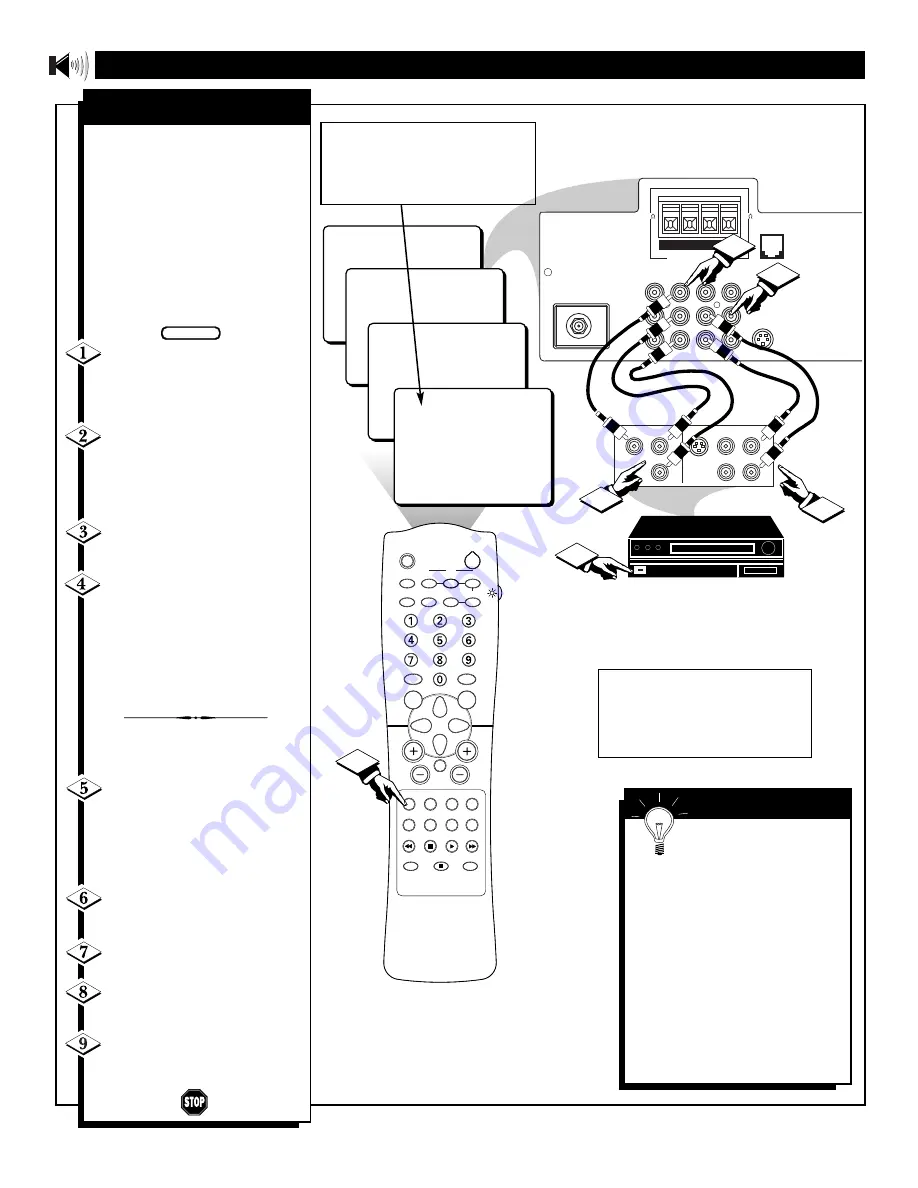
omponent Video inputs pro-
vide for the highest possible
color and picture resolution in the
playback of digital signal source
material, such as with DVD play-
ers. The color difference signals
(Pb, Pr) and the luminance (Y)
signal are connected and received
separately, which allows for
improved color bandwidth infor-
mation (not possible when using
composite video or S-Video con-
nections).
Connect the Component (Y,
Pb, Pr) Video OUT
jacks from
the DVD player (or similar
device) to the (Y, Pb, Pr) in(put)
jacks on the TV.
Connect the red and white
AUDIO CABLES
to the Audio
(left and right) output jacks on the
rear of the accessory device to the
Audio (L and R) AV1 in(put) jacks
on the TV.
Turn the TV and the DVD
(or digital accessory device)
ON.
Press the SOURCE button
on
the remote control until the CVI
source is selected. After CVI
appears, insert a disc into the
DVD (or other digital accessory
device) and press the PLAY but-
ton to view the disc on the televi-
sion. If CVI did not appear, per-
form steps 5Ð9.
NOTE:
The actions described in
steps 5Ð9 are not illustrated on this
page.
If CVI did not appear
onscreen as one of the choices
available to you by pressing the
SOURCE button, press the M
Link button
on the remote con-
trol to display the M-Link
ª
onscreen menu.
Press the CURSOR RIGHT
or CURSOR LEFT button to
highlight AV1.
Press the CURSOR UP but-
ton to toggle from AV1 to CVI.
Press the STATUS/EXIT but-
ton to remove the M-Link
™
menu
from the screen.
Press the SOURCE button
to
tune to the CVI source. You are
now ready to view the disc on the
TV.
BEGIN
C
OMPONENT
V
IDEO
I
NPUTS
NOTE: Repeatedly pressing the SOURCE
button on the remote will toggle the picture
source from the current channel, the last viewed
channel, then the CVI (or AV1) connection, the
AV2 connection, and the AV3 connection. Use
CVI for Component Video Connections.


