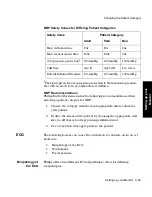


The Test Signals Function
Setting up your Monitor 3-59
S
e
tt
ing up y
our
M
onit
o
r
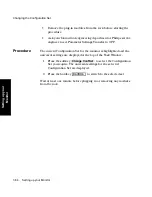
Procedure
1. Press hardkey
2. Press softkey
i
n the Instrument Configuration
Selection Window.
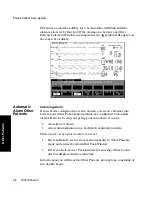
The monitor returns to Main Screen. Test waves for each parameter being
monitored are generated for 30 seconds to test the processing abilities of
the monitor. The message “Test Signals active - no monitoring” appears
on the screen.
After 30 seconds, the monitor automatically switches back to Monitoring
Mode.
If you want to go back to Monitoring Mode before 30 seconds have
elapsed, press
, then
.
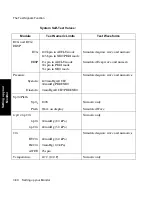
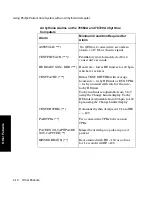
Analog
Output
(CMS only)
The Analog Output function provides eight channels of Analog Output for
connection to recorders and other data collection instruments. For more
information on Analog Output, refer to Appendix B.
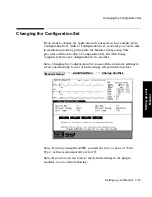
Monitor Setup
Test Signals
Monitor Setup
Stop Signals
Summary of Contents for M1165
Page 12: ...Responsibility of the Manufacturer xii ...
Page 62: ...Using an ITE Display 1 40 The CMS and V24 and V26 Patient Monitors ...
Page 74: ...Attaching the Patient 2 12 Getting Started Getting Started ...
Page 172: ...Alarm Setup 5 16 Alarm Functions Alarm Functions ...
Page 228: ...Loading Paper 6 56 Recording Functions ...
Page 236: ...Admitting a Patient 7 8 Admit Discharge End Case Admit Discharge End Case OR Mode ...
Page 238: ...Admitting a Patient 7 10 Admit Discharge End Case Admit Discharge End Case endcase tif ...
Page 274: ...Drug Calculator 8 36 Trends and Calculations Trends and Calculations ...
Page 299: ...Data Transfer Module Data Transfer 10 3 Data Transfer M1235A CTS DTM CMS CMS V24 V26 ...
Page 388: ...Performance Assurance Checks 13 22 Maintenance Maintenance ...