background image

O

PERATING DVD

38

EN


Playback

Before you begin:

Turn on the amplifier and any other equipment which is connected to this unit.
Make sure the external audio receiver (not included) are set to the correct channel.

1

Press 

[

y

y

(power)

]

 to turn on the unit.


2

Insert a disc with label facing forward.

label

•  In case the DVD was recorded on both sides, make 

sure the label of the side you want to play back is 
facing forward.

3

The unit switches to the DVD mode when the unit was 
in TV mode and detects the type of disc.


e.g.)

 DVD

DVD

• Press 

[PLAY 

B

]

 if the unit does not go to the DVD mode.

4

The unit starts playback.
•  If playback does not start automatically, press 

[PLAY 

B

]


again.

5

Press 

[STOP 

C

]

 to stop playback temporarily.

 
•  If playback remains stopped for 20 minutes, the unit will 

turn itself off automatically when “AUTO POWER OFF“ is 
set to “ON“.

6

Press 

[EJECT 

A

]

 to eject the disc.


Note:

• “   ” may appear at the top-right on the TV

screen when the operation is prohibited by the
disc or this unit.

•  Some DVD may start playback from title 2 or 3 due to 

specific programs.

•  During the playback of a 2-layered disc, pictures may stop 

for a moment. This happens while the 1st layer is being 
switched to the 2nd layer. This is not a malfunction.

•  When you cannot remove the disc, you may try either 

following operations.
- Press and hold 

[EJECT 

A

]

 on the unit for more than 5 seconds.

-  Unplug the AC power cord and plug it in again, then press 

[EJECT 

A

]

.

    It will take about 10 seconds to eject the disc, while that the 

unit will not respond to any key commands.


Disc Menu

DVD

Some discs contain disc menus which describe the contents of the disc or 
allow you to customize disc playback, or title menu which lists the titles 
available on the DVD.

To display the DVD menu, press 

[DISC MENU]

 and use 

[Cursor 

K

 / 

L

 / 

s

 / 

B

]

 to select an item, then press 

[OK]


(or 

[PLAY 

B

]

).

To display the top menu, press 

[TITLE]

 and use

[Cursor 

K


/


L


/


s

 / 

B

]

 to select an item, then press 

[OK]


(or 

[PLAY 

B

]

).

Note:

•  Menu operations may vary depending on the disc.

Refer to the manual accompanying the disc for more details.


Resume Playback

Press 

[STOP 

C

]

 during playback. 

Resume message will appear on 
the TV screen.
Press 

[PLAY 

B

]

. Playback will 

resume from the point at which 
playback was stopped.

Press 'PLAY' to play from here.
To play the beginning, 
press 'STOP' first and then 'PLAY'.

Resume ON

Note:

  •  To cancel resume, press 

[STOP 

C

]

 one more time in the 

stop mode. On some discs, 

[STOP 

C

]

 will not work while 

the resume message appears. Please wait until the message 
disappears.

  •  The resume information will be kept even when the unit is 

turned off. However, ejecting the disc will cancel the resume 
feature. Playback will start at the beginning the next time 
you insert the disc.


Paused and Step-by-step Playback

Press 

[PAUSE 

F

]

 during playback.

•  Playback will be paused and sound will be 

muted.

To continue playback, press 

[PLAY 

B

]

.

DVD

Each time you press 

[PAUSE 

F

]

 in the pause mode, the 

disc goes forward one frame at a time.
To continue playback, press 

[PLAY 

B

]

.

Note:

•  Set “STILL MODE” to “FIELD” in the “OTHERS” menu if 

pictures in the pause mode are blurred. Refer to page 49.


These operations are accessible by remote control. Some may also be accessible by controls on the main unit.

Summary of Contents for Magnavox 19MD350B

Page 1: ...User manual Manuel de l utilisateur Guía del usuario 19MD350B LCD TV DVD English Français Español 1 866 341 3738 1 866 341 3738 1 866 341 3738 MODEL NUMBER SERIAL NUMBER HIGH DEFINITION TELEVISION ...

Page 2: ...rk will be required from you to obtain warranty service Product Safety Notification By registering your product you ll receive notification directly from the manufacturer in the rare case of a product recall or safety defect Additional Benefits Registering your product guarantees that you ll receive all of the privileges to which you re entitled including special money saving offers Congratulation...

Page 3: ...standards for tilt and stability properties of its cabinet design Do not compromise these design standards by applying excessive pull force to the front or top of the cabinet which could ultimately overturn the product Also do not endanger yourself or children by placing electronic equipment toys on the top of the cabinet Such items could unsuspectingly fall from the top of the set and cause produ...

Page 4: ...e prohibited This product incorporates copyright protection technology that is protected by U S patents and other intellectual property rights Use of this copyright protection technology must be authorized by Macrovision and is intended for home and other limited viewing uses only unless otherwise authorized by Macrovision Reverse engineering or disassembly is prohibited Precaution 4 FCC WARNING T...

Page 5: ... Please dispose of any materials in accordance with your local recycling regulations Batteries should never be thrown away or incinerated but disposed of in accordance with your local regulations concerning chemical wastes Trademark Information HDMI the HDMI Logo and High Definition Multimedia Interface are trademarks or registered trademarks of HDMI Licensing LLC in the United States and other co...

Page 6: ... table as shown below Place the main unit face down onto it Make sure not to damage the screen 2 Align the 2 stand hooks with the two hooks under the bottom of the main unit shown by arrow then slide the stand in the direction as shown by arrow until it stops and the 3 mounting holes are aligned Make sure not to put the AC power cord between the stand and the unit 3 Drive Phillips pan screws in th...

Page 7: ... audio Output Features TV DVD Dolby Digital Sound Enjoy Dolby Digital multi channel surround sound when you connect the unit to your Dolby Digital decoder Still Fast Slow Step Playback Various playback modes are available including still pictures fast forward reverse slow motion and step frames DVD Menus in a Desired Language You can display DVD menus in a desired language if available on a DVD vi...

Page 8: ...Manual 5 Supplied Accessories 6 Attaching the Stand 6 Tilt Stand 6 Features 7 Control Panel 9 Terminals 9 Remote Control Function 10 Installing the Batteries 11 PREPARATION Antenna Connection 12 Connection to Cable Receiver or Satellite Box 12 External Device Connection 13 Plug In the AC Power Cord 16 TV Functions Initial Setup 17 WATCHING TV Channel Selection 18 Volume Adjustment 18 Sleep Timer 1...

Page 9: ... Antenna Input jack p 12 RF coaxial cable connection for your antenna or cable TV signal 18 Disc loading slot p 38 Insert the disc with the label side facing forward 19 AC power cord p 16 Connect to a standard AC outlet to supply power to this unit 20 PC Input jack p 16 VGA cable connection from PC 21 HDMI 1 Input jack p 12 p 13 HDMI connection for HDMI or DVI device 22 Component video and Audio I...

Page 10: ...Press to arrange the playing order or playback randomly CD Press to set the black level DVD and the virtual surround on or off Press to change the camera angle to see the sequence being played back from different angle DVD Press to search chapter title DVD track CD or time Press to set the marker Press to repeat playback chapter title DVD track disc CD repeatedly or between designated point A and ...

Page 11: ...urn to the previous channel 14 VOL p 18 Press to adjust the volume 15 Number buttons p 18 Press to select channels Press to select chapter title DVD or track CD directly dot Press to shift the subchannel from the main channel 10 button Press to select 10 or higher number of chapters 16 FREEZE p 19 TV mode Press to pause screen image 17 EJECT A p 38 Press to eject the disc 18 DISC MENU p 38 Press t...

Page 12: ...lite Box Use an HDMI or an RCA component video cable to connect the HDMI or the Component video Input jack of the unit to the HDMI or the component video output jack of the cable receiver satellite box If you connect to the unit s Component video Input jack connect RCA audio cables to the Audio L R jacks next to the Component video connector HDMI 2 HDMI 2 COMPONENT VIDEO OUT Pr Cr Pb Cb Y AUDIO OU...

Page 13: ...ly accepts signals in compliance with EIA861 HDMI DVI Connection Use an HDMI DVI conversion cable to connect the unit to external video devices equipped with DVI output jack e g DVI OUT AUDIO OUT R L STEREO PCM Note This unit accepts 480i 480p 720p 1080i video signals HDMI DVI connection requires separate RCA audio connections as well Audio signals are converted from digital to analog for this con...

Page 14: ...ices connected to the unit If you connect to the unit s S Video Input jack connect RCA audio cables to the Audio L R jacks below the Video connector e g CHAPTER 15 REPEAT A B TITLE 5 AUDIO OUT R L S VIDEO OUT Note If you connect to the S Video Input jack and the Video Input jack at the same time the S Video connection will have priority No supplied cables are used in this connection Please purchas...

Page 15: ...AND BY Note If you connect to the S Video Input jack and the Video Input jack at the same time the S Video connection will have priority Audio Output Connection for digital broadcasting only If you connect this unit to an external digital audio device you can enjoy multi channel audio like 5 1ch digital broadcasting sound Use a digital audio coaxial cable to connect the unit to external digital au...

Page 16: ...the AC power cord of your PC Unplug the AC power cord and use the built in battery of your PC Plug In the AC Power Cord Make sure that the AC power cord must be plugged to an AC outlet after all the necessary connections are completed Caution Do not connect the AC power cord to a power supply outside the indicated voltage of this unit AC 120V Connecting the AC power cord to a power supply outside ...

Page 17: ...qualification Select Home the unit is set to maximize the energy efficiency for home setting and it can be adjusted through a choice of picture and sound quality according to your preference When the initial setup is completed the lowest memorized channel with the confirmation message of the location setting will be displayed on the TV screen Note If you are not receiving a signal from your cable ...

Page 18: ...tween multiple channels broadcast by a single network Note No Signal will appear on the TV screen after the subchannel broadcast is over Audio only program message will appear on the TV screen when you receive only sound signal Volume Adjustment This section describes how to adjust the volume The mute function which turns the sound off and on is also described Use VOL to adjust the audio volume Vo...

Page 19: ... how to switch the audio in the analog mode and how to switch the audio language in the digital mode TV Press SAP AUDIO to display the currently selected audio mode While receiving an MTS broadcast press repeatedly to cycle through the available audio channel 11 SAP STEREO When all audio are available SAP STEREO SAP MONO SAP STEREO When stereo and monaural audio are available MONO STEREO MONO STER...

Page 20: ... A Day of Memories KABC KABC A quarter century ago which may now qualify as the good old days of newspapering run of paper sales accounted for 80 percent of the industry s advertising revenues Department stores and supermarket were 1 2 3 4 5 6 7 8 9 10 1 program title 2 program guide The program guide added to broadcasting information is displayed to a maximum of 4 lines 3 broadcast station 4 chan...

Page 21: ... picture is stretched horizontally and vertically to fill the screen This crops out the top and bottom of the picture Wide Display the picture with its center at the original size and the edges stretched horizontally to fill the screen For 16 9 video signal Normal Display a 16 9 picture at its original size Zoom Display a 16 9 picture at its maximum size without changing its horizontal and vertica...

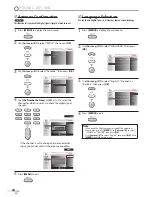
Page 22: ...e sure the unit is in stop mode Refer to DVD SETTING section on page 46 Autoprogram If you switch wires e g between antenna and CATV or if you move the unit to a different area after the initial setting or if you restore the DTV channel you deleted you will need to perform autoprogram Beforeyoubegin Make sure the unit is connected to antenna or cable 1 Press MENU to display the main menu 2 Use Cur...

Page 23: ...ted When you remove a main channel its subchannels are removed as well Note The channel with the DTV indicated on the display is ATSC Otherwise the channel is NTSC 5 Press MENU to exit Add Channels This function lets you add the channels that were not added by the autoprogram due to the receptible condition at the initial setting 1 Press MENU to display the main menu 2 Use Cursor K L to select SET...

Page 24: ...hange PICTURE SOUND FEATURES LANGUAGE DVD SETUP Indicator is available for digital broadcasting only CH 5 Press MENU to exit Language Selection You can choose English Spanish or French as your on screen language 1 Press MENU to display the main menu 2 Use Cursor K L to select LANGUAGE then press OK Select the language for setup display Elija el idioma de ajuste Sélectionner langue écran config Eng...

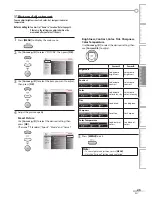
Page 25: ...t the picture quality Smart Picture Use Cursor K L to select the desired setting then press OK Personal Standard Sports Movie and Game Color Temperature PICTURE SOUND SETUP FEATURES LANGUAGE Tint Sharpness Brightness Contrast Color Sports Standard Movie Game DVD Smart Picture Personal Brightness Contrast Color Tint Sharpness Color Temperature Use Cursor K L to select the desired setting then use C...

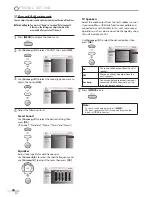
Page 26: ... s B to select the specific frequency and use Cursor K L to adjust the level then press OK SOUND SETUP FEATURES LANGUAGE DVD PICTURE 0 120Hz 0 500Hz 0 1 5kHz 0 5kHz 0 10kHz TV Speakers Select the audio output from the unit s speakers or not If your amplifier is HDMI link function compatible and connected by an HDMI cable to this unit some sound operations such as volume up can be changed by using ...

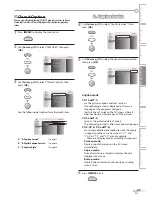
Page 27: ... Service 4 Use Cursor K L to select Caption Service then press OK DVD PICTURE SOUND SETUP LANGUAGE FEATURES Digital Caption Service Caption Style Off Off Caption Service 5 Use Cursor K L to select the desired closed caption then press OK Digital Caption Service Caption Style CC 1 CC 2 CC 3 CC 4 T 1 T 2 T 3 T 4 Off Caption Service DVD PICTURE SOUND SETUP LANGUAGE FEATURES Caption mode CC 1 and T 1 ...

Page 28: ...caption style such as font color or size etc 4 Use Cursor K L to select Caption Style then press OK Digital Caption Service Caption Style Off Off Caption Service PICTURE SOUND SETUP FEATURES LANGUAGE DVD 5 Use Cursor K L to select User Setting then press OK Font Style Font Size Middle Solid Solid Font Color Font Opacity Background Color Background Opacity Edge Color Edge Type None Off User Setting...

Page 29: ...olor Edge color of the displayed caption can be switched as below Font Style Font Size Red Green Blue Yellow Font Color Font Opacity Magenta Cyan User Setting Background Color Background Opacity Edge Color Edge Type White PICTURE SOUND SETUP FEATURES LANGUAGE DVD Closed Caption Black Edge Type Edge type of the displayed caption can be switched as below Font Style Font Size Font Color Font Opacity ...

Page 30: ...Lock Canadian English Rating Canadian French Rating Region ratings lock Change PIN US Movie ratings lock B D C A A Channel Lock B B US Movie ratings lock C C USTV ratings lock D D Change PIN page 31 page 31 page 32 page 33 Note When you select a rating and set it to Block the higher ratings will be blocked automatically The lower ratings will be available for viewing When you set the highest ratin...

Page 31: ... Press MENU to exit B US Movie ratings lock B US Movie ratings lock US Movie ratings lock is the rating system created by MPAA Motion Picture Association of America 5 Use Cursor K L to select US Movie ratings lock then press OK PICTURE SOUND SETUP FEATURES LANGUAGE US TV ratings lock Channel Lock Canadian English Rating Canadian French Rating Region ratings lock Change PIN US Movie ratings lock DV...

Page 32: ...ollow the step below Use Cursor K L s B to select the desired rating then press OK repeatedly to switch between View and Block Back BACK View Block Select FV V S L D TV MA TV 14 TV PG TV G TV Y7 TV Y OK DVD PICTURE SOUND SETUP FEATURES LANGUAGE Rating Category TV MA Mature audience only higher TV 14 Unsuitable for children under 14 TV PG Parental guidance suggested TV G General audience TV Y7 Appr...

Page 33: ...s lock Change PIN DVD PICTURE SOUND SETUP FEATURES LANGUAGE 6 Press the Number buttons to enter the new 4 digit PIN Code Enter PIN Code again in Confirm PIN entry field Confirm PIN Enter PIN PIN Code Back BACK _ DVD PICTURE SOUND SETUP FEATURES LANGUAGE 7 Press MENU to exit Note Make sure new PIN Code and confirm PIN Code must be exactly the same If they are different the space is cleared for reen...

Page 34: ...djust then press OK To automatically synchronize the phase and clock on the TV and PC Cancel Adjust DVD PICTURE SOUND SETUP LANGUAGE FEATURES The horizontal vertical position clock and phase of the PC screen are automatically adjusted Horizontal Position Vertical Position Use Cursor s B to adjust Cursor s Cursor B Horizontal Position H Position 0 Move Adjust OK OK to move PC screen left to move PC...

Page 35: ...ETUP LANGUAGE FEATURES On Select if you want to reduce the power consumption Off The power consumption may possibly exceed the limited requirement of the ENERGY STAR qualification 5 Press MENU to exit Location When you select Retail the power consumption may possibly exceed the limited requirement of the ENERGY STAR qualification 1 Press MENU to display the main menu 2 Use Cursor K L to select FEA...

Page 36: ...ocation Current Software Info On Home Closed Caption DVD PICTURE SOUND SETUP FEATURES LANGUAGE 3 Use Cursor K L to select Current Software Info then press OK Child Lock PC Settings Energy Saving Mode Location On Closed Caption DVD PICTURE SOUND SETUP LANGUAGE FEATURES Current Software Info Home 4 Confirm the version of the software currently used Release Version XXXXXX_XX Back DVD PICTURE SOUND SE...

Page 37: ... the sound recorded on the normal CD layer can be delivered The sound recorded on the high density super audio CD layer cannot be delivered Do not use a single CD adaptor which makes 3 inches 8 cm to 5 inches 12 cm disc You can play back discs with the marks listed in Playable Media If you use non standardized discs this unit may not play them back or the sound and video quality will be compromise...

Page 38: ...respond to any key commands Disc Menu DVD Some discs contain disc menus which describe the contents of the disc or allow you to customize disc playback or title menu which lists the titles available on the DVD To display the DVD menu press DISC MENU and use Cursor K L s B to select an item then press OK or PLAY B To display the top menu press TITLE and use Cursor K L s B to select an item then pre...

Page 39: ...ow playback mode are blurred Refer to page 49 Slow forward slow reverse speed varies with disc Approximate speed is 1 1 16x 2 1 8x and 3 1 2x The sound will be muted during this function Zoom DVD The zoom function allows you to enlarge the video image and to pan through the enlarged image 1 During playback press MODE repeatedly until appears OFF ZOOM The picture becomes twice as large 2 Press OK r...

Page 40: ...pter title or track search can only be performed during playback or when the unit has kept the resume information It cannot be performed in the stop mode The total number of chapters titles tracks in your disc with less than 10 chapters titles tracks press the chapter title track number directly To play a double digit chapter title track press the chapter title track number Track search is not ava...

Page 41: ...put at step 3 Time search can only be performed during playback or when the unit has kept the resume information It cannot be performed in the stop mode Direct Search Direct Search Press the Number buttons to select your desired chapter title or track Note To select a single digit chapter title or track number press the number directly To select double digit chapter title or track number If the di...

Page 42: ... 2 Use Cursor K L to select a desired track then press OK to store Additional tracks may be on other screens Use Cursor K L to go on to the next previous pages Repeat this step until you have selected all the tracks you wish to play back in the program PROGRAM PLAY CLEAR CD DA TOTAL 0 08 22 1 1 3 3 T 15 3 18 T 16 4 24 ALL CLEAR T 4 3 58 T 16 4 24 T 16 4 24 ENTER OK Up to 99 tracks can be ordered I...

Page 43: ...t setting is active C Chapter repeat T Title repeat A B A B repeat bit rate indication for the amount of audio and video data currently being read layer number appears only when playing a 2 layered disc L0 Layer 0 is playing L1 Layer 1 is playing CH Chapter current chapter number total chapters elapsed time of the current chapter remaining time of the current chapter current playback status appear...

Page 44: ...ou to change the audio setting from the disc menu Refer to the manual accompanying the discs for details If your language is not shown after pressing SAP AUDIO several times the disc may not have that language However some discs allow you to change multiple audio languages setting in the disc menu Operation varies depending on the disc so refer to the manual along with the disc When NOT AVAILABLE ...

Page 45: ...et to something other than STEREO Refer to Stereo Sound Mode on page 45 Turn down the level or select OFF if the sound is distorted Marker Setup Marker Setup Thisfeatureallowsyoutoassignaspecificpointonadisctobecalledbacklater To set a marker 1 During playback press MODE repeatedly until appears e g DVD _ _ 12 SEARCH 2 Use Cursor K L repeatedly until marker search menu appears 1 2 3 4 5 6 7 8 9 10...

Page 46: ...subtitle language LANGUAGE ENTER OK OFF ENGLISH FRENCH SPANISH GERMAN ITALIAN SWEDISH SUBTITLE DISC MENU 1 Default ENGLISH Select the desired language in DVD menu LANGUAGE ENTER OK ENGLISH FRENCH SPANISH GERMAN ITALIAN SWEDISH DUTCH DISC MENU Note To change the on screen language call up LANGUAGE from the main menu and set the desired language Refer to Language Selection on page 24 1 Language opti...

Page 47: ...lable only on the discs which are recorded in the Dolby Digital format AUDIO ENTER OK DRC ON DOWN SAMPLING ON DOLBY DIGITAL BITSTREAM ON Compress the range between soft and loud sounds OFF No effects original sound DOWN SAMPLING Default ON This function is available only on digital outputting of a disc recorded in 96kHz AUDIO ENTER OK DRC ON DOWN SAMPLING ON DOLBY DIGITAL BITSTREAM ON When outputt...

Page 48: ... PARENTAL LEVEL ALL PASSWORD CHANGE 6 Use Cursor K L to select the desired item then press OK PARENTAL ENTER OK ALL 8 ADULT 7 NC 17 6 R 5 PGR 4 PG13 3 PG PARENTAL LEVEL PARENTAL LEVEL ALL All parental locks are cancelled 8 ADULT All ratings adult general children can be played back 7 NC 17 2 G Only DVD intended for general use and children can be played back 1 KID SAFE Only DVD intended for childr...

Page 49: ... select the desired item then press OK ANGLE ICON Default ON Set to ON to show the angle icon when multiple camera angles are available during DVD playback OTHERS ENTER OK ANGLE ICON ON STILL MODE AUTO AUTO POWER OFF ON STILL MODE Default AUTO Set the picture quality in the still mode If you select AUTO it automatically selects the best resolution setting FRAME or FIELD based on the date character...

Page 50: ...h DAN 5047 Dutch DUT 6058 English ENG 5160 Esperanto 5161 Estonian 5166 F H Faroese 5261 Fiji 5256 Finnish FIN 5255 French FRE 5264 Frisian 5271 Galician 5358 Georgian 5747 German GER 5051 Greek GRE 5158 Greenlandic 5758 Guarani 5360 Gujarati 5367 Hausa 5447 Hebrew 5569 Hindi 5455 Hungarian HUN 5467 I K Icelandic ICE 5565 Indonesian 5560 Interlingua 5547 Interlingue 5551 Inupiak 5557 Irish IRI 534...

Page 51: ...lected channel cannot be viewed by the Child Lock setting Refer to Child Lock on page 30 The unit requires some kind of antenna input An indoor antenna VHF UHF an external antenna VHF UHF or an RF coaxial cable from your wall cable satellite box needs to be plugged into the unit How come there is no image from the connected external devices Check if the right input mode is selected by pressing SOU...

Page 52: ...y key on the keyboard to wake up your computer Make sure that the sound is not muted Press MUTE so that the volume bar and current volume level will appear on the TV screen Make sure that the volume is NOT set to 0 or Mute If so use VOL to adjust the desired volume No color View other TV channels The problem might be limited to the broadcasting station Adjust Color in the main menu Adjusted PICTUR...

Page 53: ... CC 4 or Off D V D Completely distorted picture or black white picture with DVD Make sure the disc is compatible with the unit Picture freezes momentarily during playback Check the disc for finger prints scratches and clean with a soft cloth wiping from center to edge Disc cannot be played Clean the disc Ensure the disc is correctly inserted Check if the disc is defective by trying another disc Ca...

Page 54: ...ffers higher quality images by delivering each signal color c and luminance y independently of each other through a separate cable Glossary Maintenance Cabinet Cleaning Wipe the front panel and other exterior surfaces of the unit with a soft cloth immersed in lukewarm water and wrung dry Never use a solvent or alcohol Do not spray insecticide liquid near the unit Such chemicals may cause damage an...

Page 55: ...s are subject to change without notice and without our legal obligation If there is a discrepancy between languages the default language will be English Other Specifications Terminals Antenna Input VHF UHF CATV 75Ω unbalanced F type Audio Input RCA jack L R x 6 500mV rms Composite video Input RCA jack x 1 1V p p 75Ω S Video Input Mini DIN 4 pin jack x 1 Y 1V p p 75Ω C 286mV p p 75Ω Component video...

Page 56: ...al product or part not cov ered by this warranty Recovery or reinstallation of programs data or other information is not covered under this Limited Warranty This warranty does not apply a to damage caused by accident abuse misuse neglect misapplication or non supplied product b to damage caused by service performed by anyone other than company approved Authorized Service Location c to a product mi...

Page 57: ...Français ...

Reviews: