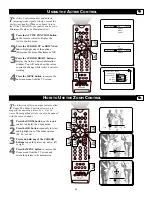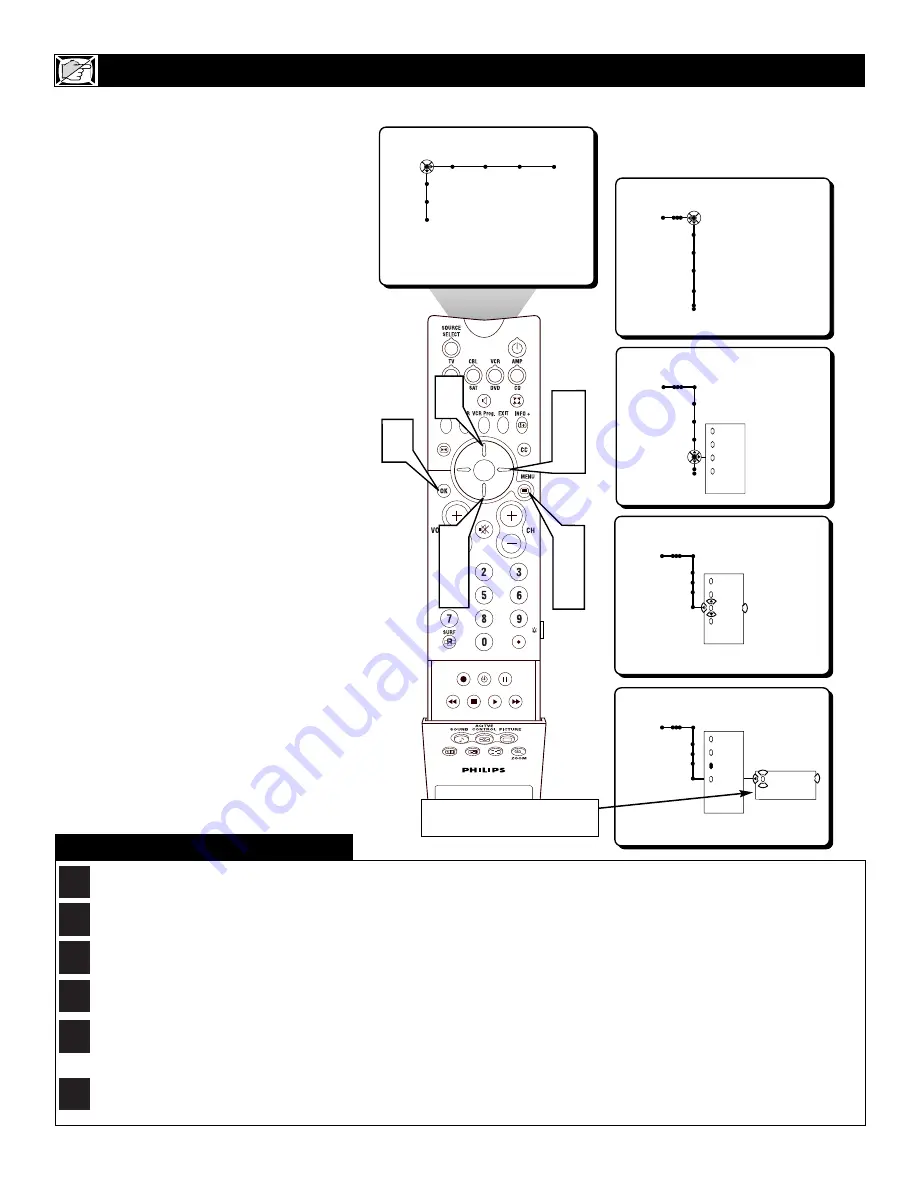
background image

38

Y

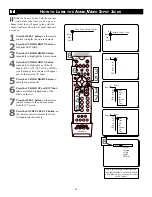
ou can select specific TV Ratings to block
broadcast signal with unsuitable informa-

tion.

1

Press the MENU button on the remote
control to display the onscreen menu.

2

Press the CURSOR RIGHT button
repeatedly to highlight CHANNELS.

3

Press the CURSOR DOWN button
repeatedly to highlight the TV Ratings
Lock Control.

4

Press the CURSOR RIGHT button to
enter the TV Ratings Lock list of options.

5

Press the CURSOR UP or DOWN but-
ton 
to highlight one of the ratings.

6

Press the OK button to activate your
choice. Note: Whenever a rating is turned
On, all higher ratings (with their sub rat-
ings) will also be turned On or blocked.

Note: Some of the TV Rating options contain
specific sub-ratings. TV-Y7 contains sub-rating
of (FV) Fantasy Violence; TV-PG and TV-14
contains sub-ratings of (D) Dialogue, (L)
Language, (S) Sex, and (V) Violence; TV-MA
contains sub-ratings of (L) Language, (S) Sex,
and (V) Violence.

7

Press the MENU button to remove the
onscreen menu from the TV screen.

H

OW TO

B

LOCK

P

ROGRAMMING

B

ASED ON

TV R

ATINGS

SOUND

PICTURE

ACITVE

CONTROL

ZOOM

3

5

Picture   Sound  Features  Channels

TV

Settings

Demo

Install

1

7

Channels

TV

Channel list

Channel lock

Lock after

TV ratings lock

2

4

5

6

Channels

TV

Channel list

Channel lock

Lock after

TV ratings lock

All
None
TV-Y
TV-Y7
---

Channels

TV

TV ratings lock

All
None
TV-Y
TV-Y7
---

Channels

TV

TV ratings lock

All
None
TV-Y
TV-Y7
TV-G
---

(FV) Fantasy
Violence

TV-Y:  (All children -- appropriate for all children.) Designed for a very young audience, including children ages 2-6.

TV-Y7:  (Directed to Older Children -- designed for children ages 7 and above.) For children who have acquired the develop-

ment skills needed to distinguish make-believe from reality. This programming may include mild fantasy and comic violence (FV).

TV-G:  (General Audience -- suitable for all ages.) Contains little or no violence, no strong language, and little or no sexual dia-
logue or sexual situations.

TV-PG:  (Parental Guidance Suggested -- Contains material unsuitable for younger children.) Contains one or more of the fol-
lowing: Moderate violence (V), some sexual situations (S), infrequent coarse language (L), or some suggestive dialogue (D).

TV-14:  (Parents Strongly Cautioned -- Contains some material unsuitable for children under 14 years of age.) Contains one or
more of the following: intense violence (V); intense sexual situations (S); strong, coarse language (L); or intensely suggestive dia-
logue (D).

TV-MA:  (Mature Audience Only -- Designed to be viewed by adults and unsuitable for children under 17.) Contains one or
more of the following: graphic violence (V); explicit sexual situations (S); or crude, indecent language (L).

TV R

ATINGS (TV B

ROADCASTERS

)

TV

Y

TV

Y7

TV

G

TV

PG

TV

14

TV

MA

Some TV Ratings have sub-ratings
that can be chosen.

Summary of Contents for MatchLine 30PW9818

Page 1: ... any problems Philips Representatives can help you get the most from your new product by explaining Hookups FirstTime Setup and Feature Operation For fast help call us first 1 800 531 0039 Thank you for making Philips a part of your home Important Return your Warranty Registration Card within 10 days See why inside 3104 315 2176 1 Model No Serial No ...

Page 2: ... cause an elec trical shock For the safety of everyone in your household please do not remove product cov ering sThe exclamation point calls attention to features for which you should read the enclosed literature closely to prevent operating and maintenance problems WARNING TO PREVENT FIRE OR SHOCK HAZARD DO NOT EXPOSETHIS EQUIPMENT TO RAIN OR MOISTURE CAUTION To prevent electric shock match wide ...

Page 3: ...ave fallen or liquid has been spilled into the appli ance or C The appliance has been exposed to rain or D The appliance does not appear to operate normally or exhibits a marked change in performance or E The appliance has been dropped or the enclosure damaged 17 Tilt Stability All televisions must comply with recommended international global safety standards for tilt and stability properties of i...

Page 4: ... Descriptions 2 How to Use the Installation Features 3 4 Using the Language Control 3 Setting the Tuner Mode Control 3 How to Automatically Program Channels 3 How to Add and Delete Channels 4 How to set the AutoChron Feature Clock 4 How to Name Label Channels 4 IMPORTANT NOTE This owner s manual is used with several different television models Not all features and drawings discussed in this manual...

Page 5: ...ss and depth Gives the viewer near High Definition and natural looking detail without the High Definition signal Infrared Remote Control works your TV and other remote controlled devices such as VCRs DVD players cable convert ers satellite receivers etc Onscreen Menu shows helpful messages and instructions for setting TV feature controls can be viewed in English French or Spanish Your new televisi...

Page 6: ...company to the antenna jack on the back of the TV Coaxial cables use F connectors A two way signal splitter enables you to take a single antenna or cable TV signal and supply it to two different inputs A 300 to 75 ohm twin lead adapter accepts the antenna cables called twin lead wires from an antenna allowing you to connect the antenna signal to the TV A S Video cable provides better picture perfo...

Page 7: ...ack of the TV 2 Connect the AUDIO red and white cables to the AUDIO left and right AV1 IN jacks on the rear of the TV 3 Connect the VIDEO yellow cable to the VIDEO OUT jack on the back of the VCR 4 Connect the AUDIO red and white cables to the AUDIO left and right OUT jacks on the rear of the VCR 5 Turn the VCR accessory device and the TV ON 6 Press the SOURCE SELECT button on the remote control t...

Page 8: ...O AV2 IN jack on the back of the TV 2 Connect the AUDIO red and white cables to the AUDIO left and right AV2 IN jacks on the rear of the TV 3 Connect the VIDEO yellow cable to the VIDEO OUT jack on the back of the VCR 4 Connect the AUDIO red and white cables to the AUDIO left and right OUT jacks on the rear of the VCR 5 Turn the VCR accessory device and the TV ON 6 Press the SOURCE SELECT button o...

Page 9: ...SOURCE SELECT button on the remote control to display the SOURCE menu 7 Press the CURSOR UP or DOWN button to select the SIDE option 8 Press the OK button to confirm your selection The TV will change to the SIDE channel 9 With the camera or accessory device ON and a prerecorded tape or other media depending on type of accessory device being used inserted press the PLAY button to view the tape on t...

Page 10: ...le and Antenna signals to the ANTENNA A or B IN on the back of the HD Receiver 6 Press the SOURCE SELECT button on the remote control to display the SOURCE menu 7 Press the CURSOR UP or DOWN button to select the AV3 option 8 Press the OK button to confirm your selection The TV will change to the AV3 channel USING THE AV 3 INPUT JACKS Coaxial Cable Lead in from Cable Outlet Converter Box orVHF UHF ...

Page 11: ...l to display the SOURCE menu 4 Press the CURSOR UP or DOWN button to select the AV3 option 5 Press the OK button to confirm your selection The TV will change to the AV3 channel 6 Turn the TV and the DVD or digital accessory device ON 7 Press the PLAY button on the DVD or digital accessory device to view the pro gram on the television USING THE AV 4 INPUT JACKS S VIDEO OUT OUT OUT L R AUDIO VIDEO C...

Page 12: ...n AV1 5 Press the OK button to confirm your selection The TV will change to the AV1 channel 6 Turn the TV and the DVD or digital accessory device ON 7 Insert a DVD disc into the DVD player and press the PLAY 䊳 button on the DVD Player or digital accessory device S VIDEO OUT OUT OUT L R AUDIO VIDEO COMP VIDEO Y Pb Pr 2 1 6 7 CVI SOUND PICTURE ACITVE CONTROL ZOOM 3 Source TV AV1 VCR AV2 Recorder AV3...

Page 13: ...ntrol to display the SOURCE menu 6 Press the CURSOR UP or DOWN button to select the AV2 option 7 Press the OK button to confirm your selection The TV will change to the AV2 channel 8 Turn the VCR DVD or other acces sory device ON 9 With the VCR or accessory device ON and a prerecorded tape inserted press the PLAY button to view the tape on the television USING THE S VIDEO INPUT JACKS The S Video j...

Page 14: ...gram channel you wish to record Note Once selected be sure to leave the TV channel tuned to the desired program until the complete recording is finished 4 Press the SOURCE SELECT button on the remote control to display the SOURCE menu 5 Press the CURSOR UP or DOWN button to select the AV1 option or any of the other AV connection options from which you wish towatch an accessory device playback Exam...

Page 15: ...UME or button on the TV or remote control For External Speaker Connection 1 Connect one end of the R ight and L eft Audio Cables red and white to each of the external speakers 2 Using a Stereo to Mono adapter not supplied connect the other ends of the Audio Cables to the Stereo end of the adapter 3 Connect the mono end of the Stereo to Mono Adapter to the AUDIO OUT S jack These speakers can now be...

Page 16: ... mid range levels NOTE The SHARPNESS and TINT Controls will not be available for adjust ments when tuned to the AV3 AV4 CVI Inputs BRIGHTNESS adds or subtracts light from the darkest part of the picture COLOR adds or eliminates color PICTURE improves the detail of the light est parts of the picture SHARPNESS improves the detail in the picture TINT adjusts the picture to obtain natural skin tones C...

Page 17: ...DOWN button to select PROGRESSIVE SCAN or PIXEL PLUS 6 Press the MENU button to remove the onscreen menu from the TV screen HOW TO USE THE DIGITAL PROCESSING CONTROL Picture Sound Features Channels TV Settings Demo Install SOUND PICTURE ACITVE CONTROL ZOOM 1 6 3 5 2 4 5 Picture Sound Features Channels TV Contrast Brightness Color Sharpness Picture TV Contrast Brightness Color Sharpness 40 Picture ...

Page 18: ... enter the Dynamic Contrast sub menu 5 Press the CURSOR UP or DOWN button to select one of the Dynamic Contrast options OFF MINIMUM MEDIUM or MAXIMUM 6 Press the MENU button to remove the onscreen menu from the TV screen HOW TO SET THE DYNAMIC CONTRAST CONTROL Picture Sound Features Channels TV Settings Demo Install SOUND PICTURE ACITVE CONTROL ZOOM 1 6 3 5 2 4 5 Picture Sound Features Channels TV...

Page 19: ...on to enter the DNR sub menu 5 Press the CURSOR UP or DOWN button to select one of the DNR options OFF MINIMUM MEDIUM or MAXIMUM 6 Press the MENU button to remove the onscreen menu from the TV screen 7 The DNR Control can also be accessed by simply pressing the DNR button on the remote control HOW TO USE THE DNR DYNAMIC NOISE REDUCTION CONTROL Picture Sound Features Channels TV Settings Demo Insta...

Page 20: ...kin tones 1 Press the MENU button on the remote to display the onscreen menu 2 Press the CURSOR RIGHT button to highlight PICTURE 3 Press the CURSOR DOWN button repeatedly until the COLOR ENHANCEMENT control is highlight ed 4 Press the CURSOR RIGHT button to turn the Color Enhancement control ON or OFF 5 Press the MENU button to remove the onscreen menu from the TV screen HOW TO USE THE COLOR ENHA...

Page 21: ... other settings are set up at the factory during production and cannot be adjusted HOW TO USE THE AUTO PICTURE CONTROL Personal Rich Natural Soft Multimedia Eco Auto picture SOUND PICTURE ACITVE CONTROL ZOOM 1 2 Personal Rich Natural Soft Multimedia Eco Auto picture Personal Rich Natural Soft Multimedia Eco Auto picture Natural Soft Multimedia Eco Auto picture Soft Multimedia Eco Auto picture Mult...

Page 22: ...e of program you re watch ing Select the normal 4 3 aspect ratio or a variety for wide screen formats 1 Press the MENU button on the remote to display the onscreen menu 2 Press the CURSOR RIGHT button to highlight PICTURE 3 Press the CURSOR DOWN button repeatedly until the Picture Format control is highlighted 4 Press the CURSOR RIGHT button to enter the Picture Format sub menu options 5 Press the...

Page 23: ...emote control to display the onscreen menu 4 Press the CURSOR RIGHT button to highlight SOUND 5 Press the CURSOR DOWN button repeatedly until the Headphone Volume control is highlighted 6 Press the CURSOR RIGHT button to increase the volume level being heard through the headphones 7 Press the CURSOR LEFT button to decrease the volume level being heard through the headphones 8 Press the MENU button...

Page 24: ...ned settings are changed they will become the new Personal settings 1 Press the MENU button on the remote to display the onscreen menu 2 Press the CURSOR RIGHT button repeatedly to highlight SOUND 3 Press the CURSOR DOWN button repeatedly until the Equalizer control is highlighted 4 Press the CURSOR RIGHT button to enter the Equalizer sub menu options Continue to press the CUR SOR RIGHT to select ...

Page 25: ...hlighted 4 Press the CURSOR RIGHT button to enter the Sound Mode sub menu options 5 Press the CURSOR DOWN button to select one of the five options Stereo 3 Stereo 3D Surround Hall or Pro Logic Stereo Reproduces only left and right front speaker sound If you are receiv ing a stereo broadcast you will hear left and right channel stereo sound 3 Stereo Gives stereo sound through the left right and cen...

Page 26: ...adcast sys tem Sent as a third audio channel SAP can be heard apart from the current TV program sound TV stations are free to use SAP for any number of purposes If a SAP signal is not present with a selected program the Alt Audio option cannot be selected and will appear grayed out in the onscreen menu If SAP is available on the tuned channel 1 Press the MENU button on the remote to display the on...

Page 27: ...ound can be heard 1 Press the MENU button on the remote to display the onscreen menu 2 Press the CURSOR RIGHT button repeatedly to highlight SOUND 3 Press the CURSOR DOWN button repeatedly until the Mono Stereo con trol is highlighted 4 Press the CURSOR RIGHT button to toggle and select either Mono or Stereo Note If the signal being received is in mono it can not be set to Stereo However if the si...

Page 28: ...ct AVL Delta volume Auto sound 100 The 3D Surround Effect Control helps to widen the effect being heard through the television speakers This control is only available if the television has been placed in the 3D Surround mode 1 Press the MENU button on the remote to display the onscreen menu 2 Press the CURSOR RIGHT button repeatedly to highlight SOUND 3 Press the CURSOR DOWN button repeatedly unti...

Page 29: ...een menu 2 Press the CURSOR RIGHT button repeatedly to highlight SOUND 3 Press the CURSOR DOWN button repeatedly until AVL is highlighted 4 Press the CURSOR RIGHT button to toggle the control ON or OFF 5 Press the MENU button to remove the menu from the screen HOW TO USE THE AVL CONTROL SOUND PICTURE ACITVE CONTROL ZOOM 1 5 3 2 4 Picture Sound Features Channels TV Settings Demo Install Sound Featu...

Page 30: ...on on the remote control to show the onscreen menu 3 Press the CURSOR RIGHT button once to highlight SOUND 4 Press the CURSOR DOWN button repeatedly until Delta Volume is high lighted 5 Press the CURSOR LEFT button to decrease the overall volume or press CURSOR RIGHT button to increase the overall volume for the tuned chan nel Repeat steps for other channels you wish to adjust the Delta Volume 6 P...

Page 31: ...thin few seconds The Auto Sound options can also be selected through the SOUND menu options within the onscreen menu HOW TO USE THE AUTO SOUND CONTROL Personal Speech Music Movie Multimedia Auto sound SOUND PICTURE ACITVE CONTROL ZOOM 1 2 Personal Speech Music Movie Multimedia Auto sound Personal Speech Music Movie Multimedia Auto sound Personal Speech Music Movie Multimedia Auto sound Music Movie...

Page 32: ...d Captions Control ON or OFF 8 Press the CC button on the remote control 9 Press the CURSOR UP or DOWN button repeatedly to select OFF ON or ON with Mute OFF Closed Captioning service will not be displayed on the TV screen ON Closed Captioning information if available will display on the TV screen ON with Mute Closed Captioning information will turn On only when the MUTE button is pressed Turns th...

Page 33: ...tomatically switch the TV OFF after a peri od of time you choose 5 minutes up to 180 minutes in 5 minute increments 1 Press the MENU button on the remote control to display the onscreen menu 2 Press the CURSOR RIGHT button repeatedly until FEATURES is high lighted 3 Press the CURSOR DOWN button repeatedly to highlight Sleeptimer 4 Press the CURSOR RIGHT button to set the Sleeptimer in 5 minute inc...

Page 34: ...N but ton to select the day to turn on or select Daily Press the CURSOR RIGHT button to enter the AM PM sub menu Press the CURSOR UP or DOWN button to select AM or PM Press the CURSOR RIGHT button to enter the start time Press the NUMBERED buttons to enter the time Use 0 first if entering a signal digit i e 0 1 3 0 for 1 30 Press the OK button to confirm Press the MENU button to remove the onscree...

Page 35: ...ton to enter the Channel List sub menu 5 Press the CURSOR UP or DOWN but ton to highlight a specific channel from the list 6 Press the OK button The television will tune to the highlighted channel 7 Press the MENU button to remove the onscreen menu from the TV screen HOW TO USE THE CHANNEL LIST CONTROL SOUND PICTURE ACITVE CONTROL ZOOM 3 5 Picture Sound Features Channels TV Settings Demo Install 1...

Page 36: ...nu from the TV screen Note To unlock a locked channel enter your personal PIN number to clear the channel from being blocked Please refer to page 51 for instructions on setting up a PIN Personal Identification Number HOW TO USE THE CHANNEL LOCK CONTROL SOUND PICTURE ACITVE CONTROL ZOOM 3 5 Picture Sound Features Channels TV Settings Demo Install 1 7 Channels TV Channel list Channel lock Lock after...

Page 37: ...elevision to lock all channels Press the MENU button to remove the onscreen menu from the TV screen Note To unlock a locked channel enter your personal PIN number to clear the channel from being blocked Please refer to page 51 for instructions on setting up a PIN Personal Identification Number HOW TO USE THE LOCK AFTER CONTROL SOUND PICTURE ACITVE CONTROL ZOOM 3 5 7 Picture Sound Features Channels...

Page 38: ...ll None TV Y TV Y7 Channels TV TV ratings lock All None TV Y TV Y7 Channels TV TV ratings lock All None TV Y TV Y7 TV G FV Fantasy Violence TV Y All children appropriate for all children Designed for a very young audience including children ages 2 6 TV Y7 Directed to Older Children designed for children ages 7 and above For children who have acquired the develop ment skills needed to distinguish m...

Page 39: ... find this programming suitable for all ages This type of programming contains little or no violence no strong language and little or no sexual dialogue or sexual situations PG Parental Guidance Suggested This programming contains material that parents may find unsuitable for younger children It may contain one or more of the following Moderate violence some sexual situations infrequent coarse lan...

Page 40: ...R RIGHT button repeatedly to highlight CHANNELS 3 Press the CURSOR DOWN button repeatedly to highlight the Channel Remove Control 4 Press the CURSOR RIGHT button to enter the list of channels within the tele vision s memory 5 Press the CURSOR UP or DOWN but ton to highlight a channel you wish to remove 6 Press the OK button to activate your choice After you activate the Channel Remove Control the ...

Page 41: ...RSOR DOWN button repeatedly to highlight the Antenna Attenuator Control 4 Press the CURSOR RIGHT button toggle the control ON or OFF 5 Press the MENU button to remove the onscreen menu from the TV screen HOW TO USE THE ANTENNA ATTENUATOR CONTROL SOUND PICTURE ACITVE CONTROL ZOOM 3 Picture Sound Features Channels TV Settings Demo Install 1 5 Channels TV Channel list Channel lock Lock after TV ratin...

Page 42: ...menu 2 Press the CURSOR DOWN button to highlight SETTINGS 3 Press the CURSOR RIGHT button to highlight the Speakers menu 4 Press the CURSOR DOWN button to highlight the Test Tone Control 5 Press the CURSOR RIGHT button to toggle the Test Tone Control ON or OFF When ON is selected the Test Tone con trol generated a sound test signal that cir culates through all active speakers one at a time in a cl...

Page 43: ...urn the Surround Speakers ON To turn the Center Mode Control ON 1 Press the MENU button on the remote control to display the onscreen menu 2 Press the CURSOR DOWN button to highlight SETTINGS 3 Press the CURSOR RIGHT button to highlight the Speakers menu 4 Press the CURSOR DOWN button repeatedly to highlight the Center Mode Control 5 Press the CURSOR RIGHT button to toggle the Center Mode Control ...

Page 44: ...nsparent green field behind the onscreen menu This field reduces the contrast in the TV picture allowing the text of the onscreen menu to be more highly visible 1 Press the MENU button on the remote control to display the onscreen menu 2 Press the CURSOR DOWN button to highlight SETTINGS 3 Press the CURSOR RIGHT button repeatedly to highlight the General menu 4 Press the CURSOR DOWN button to high...

Page 45: ...MENU button on the remote control to display the onscreen menu 2 Press the CURSOR DOWN button to highlight SETTINGS 3 Press the CURSOR RIGHT button repeatedly to highlight the General menu 4 Press the CURSOR DOWN button repeatedly to highlight the Surf Control 5 Press the CURSOR RIGHT button to toggle the Surf Control between 2 chan nels or 9 channels 6 Press the MENU button to remove the onscreen...

Page 46: ... 1 Press the MENU button on the remote control to display the onscreen menu 2 Press the CURSOR DOWN button to highlight SETTINGS 3 Press the CURSOR RIGHT button repeatedly to highlight the General menu 4 Press the CURSOR DOWN button repeatedly to highlight the Dual Screen Format Control A sub menu or list of options will appear 5 Press the CURSOR RIGHT button to enter the list of options 6 Press t...

Page 47: ...splay the onscreen menu 2 Press the CURSOR DOWN button to highlight SETTINGS 3 Press the CURSOR RIGHT button repeatedly to highlight the General menu 4 Press the CURSOR DOWN button repeatedly to highlight the Multipip Control 5 Press the CURSOR RIGHT button to toggle between PIP 3 3 PIP windows or PIP 6 6 PIP windows 6 Press the MENU button to remove the onscreen menu from the TV screen 7 Press th...

Page 48: ...l menu 4 Press the CURSOR DOWN button repeatedly to highlight the Freeze Format Control A sub menu with a list of options will appear 5 Press the CURSOR RIGHT button to enter the list of options 6 Press the CURSOR UP or DOWN but ton to select the desired Freeze Format Choose from Freeze Replay or Photo finish Freeze Will freeze the main screen image while the audio continues to play Replay Will di...

Page 49: ...menu from the TV screen HOW TO RESET THE AUDIO VIDEO SETTING TO THE FACTORY PRESETS General Source Settings Menu background Surf Dual screen format Multipip format 2 4 1 6 3 5 Speakers General Source TV Settings Demo Install General Source Settings Menu background Surf Dual screen format Multipip format General Settings Tilt adjust 5 0 There may be times when the video reproduc tion from some sign...

Page 50: ...stall General Source Settings OSD Time Zone Daylight savings Change PIN General Settings OSD Time Zone Daylight savings Change PIN Auomatic Off 6 Atlantic Eastern Central Mountain Pacific Alaska Hawaii General Source Settings Menu background Surf Dual screen format Multipip format 7 Your television can pick the current time from the signal being received It needs to know your Time Zone and if you ...

Page 51: ...ss the CURSOR DOWN button to highlight SETTINGS 3 Press the CURSOR RIGHT button repeatedly to highlight the General menu 4 Press the CURSOR DOWN button repeatedly to highlight the Change PIN Control 5 Press the OK button to begin the process 6 Enter the default four digit PIN num ber 0 7 1 1 using the NUMBERED buttons on the remote control 7 Using the NUMBERED buttons on the remote control enter a...

Page 52: ...RSOR DOWN button to highlight SETTINGS 3 Press the CURSOR RIGHT button repeatedly to highlight the Source menu 4 Press the CURSOR DOWN button repeatedly to highlight any of the AV Inputs AV1 AV2 AV3 AV4 or SIDE A sub menu or list of names will appear next to the selected AV Input 5 Press the CURSOR RIGHT button to enter the sub menu list 6 Press the CURSOR UP or DOWN but ton to scroll and highligh...

Page 53: ...ontrol information window You will notice how the values constantly change while Active Control is working 4 Press the MENU button to remove the onscreen menu from the TV screen USING THE ACTIVE CONTROL SOUND PICTURE ACITVE CONTROL ZOOM 3 4 3 Zoom 1x 4x 9x 16x 3 1 2 3 Zoom 1x 4x 9x 16x Zoom 1x 4x 4x 9x 16x This television offers an unique feature called Zoom The Zoom Controls allows you to magnify...

Page 54: ...p of the button while a red light will indicate the mode labeled on the bottom of the button If needed hold the button down and the light will toggle between the green and red settings 3 Press and hold the NUMBER 1 and 3 buttons at the same time until the back light and selected mode buttons light up Then release both buttons 4 Within 30 seconds of completing step 3 and using the NUMBERED buttons ...

Page 55: ...ack light and selected mode buttons light up Then release both buttons 4 Press and release the red POWER but ton on the remote control The backlight buttons will turn off The remote will start the Auto Search of all available codes sending a command to channel up The backlight will blink after each code is tried For devices such as DVD or CD players insert a disc and press PLAY on the device The r...

Page 56: ...27 CD Players Remote Code No Aiwa 0184 Burmester 0447 California Audio Labs 0056 Carver 0184 0206 0464 DKK 0027 Denon 0030 0900 Emerson 0332 Fisher 0201 0206 Garrard 0420 0447 Genexxa 0059 0332 Harman Kardon 0200 0184 Hitachi 0059 JVC 0099 Kenwood 0055 0217 0853 0064 0653 0708 Krell 0184 LXI 0332 Linn 0184 MCS 0056 MTC 0447 Magnavox 0184 0332 Marantz 0184 0056 0207 Mission 0184 NSM 0184 Nikko 0201...

Page 57: ...d s 0027 0235 Logik 0099 MEI 0062 MGA 0070 0088 0267 MGN Technology 0267 MTC 0027 0267 Magnasonic 0305 Magnavox 0062 0108 0027 0066 0176 Magnin 0267 Marantz 0108 0062 Marta 0064 Matsushita 0062 0189 0481 Memorex 0131 0074 0027 0064 0075 0062 0073 0267 1064 0334 0066 0236 1189 1289 Minolta 0132 0069 Mitsubishi 0070 0088 0075 0094 Motorola 0062 0075 Multitech 0027 0099 NEC 0065 0068 0094 0131 Nikko ...

Page 58: ...tton lights green 2 Point the top of the remote toward the front of the VCR remote sensor win dow when pressing the buttons Remember the VCR buttons on the remote will not operate your VCR if those features are not found on your VCR remote control NOTE All VCR functions particularly Search Rewind Fast Forward etc will oper ate the same as with the original VCR remote control provided with the VCR ...

Page 59: ... cloth or sponge dampened in a solution of cool clear water and a mild soap or detergent Use a clean dry cloth to dry the wiped surfaces Occasionally vacuum the ventilation holes or slots in the back cover of the set Never use thinners insecticide sprays or other chemicals on or near the cabinet as they might cause permanent marring of the cabinet finish No Power Check the TV power cord Unplug the...

Page 60: ...ntrols available for you to adjust or set NTSC analog video signals National Television Standards Committee format devised to TV broadcasting signals in the 1940s 525 lines 60Hz Onscreen Displays OSD The wording or messages generat ed by the television or VCR to help you with specific feature controls color adjustment or programming for example Pixel Plus improves picture quality and definition by...

Page 61: ...ol 46 Dynamic Contrast Control 18 Equalizer Control 24 Feature Highlights 5 Freeze Control 48 Glossary of Terms 60 Headphone Volume Control 24 Index 61 Lock After Control 37 Menu Background Control 44 Minimize Maximize OSD Control 50 Movie Ratings Lock Control 39 MultiPIP Control 47 On Timer Control 34 Picture Format Control 22 PIN Personal Identification Number 51 Pixel Plus Control 17 Progressiv...

Page 62: ...RENEWED 90 DAY LIMITED WARRANTY ...

Reviews: