16
English
Basic Operations
Switching on/off
Switching to active mode
●
Press
CD
,
TUNER
,
AUX
or
USB PC LINK
.
Switching to standby mode (view
clock)
●
Press
B
.
➜
The clock is displayed.
Note:
– Before switching the system to standby mode,
make sure the demonstration mode has been
deactivated.
Demonstration mode
If the demonstration mode is active, whenever
you switch the system to standby mode, it will
begin showing the various features offered by
the system.
To activate the demonstration
●
In standby mode
, press and hold
Ç
on the
main unit until "
DEMO ON
" is displayed.
To deactivate the demonstration
●
Press and hold
Ç
on the main unit until
"
DEMO OFF
" is displayed.
Setting the clock
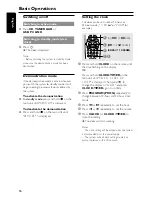
The clock can be set in either 12-hour or
24-hour mode ("
11
:
59
PM
" or "
23
:
59
" for
example).
(00:00
î
12:00AM)
(
00
:00
/
12
:00AM
)
(
00:
00
/
12:
00
AM
)
4
3
2
1
5
,
1
Press and hold
CLOCK
on the remote until
the time flashing on the display.
OR
Press and hold
CLOCK•TIMER
on the
main unit until "
SELECT CLOCK OR
TIMER
" is displayed. Then press
ë
to
change the display to “
CLOCK
” and press
CLOCK•TIMER
again to confirm.
2
Press
PROGRAM (PROG)
repeatedly to
change between 12-hour and 24-hour clock
mode.
3
Press
à
or
á
repeatedly to set the hour.
4
Press
í
or
ë
repeatedly to set the minute.
5
Press
CLOCK
(or
CLOCK•TIMER
) to
store the setting.
➜
The clock will start working.
Notes:
– The clock setting will be erased when the system
is disconnected from the power supply.
– The system will exit clock setting mode if no
button is pressed within 90 seconds.

