background image

23

English

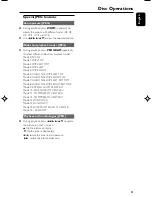
Special JPEG features

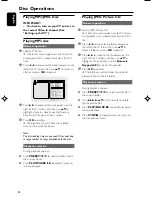
Zoom picture (JPEG)

During playback, press 

ZOOM

 repeatedly to

display the picture with different scales (X2, X3,
X4, X1/2, X1/3 and X1/4).

Use 

22

/

33

/

5

/

4

 to view the zoomed picture.

Slide show playback modes (JPEG)

During playback, press 

PROGRAM

 repeatedly

to select different slide-show playback modes:
Mode 0: NONE
Mode 1: WIPE TOP
Mode 2: WIPE BOTTOM
Mode 3: WIPE LEFT
Mode 4: WIPE RIGHT
Mode 5: DIAGONAL WIPE LEFT TOP
Mode 6: DIAGONAL WIPE RIGHT TOP
Mode 7: DIAGONAL WIPE LEFT BOTTOM
Mode 8: DIAGONAL WIPE RIGHT BOTTOM
Mode 9: EXTEND FROM CENTER H
Mode 10: EXTEND FROM CENTER V
Mode 11: COMPRESS TO CENTER H
Mode 12: COMPRESS TO CENTER V
Mode 13: WINDOW H
Mode 14: WINDOW V
Mode 15: WIPE FROM EDGE TO CENTER
Mode 16:  RANDOM

Playback with multi-angles (JPEG)

During playback, press 

22

/

33

/

5

/

to rotate

the picture on the TV screen.

5

: flip the picture vertically.


4

: flip the picture horizontally.

22

:  rotate the picture anti-clockwise.


33

:  rotate the picture clockwise.

Disc Operations

pg001-pg035_MCD190_21-Eng

2005.7.27, 11:25

23

Summary of Contents for MCD 190

Page 1: ...MCD190 DVD Micro System ...

Page 2: ...de Serie ______________________________ LEA CUIDADOSAMENTE ESTE INSTRUCTIVO ANTES DE USAR SU APARATO CAUTION Use of controls or adjustments or performance of procedures other than herein may result in hazardous radiation exposure or other unsafe operation AVISO IMPORTANTE Philips Mexicana S A de C V no se hace responsable por daños o desperfectos causados por Maltrato descuido o mal uso presencia ...

Page 3: ...3 1 2 7 9 8 0 5 4 3 6 DISPLAY ST ...

Page 4: ...4 1 2 7 0 ª 3 8 9 0 7 5 6 8 4 ...

Page 5: ...5 English Français Español Index English 6 Français 36 Español 68 99 ...

Page 6: ...nce 18 Disc Operations Playing discs 19 Using the disc menu 19 Basic playback controls 19 21 Pausing playback Selecting a track chapter title Resuming playback from the last stopped point Zoom Repeat Repeat A B Slow Motion Program Forward Reverse Searching Time search search by chapter track number Information display during playback Special disc features 21 Playing aTitle Camera Angle Changing th...

Page 7: ... grid 27 Tape Operation Recording Tape playback 28 General information on recording 28 Preparation for recording 29 Synchro start CD recording 29 One touch recording 29 Clock Timer Clock setting 30 Timer setting 30 Sleep timer setting 30 Sound andVolume Controls Sound control 31 DBB DSC LOUDNESS Volume control 31 Specifications 32 Troubleshooting 33 34 Glossary 35 ...

Page 8: ...Max nested directory is 8 levels The max album number is 32 The max MP3 track number is 999 Supported sampling frequencies for MP3 disc 32 kHz 44 1 kHz 48 kHz Supported Bit rates of MP3 disc are 32 64 96 128 192 256 kbps The following formats can t be supported The files like VMA AAC DLF M3U PLS WAV Non English Album Title name The discs recorded under Joliet format Region Codes DVDs must be label...

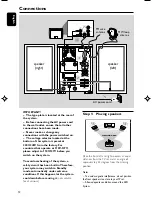
Page 9: ...s of free space all around the player for adequate ventilation 10 cm 4 inches 10 cm 4 inches 10 cm 4 inches DVD Micro Hi Fi System The ventilation should not be impeded by covering the ventilation openings with items such as newspapers table cloths curtains etc Cleaning the cabinet Use soft cloth slightly moistened with a mild detergent solution Do not use a solution containing alcohol spirits amm...

Page 10: ...e AC power cord to the wall outlet ensure that all other connections have been made Never make or change any connections with the power switched on The voltage selector located at the bottom of this system is preset at 220V 240V from the factory For countries that operate at 110V 127V please adjust to 110V 127V before you switch on the system To avoid overheating of the system a safety circuit has...

Page 11: ...RS terminals right speaker to RIGHT and left speaker to LEFT coloured marked wire to and black unmarked wire to Fully insert the stripped portion of the speaker wire into the terminal as shown Notes Ensure that the speaker cables are correctly connected Improper connections may damage the system due to short circuit For optimal sound performance use the supplied speakers Do not connect more than o...

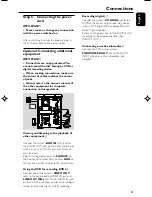
Page 12: ...rations Use the composite cable yellow to connect the system s VIDEO jack to the video input jack on the RF modulator Use an RF coaxial cable not supplied to connect the RF modulator to yourTV s RF jack Connections Using S Video In jack Use the S Video cable not supplied to connect the system s S VIDEO jack to the S Video input jack or labelled asY C or S VHS on the TV set AUDIO IN R L VIDEO IN TO...

Page 13: ...cks to the AUDIO OUT jacks on the other audio visual device such as aTV VCR Laser Disc player or cassette deck Before starting operation press SOURCE on the front panel to select AUX or press AUX on the remote in order to activate the input source Using theVCR for recording DVDs B Connect one of the system s VIDEO OUT jacks to the correspondingVIDEO IN jack and LINE OUT R L jacks to the AUDIO IN j...

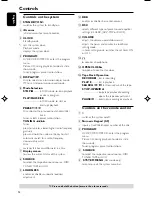
Page 14: ...tem 8 SOURCE to select the respective sound source DISC TUNER TAPE or AUX 9 LOUDNESS enables or disables automatic loudness adjustment 0 DBB enables or disables bass enhancement DSC selects different types of preset sound equalizer settings CLASSIC JAZZ POP or ROCK VOLUME adjusts the volume upward downward adjusts the hours and minutes in clock timer setting mode in timer setting mode switches the...

Page 15: ...LEEP to set the sleep auto off timer function LOUDNESS enables or disables automatic loudness adjustment DSC selects different types of preset sound equalizer settings CLASSIC JAZZ POP or ROCK DBB enables or disables bass enhancement MUTE to interrupt or resume sound reproduction DISPLAY OSD displays information onTV screen during playback FM to set stereo or mono sound mode SLOW selects different...

Page 16: ...exhausted or will not be used for a long time Do not use old and new or different types of batteries in combination Batteries contain chemical substances so they should be disposed of properly Step 2 Setting the clock 1 Go to Standby mode 2 Press and hold CLOCK on the front panel SET CLOCK is displayed briefly Then the hour digits flash on the display screen 3 Turn the VOLUME control on the front ...

Page 17: ... set use this setting you must also set your widescreen TV to full size available on a disc then the disc s own preference will be used Step 3 Setting video preference IMPORTANT Make sure you have completed all the necessary connections See Connections ConnectingTV Turn on theTV set and set it to the correct Video In channel You may go to channel 1 on yourTV set then press the channel button repea...

Page 18: ...y each disc will be selected 3 Press 5 4 to select a language and press OK 4 Repeat steps 2 3 for other settings To exit the menu Press SYSTEM MENU again Note The format you select must be available on the disc If it is not the setting forTVType will not affect the picture during playback To exit the menu Press SYSTEM MENU again Step 4 Setting language preference You can select your preferred lang...

Page 19: ...Playback will start automatically depending on the disc type If a disc menu appears on theTV see Using the Disc Menu If the disc is locked by parental control you must enter your four digit password See SYSTEM SETUP PASSWORD 6 At any time simply press STOP 9 to stop playback Disc Operations Using the disc menu For disc with Table Of Contents a menu may appear on theTV screen once you load the disc...

Page 20: ...Repeat A B DVD VCD CD MP3 1 Press REPEAT A B at your chosen starting point 2 Press REPEAT A B again at your chosen end point The section A and B can be set only within the same chapter track The section will now repeat continuously 3 To exit the sequence press REPEAT A B again A B CANCEL is displayed on the TV screen Slow Motion DVD VCD 1 Press SLOW during playback to select the required forward s...

Page 21: ...LAY to show disc information on theTV screen For DVD VCD CD Remaining playback time of the current track title Elapsed playback time of the current track title Remaining playback time of the whole disc Display off For MP3 CD Remaining playback time of the current track Display off Special disc features Playing aTitle DVD 1 Press DISC MENU The disc title menu appears on theTV screen 2 Use 22 33 5 4...

Page 22: ...back selection During playback you can Press PRESETí ë to select another track in the current album Press PLAY PAUSE 2 repeatedly to pause resume playback Playing JPEG Picture CD General operation 1 Load a JPEG Picture CD A data disc menu appears on theTV screen and playback starts automatically from the first file 2 Press 22 to move to the folder column on the left of theTV screen then use 5 4 to...

Page 23: ...ode 4 WIPE RIGHT Mode 5 DIAGONAL WIPE LEFTTOP Mode 6 DIAGONAL WIPE RIGHT TOP Mode 7 DIAGONAL WIPE LEFT BOTTOM Mode 8 DIAGONAL WIPE RIGHT BOTTOM Mode 9 EXTEND FROM CENTER H Mode 10 EXTEND FROM CENTER V Mode 11 COMPRESS TO CENTER H Mode 12 COMPRESS TO CENTERV Mode 13 WINDOW H Mode 14 WINDOWV Mode 15 WIPE FROM EDGETO CENTER Mode 16 RANDOM Playback with multi angles JPEG During playback press 22 33 5 ...

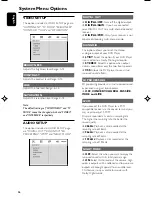
Page 24: ...e Preparations Step 3 Setting video preference for details SCREEN SAVER This function is used to turn the screen saver on or off ON In STOP PAUSE or No DISC mode if no actions are performed about 3 minutes the screen saver will be activated OFF Screen saver is disabled TV TYPE See Preparations Step 3 Setting video preference for details PASSWORD You can enter your four digit password to activate o...

Page 25: ...ork for such Discs Rating explanations 1 KID SAFE Suitable for children 2 G General Audience recommended as acceptable for viewers of all ages 3 PG Parental Guidance suggested 4 PG 13 Material is unsuitable for children under age 13 Parental Guidance suggested 5 6 PG R R Parental Guidance Restricted recommended that parents restrict children under 17 from viewing or allow them to view only when su...

Page 26: ...ct this option if your DVD Player is connected to a Dolby Pro Logic decoder STEREO Select this option when output delivers sound from only the two front speakers VSS Allows the DVD player to use virtual surround sound effects 3D PROCESSING 3D processing provides a virtual surround sound experience using just two speakers OFF CONCERT CHURCH PASSIVE WIDE and LIVE LPCM If you connect the DVD Player t...

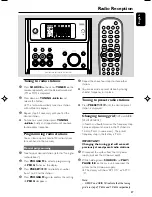
Page 27: ...a number from 1 to 20 to this station 4 Press PROGRAM again to confirm the setting PROG disappears 5 Repeat the above four steps to store other stations You can override a preset station by storing another frequency in its place Tuning to preset radio stations Press PRESETí ë until the desired preset station is displayed Changing tuning grid not available for all versions In North and South Americ...

Page 28: ...king of unauthorized copies of copy protected material including computer programmes files broadcasts and sound recordings may be an infringement of copyrights and constitute a criminal offence This equipment should not be used for such purposes IMPORTANT Recording is permissible if copyright or other rights of third parties are not infringed upon Tape playback 1 Select TAPE source Display shows t...

Page 29: ... To stop recording press STOP OPENÇ0 It is not possible to listen to another source It is not possible to activate the timer function Synchro start CD recording 1 Select CD source Press í ë select the desired track 2 Press RECORD to start recording Playing of the CD programme starts automatically from the beginning of the CD It is not necessary to start the CD player separately One touch recording...

Page 30: ...ntrol on the front panel or press VOLUME on the remote to set the minutes and press TIMER to confirm ON or OFF flashes 4 Turn the VOLUME control on the front panel or press VOLUME on the remote to activate or deactivate the timer and press TIMER to complete the setting Display shows if activated and disappears if deactivated Sleep timer setting The sleep timer enables the system to switch off by i...

Page 31: ...le and bass sound effect at low volume the higher the volume the lower the treble and bass increase Press LOUDNESS on the remote to enable or disable LOUDNESS feature icon appears disappears after this feature is enabled disabled Volume control Turn the VOLUME control on the front panel clockwise or anticlockwise or press VOL on the remote to increase or decrease the volume level VOL XX is display...

Page 32: ...Hz Total harmonic distortion 0 1 1 kHz TUNER FM wave range 87 5 108 MHz MW wave range 9 kHz 531 1602 kHz MW wave range 10 kHz 530 1700 kHz Tuning grid 9 10 kHz Sensitivity at 75 Ω mono 26 dB signal to noise ratio 2 8 µV stereo 46 dB signal to noise ratio 61 4 µV Selectivity 28 dB Total harmonic distortion 5 Frequency response 63 5500 Hz 6 dB Signal to noise ratio 50 dBA TAPE DECK Frequency respons...

Page 33: ...ntil the moisture condensed at the lens has cleared Replace or clean the disc see Maintenance Use a readable disc or correctly recorded format MP3 CD Select the appropriate video input mode on the TV set Check if theTV set is switched on Check the video connection Check if the system is securely connected Sometimes a slight picture distortion may appear This is not a malfunction Clean the disc Con...

Page 34: ...tem is in pause slow motion or fast forward reverse mode press PLAY PAUSE 2 to resume the normal play mode Make sure the MP3 CD was recorded within 32 256 kbps bit rate with sampling frequencies at 48 kHz 44 1 kHz or 32 kHz Ensure that the DTS disc also supports Dolby Digital output If the signal is too weak adjust the antenna or connect an external antenna for better reception Increase the distan...

Page 35: ...ugh the MP3 format one CD R or CD RW can contain about 10 times as much data volume as a regular CD can Multichannel DVD is specified to have all sound tracks constitute one sound field Multichannel refers to a structure of sound tracks having three or more channels Parental control A function of the DVD to limit playback of the disc by the age of the users according to the limitation level in eac...

Reviews: