background image

English

7

General Information

Place the system in a location with adequate
ventilation to prevent internal heat build-up in
your system.  Allow at least 10 cm (4 inches)
clearance from the rear and the top of the unit
and 5 cm (2 inches) from each side.

The ventilation should not be impeded by
covering the ventilation openings with items,
such as newspapers, table-cloths, curtains, etc.

Do not expose the system, batteries or discs to
excessive moisture, rain, sand or heat sources
caused by heating equipment or direct sunlight.

No naked flame sources, such as lighted candles,
should be placed on the apparatus.

No objects filled with liquids, such as vases, shall
be placed on the apparatus.

If the system is brought directly from a cold to a
warm location, or is placed in a very damp room,
moisture may condense on the lens of the disc
unit inside the system. Should this occur, the CD
player would not operate normally. Leave the
power on for about one hour with no disc in the
system until normal playback is possible.

The mechanical parts of the set contain self-
lubricating bearings and must not be oiled or
lubricated.

Batteries (battery pack or batteries installed)
shall not be exposed to excessive heat such as
sunshine, fire or the like.

When the system is switched to Standby
mode, it is still consuming some power.
To disconnect the system from the
power supply completely, remove the AC
power plug from the wall socket.

Maintenance

When a disc becomes dirty,
clean it with a cleaning cloth.
Wipe the disc from the center
out, in a straight line.

Do not expose the player,
batteries or discs to humidity,
rain, sand or excessive heat
(caused by heating equipment or direct sunlight).
Always keep the disc tray closed to avoid dust
on the lens.

Do not use solvents such as benzene, thinner,
commercially available cleaners, or anti-static
spray intended for colour discs.

The lens may cloud over when the player is
suddenly moved from cold to warm
surroundings, making it impossible to play a disc.
Leave the player in the warm environment until
the moisture evaporates.

Hearing Safety

Listen at a moderate volume.

Using headphones at a high volume can impair
your hearing.  This product can produce sounds
in decibel ranges that may cause hearing loss for
a normal person, even for exposure less than a
minute.  The higher decibel ranges are offered
for those that may have already experienced
some hearing loss.

Sound can be deceiving.  Over time your hearing
"comfort level" adapts to higher volumes of
sound.  So after prolonged listening, what sounds
"normal" can actually be loud and harmful to
your hearing.  To guard against this, set your
volume to a safe level before your hearing
adapts and leave it there.

To establish a safe volume level:

Set your volume control at a low setting.

Slowly increase the sound until you can hear it
comfortably and clearly, without distor tion.

Listen for reasonable periods of time:

Prolonged exposure to sound, even at normally
"safe" levels, can also cause hearing loss.

Be sure to use your equipment reasonably and
take appropriate breaks.

Be sure to observe the following
guidelines when using your headphones.

Listen at reasonable volumes for reasonable
periods of time.

Be careful not to adjust the volume as your
hearing adapts.

Do not turn up the volume so high that you
can't hear what's around you.

You should use caution or temporarily
discontinue use in potentially hazardous
situations.

Do not use headphones while operating a
motorized vehicle, cycling, skateboarding, etc.; it
may create a traffic hazard and is illegal in many
areas.

pg001-020_MCD179_58_Eng 3/27/08, 

15:32

7

Summary of Contents for MCD179

Page 1: ...Register your product and get support at www philips com welcome ...

Page 2: ...by Macrovision Corporation and other rights owners Use of this copyright protection technology must be authorized by Macrovision Corporation and is intended for home and other limited viewing uses only unless otherwise authorized by Macrovision Corporation Reserve engineering or disassembly is prohibited CONSUMERS SHOULD NOTETHAT NOT ALL HIGH DEFINITIONTELEVSION SETS ARE FULLY COMPATIBLE WITHTHIS ...

Page 3: ...3 English English Р ус с к и й Index English 4 êÛÒÒÍËÈ 41 ...

Page 4: ...etting the OSD Language Setting the Audio Subtitle and Disc Menu language Basic Operations Plug and Play for tuner installlation 19 Switching the system on off 19 Power saving automatic standby 19 Volume control 20 Sound Control 20 DBB Dynamic Bass Boost DSC Digital Sound Control LOUDNESS Disc Operations Playable Discs 21 Region Codes 21 Playing discs 22 Using the Disc Menu 22 Resuming playback 22...

Page 5: ...io station 32 Automatic programming Manual programming Tuning to preset radio stations 32 USB Connection Using USB connectivity 33 34 Clock Timer Viewing clock 35 Setting clock 35 Setting wake up timer 35 Setting sleep timer 35 Specifications 36 Troubleshooting 37 39 Glossary 40 ...

Page 6: ...onnet device the disconnect device shall remain readily operable Place the system on a flat hard and stable surface The apparatus shall not be exposed to dripping or splashing Install the unit near the AC outlet and where the AC power plug can be easily reached Congratulations on your purchase and welcome to Philips To fully benefit from the support that Philips offers register your product at www...

Page 7: ...Always keep the disc tray closed to avoid dust on the lens Do not use solvents such as benzene thinner commercially available cleaners or anti static spray intended for colour discs The lens may cloud over when the player is suddenly moved from cold to warm surroundings making it impossible to play a disc Leave the player in the warm environment until the moisture evaporates Hearing Safety Listen ...

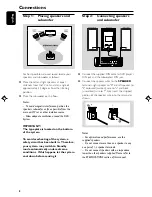
Page 8: ...manual Step 1 Placing speakers and subwoofer For best possible surround sound locate your speakers and subwoofer as follows Place the left and right speakers at equal distances from theTV set and at an angle of approximately 45 degrees from the listening position Place the subwoofer on the floor Notes To avoid magnetic interference position the speakers subwoofer as far as possible from the main u...

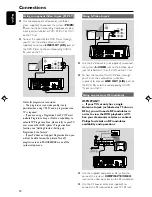
Page 9: ... one video connection from the following options according to the capabilities of yourTV system S Video or ComponentVideo connection provides higher picture quality These options must be available on yourTV set Connect the system directly to theTV set Using Video In jack CVBS IN Y PB PR Use the supplied composite video cable yellow to connect the system s COMPOSITE VIDEO jack to the video input ja...

Page 10: ...yourTV does not support Progressive Scan you will not be able to view the picture Turn off progressive scan in PROGRESSIVE menu of the system setup menu Connections Using S Video In jack Y PB PR Use the S Video cable not supplied to connect the system s S VIDEO jack to the S Video input jack or labeled asY C or S VHS on the TV set To hear the sound of this DVD Player through yourTV use the audio c...

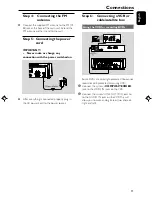
Page 11: ...UT R L jacks to to the AUDIO IN jacks on theVCR This will allow you to make analog stereo two channels right and left Step 4 Connecting the FM antenna Connect the supplied FM antenna to the FM 75 Ω jack at the back of the main unit Extend the FM antenna and fix its end to the wall Step 5 Connecting the power cord IMPORTANT Never make or change any connection with the power switched on PR After eve...

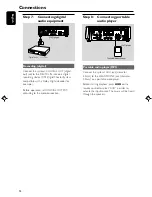
Page 12: ...olby Digital decoder for example Before operation set COAXIAL OUTPUT according to the audio connection Connections Step 8 Connecting portable audio player Y PB PR Portable audio player MP3 Connect the system s AUX jack diameter 3 5mm to the HEADPHONE jack diameter 3 5mm on a portable audio player Before starting playback press AUX on the remote control to select AUX in order to activate the input ...

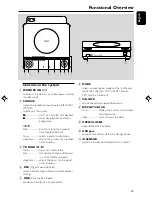
Page 13: ...st searches backward forward in a disc at different speeds clock timer adjusts the hours for the clock timer function 4 DSC Digital Sound Control selects different types of preset sound equalizer settings 5 DBB Dynamic Bass Boost enables or disables bass enhancement 6 MODE selects various repeat modes or the shuffle play mode for a disc For VCD with PBC feature PBC must be turned off 7 VOLUME adju...

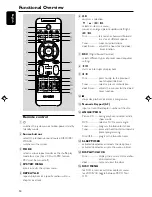
Page 14: ...ontrol selects different types of preset sound equalizer settings 8 ÉÅ starts or interrupts disc playback 9 Disc press to skip to the previous next chapter title track Tuner selects a preset radio station clock timer adjusts the minutes for the clock timer function 0 9 stops disc playback or erases a programme Numeric Keypad 0 9 inputs a track title chapter number of the disc ANGLE PROG Picture CD...

Page 15: ...no left mono right or mix mono sound mode for DVD selects an audio language ZOOM zoom in or out the picture SUBTITLE selects a subtitle language GOTO In DISC mode to fast search in a disc by entering a time title chapter or track Notes for remote control First select the source you wish to control by pressing one of the source select keys on the remote control for example DISC FM Then select the d...

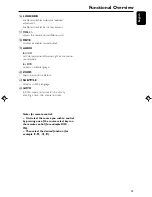
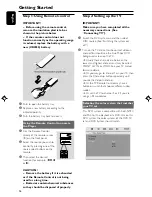
Page 16: ...ical substances so they should be disposed of properly Getting Started Step 2 Setting up theTV IMPORTANT Make sure you have completed all the necessary connections See ConnectingTV 1 Switch the DVD system on and then select DISC source See Switching the system on off 2 Turn on theTV and set to the correct video in channel You should see the blue Philips DVD background screen on theTV Usually these...

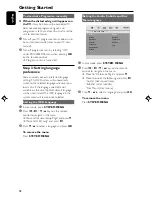
Page 17: ...on and quality IMPORTANT Before enabling the progressive scan feature you must ensure 1 YourTV can accept progressive signals a progressive scanTV is required 2 You have connected the DVD player to your TV usingY Pb Pr see ConnectingTV set 3 Make sure Component has been set toYUV 1 Turn on your TV 2 Turn off yourTV progressive scan mode or turn on interlaced mode refer to yourTV user manual 3 Pres...

Page 18: ...sc the disc s default language will be used instead The OSD language in the system menu will remain once selected Setting the OSD Language 1 In disc mode press SYSTEM MENU 2 Press à á 4 3 keys on the remote control to navigate in the menu Move to General Setup Page and press 4 Move to OSD Lang and press á 3 Press 4 3 to select a language and press OK To remove the menu Press SYSTEM MENU Setting th...

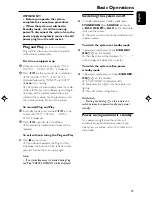
Page 19: ...stored radio stations will be replaced To exit without storing the Plug and Play Press 9 on the system If you do not complete the Plug and Play installation the function will be restarted when you next turn on the main supply again Notes If no stereo frequency is detected during Plug and Play CHECK ANTENNA will be displayed Switching the system on off In standby Eco power standby mode press STANDB...

Page 20: ...to enable or disable DBB feature If DBB is activated DBB will be shown Helpful hints Some discs might be recorded in high modulation which causes a distortion at high volume If this occurs switch off DBB or reduce the volume DSC Digital Sound Control DSC provides a different type of preset sound equalizer setting Press DSC on the remote or on the system repeatedly to select POP default CLASSIC ROC...

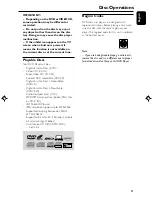
Page 21: ...s Recordable DVD R DigitalVersatile Discs Rewritable DVD RW Audio Compact Discs CDs MP3 WMA discs picture Kodak JPEG files on CD R W ISO 9660 UDF format JPEG resolution support up to 3073x2048 Supported sampling frequencies 32kHz 44 1kHz 48kHz Supported Bit rates 32 256 kbps variable bit rates average 128kbps DivX files on CD R W DVD R W DivX 3 4 5 Disc Operations Region Codes DVD discs and player...

Page 22: ...root menu is recorded in the DVD disc pressing this button will restart playback from the first track Disc Operations Playback control PBC PBC playback allows you to playVideo CD interactively following the menu on the display Press DISC MENU to toggle between PBC ON and PBC OFF Playing a disc with PBC function If PBC OFF the system will start playback automatically If PBC ON the PBC menu if avail...

Page 23: ...LL Plays all the content repeatedly SHUFFLE Random play REPEAT OFF Switches off play mode ForVCDs SVCDs CDs REPEAT TRACK Repeats the current track REPEAT ALL Plays all the tracks repeatedly SHUFFLE Random play REPEAT OFF Switchs off play mode For MP3 WMA JPEG DivX REPEAT ONE Repeats the current track REPEAT ALL Plays all the tracks repeatedly SHUFFLE Random play REPEAT OFF Switchs off play mode To...

Page 24: ...ee times playlist menu will appear 3 Press 4 3 to select a track picture on the disc menu Then press PROG to add the track picture to playlist 4 Press 4 3 to select a track picture and press OK to start playback You can select a track picture and press PROG to remove it from programme playlist 5 Press STOP to stop program playback 6 Press DISC MENU return to disc menu Notes At most 20 tracks can b...

Page 25: ...e desired language for sound track The feature is disc dependant ForVCDs Press AUDIO repeatedly to select the audio channel for sound output displayed on theTV screen STEREO MONO LEFT MONO RIGHT or MIX MONO SUBTITLE Press repeatedly SUBTITLE on the remote control to select different subtitle languages The feature is disc dependant Playing MP3 Picture disc Kodak JPEG IMPORTANT You have to turn on y...

Page 26: ...or multi session discs with different formats only the first session can be read and played Disc Operations If the MP3 menu is switched off While in playback mode press or to select the previous next track Note No album search function in menu off mode 6 During JPEG or Kodak Picture disc playback press PROG repeatedly to select different scan effect There are 16 types of scan effect for selection ...

Page 27: ...subtitle language If the Divx disc has different audio tracks you can press AUDIO on the remote control to change the audio stream Press 5 6 keys on the remote control to perform fast reverse and forward Press DISPLAY CLOCK repeatedly until the time search menu appears key in he time where playback should start Playback skips to the time entered Helpful Hints Subtitle files with the following file...

Page 28: ...d to turn the screen saver on or off DIVX VOD Philips provides you with the Divx R VOD registration code that allows you to rent or purchase videos from Divx R VODE service at www divx com vod All the downloaded videos from Divx R VOD can only be displayed back on this unit Press á or OK to enter its submenu then press OK again to see the registration code Div Audio Setup Page The options included...

Page 29: ...ith black bands on the upper and lower portions of theTV screen will be displayed 16 9 If you have a wide screenTV System Menu Options Dolby Digital Setup The options included in the Dolby Digital Setup page is Dynamic Dynamic Optimises the dynamic sound output High volume outputs are softened enabling you to watch your favourite movie without disturbing others The levels for dynamic selection FUL...

Page 30: ...or your children or have certain discs played with alternative scenes VCD SVCD and CD have no level indication so parental control function has no effect on those kinds of discs This applies to most illegal DVD discs 1 Press 5 4 to highlight Parental 2 Enter its submenu by pressing á 3 Use 5 4 to highlight a rating level for the disc inserted DVDs that are rated above the level you selected will n...

Page 31: ...rd using Numeric Keypad 0 9 5 Enter the new password again for confirmation 6 Press OK to confirm and the new password takes effect Note The default password 1234 is always active even if the password has been changed Divx Subtitle Select the font type that supports the recorded Divx subtitle Standard Display a standard list of Roman subtitle fonts provided by this unit Central Europe Display Cent...

Page 32: ...tostore automatically starts programming radio stations from preset 1 Any previous presets e g manually programmed will be erased In tuner mode press and hold PROG until AUTO appears on the display panel All previously stored radio stations will be replaced Manual programming 1 Tune to your desired station seeTuning to radio stations 2 Press PROG on the remote control to activate programming PROG ...

Page 33: ...wing Empty albums an empty album is an album that does not contain MP3 WMA files and will not be shown in the display Non supported file formats are skipped This means that e g Word documents doc or MP3 files with extension dlf are ignored and will not be played AAC WAV PCM NTFS audio files DRM protected WMA files WMA files in Lossless format Playing a USB mass storage device 1 Make sure that your...

Page 34: ... it will work with this micro system b If your Mass storage device requires a battery power source please make sure you have a fresh battery in it or charge the USB device first and then plug it into the micro system again 2 Supported Music type a This device only supports unprotected music with file extension mp3 wma b Music bought from on line music stores are not supported because they are secu...

Page 35: ...n standby mode press and hold SLEEP TIMER on the remote for more than 2 seconds to enter timer setting mode The source and timer digits will be lighted on the display panel 00 00 will be displayed briefly if wake up timer is not set 2 Press DISC USB or TUNER to select the desired source Before setting timer make sure the music source has been prepared DISC load the disc TUNER tune to the desired r...

Page 36: ...Audio DAC 24 Bits 96 kHz USB PLAYER USB 12 Mb s V1 1 support MP3 and WMA files Number of albums folders maximum 99 Number of tracks titles maximum 800 Specifications Main unit Power Supply Rating 220 240V 50 Hz Power Consumption Active 60 W Eco power standby 1 W Dimensions w x h x d 232 x 85 x 275 mm Weight 1 24 kg Package Dimension w x h x d 615 x 515 x 225 mm Gross weight 11 5 kg SPEAKERS System...

Page 37: ...ctVideo In channel This channel is usually near channel 00 Or you may have a button on theTV remote control that selects Auxiliary or A V IN channel See yourTV owner s manual for details Or change channels at theTV until you see DVD screen on theTV If the progressive scan feature is activated but the connectedTV does not support progressive signals or the cables are not connected accordingly see G...

Page 38: ...as condensed inside the system Remove the disc and leave the system turned on for about an hour Disconnect the power plug from the outlet and insert again Multi language sound or subtitle is not recorded on the DVD Changing the language for the sound or subtitle is prohibited on the DVD The features may not be available on the disc If the signal is too weak adjust the antenna or connect an externa...

Page 39: ...y possible obstacles Replace the battery with new one Check that the battery is loaded correctly Place the DVD micro system as far away as possible from electrical devices such as speakers TV that may be causing interference Check all speakers for correct polarity Check that the output of the video signal is switched to Ypbpr The Clock Timer setting is erased The remote control does not function L...

Page 40: ... can Multichannel DVD is specified to have all sound tracks constitute one sound field Multichannel refers to a structure of sound tracks having three or more channels Parental control A function of the DVD to limit playback of the disc by the age of the users according to the limitation level in each country The limitation varies from disc to disc when it is activated playback will be prohibited ...

Page 41: ...English Р ус с к и й Printed in China MCD179 PDCC ZYL 0811 Meet Philips at the Internet http www philips com CLASS 1 LASER PRODUCT ...

Reviews: