background image

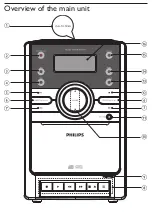
Overview of the main unit


Summary of Contents for MCM167

Page 1: ...EN User manual MCM167 ...

Page 2: ...ther apparatus including amplifiers that produce heat i Protect the power cord from being walked on or pinched particularly at plugs convenience receptacles and the point where they exit from the apparatus j Only use attachments accessories specified by the manufacturer k Use only with the cart stand tripod bracket or table specified by the manufacturer or sold with the apparatus When a cart is us...

Page 3: ...y and as marked on the unit Do not mix batteries old and new or carbon and alkaline etc Remove batteries when the unit is not used for a long time o Apparatus shall not be exposed to dripping or splashing p Do not place any sources of danger on the apparatus e g liquid filled objects lighted candles q This product may contain lead and mercury Disposal of these materials may be regulated due to env...

Page 4: ...ten at a moderate volume Using headphones at a high volume can impair your hearing This product can produce sounds in decibel ranges that may cause hearing loss for a normal person even for exposure less than a minute The higher decibel ranges are offered for those that may have already experienced some hearing loss Sound can be deceiving Over time your hearing comfort level adapts to higher volum...

Page 5: ...rding etc it may create a traffic hazard and is illegal in many areas Notice This product complies with the radio interference requirements of the European Community This product complies with the requirements of the following directives and guidelines 2004 108 EC 2006 95 EC Any changes or modifications made to this device that are not expressly approved by Philips Consumer Lifestyle may void the ...

Page 6: ...sposed of with normal household waste When you see the crossed out wheel bin symbol with the chemical symbol Pb it means that the batteries comply with the requirement set by the directive for lead Please inform yourself about the local rules on separate collection of batteries The correct disposal of batteries helps prevent potentially negative consequences on the environment and human health Env...

Page 7: ...tet nettkontakten For å redusere faren for brann eller elektrisk støt skal apparatet ikke utsettes for regn eller fuktighet 2 Your Micro Hi Fi Congratulations on your purchase and welcome to Philips To fully benefit from the support that Philips offers register your product at www philips com welcome Introduction With this Micro Hi Fi you can enjoy music from audio discs tapes external devices and...

Page 8: ...to tape this Micro Hi Fi starts disc play automatically The Micro Hi Fi supports the following media formats What s in the box Check and identify the contents of your package Main unit Loudspeaker boxes x 2 Remote control MP3 link cable ...

Page 9: ...Overview of the main unit ...

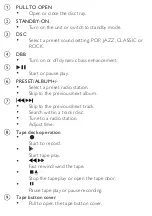
Page 10: ... e Start or pause play f PRESET ALBUM Select a preset radio station Skip to the previous next album g Skip to the previous next track Search within a track disc Tune to a radio station Adjust time h Tape deck operation Start to record Start tape play Fast rewind wind the tape Stop the tape play or open the tape door Pause tape play or pause recording i Tape button cover Pull to open the tape butto...

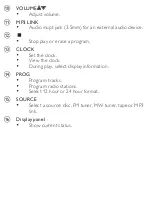
Page 11: ... l Stop play or erase a program m CLOCK Set the clock View the clock During play select display information n PROG Program tracks Program radio stations Select 12 hour or 24 hour format o SOURCE Select a source disc FM tuner MW tuner tape or MP3 link p Display panel Show current status ...

Page 12: ...Overview of the remote control a REP Play a track repeatedly b REP ALL Play all tracks repeatedly c TIMER ON OFF Turn on or off alarm timer ...

Page 13: ...OG Program tracks Program radio stations Select 12 hour or 24 hour format i CLOCK DISPLAY Set the clock View the clock During play select display information j Numeric keypad Select a track from a disc directly k VOL Adjust volume l Stop play or erase a program m DBB Turn on or off dynamic bass enhancement n Search within a track disc Tune to a radio station Adjust time o Start or pause play ...

Page 14: ...IMER Set the alarm timer q SHUF Play tracks randomly r SLEEP Set the sleep timer s Source selection keys DISC TUN MP3 LINK TAPE t POWER Turn on the unit or switch to standby mode 3 Connect Connect speakers ...

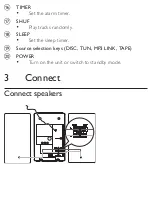
Page 15: ...eakers Refer to the Specifications section of this manual 1 For the right speaker find the sockets on the main unit marked RIGHT 2 Insert the red wire to the red socket To insert each speaker wire a Hold down the socket flap b Insert the speaker wire fully c Release the socket flap 3 Insert the black wire into the black socket 4 For the left speaker find the sockets on the main unit marked LEFT 5 ...

Page 16: ...ted on the back or the underside of the Micro Hi Fi Before connecting the AC power cord ensure you have completed all other connections 1 Connect the AC power cord to the wall socket 4 Get started Caution Use the controls only as stated in this user manual Always follow the instructions in this chapter in sequence ...

Page 17: ... Serial No ___________________________ Prepare the remote control Caution Risk of explosion Keep batteries away from heat sunshine or fire Never discard batteries in fire To replace the remote control battery 1 Open the battery compartment 2 Insert 2 AAA batteries with correct polarity as indicated 3 Close the battery compartment Note If you are not going to use the remote control for a long time ...

Page 18: ...all the available radio stations are stored the first preset radio station is broadcast automatically Set clock 1 Press and hold CLOCK DISPLAY to activate the clock setting mode The 12 hour or 24 hour format is displayed 2 Press PROG repeatedly to select 12 hour or 24 hour format 3 Press CLOCK DISPLAY to confirm The hour digits are displayed and begin to blink 4 Press to set the hour 5 Press CLOCK...

Page 19: ...ay panel 5 Play Play disc 1 Press DISC to select the disc source 2 Lift the lid of the CD compartment 3 Insert a disc with the printed side facing up then close the disc tray 4 Press to start play To pause resume play press To stop play press Play tape Note When you play or record a tape the sound source cannot be changed 1 Press TAPE to select the tape source 2 Pull at PULL TO OPEN on the front p...

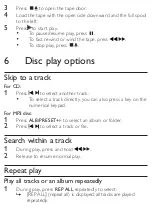
Page 20: ...CD 1 Press to select another track To select a track directly you can also press a key on the numerical keypad For MP3 disc 1 Press ALB PRESET to select an album or folder 2 Press to select a track or file Search within a track 1 During play press and hold 2 Release to resume normal play Repeat play Play all tracks or an album repeatedly 1 During play press REP ALL repeatedly to select REP ALL rep...

Page 21: ...ormal play press REP again Random play 1 Press SHUF SHUF shuffle is displayed all tracks are played randomly 2 To return to normal play press SHUF again Tip The repeat and shuffle functions cannot be activated at the same time Program tracks You can program a maximum of 40 tracks 1 At disc mode in the stop position press PROG to activate the program mode PROG program blinks on the display 2 For MP...

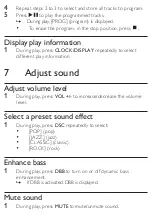
Page 22: ...SPLAY repeatedly to select different play information 7 Adjust sound Adjust volume level 1 During play press VOL to increase decrease the volume level Select a preset sound effect 1 During play press DSC repeatedly to select POP pop JAZZ jazz CLASSIC classic ROCK rock Enhance bass 1 During play press DBB to turn on or off dynamic bass enhancement If DBB is activated DBB is displayed Mute sound 1 D...

Page 23: ... mode press and hold PROG for more than 2 seconds to activate automatic program mode AUTO auto is displayed All available stations are programmed in the order of waveband reception strength The first programmed radio station is broadcast automatically Program radio stations manually You can program a maximum of 40 preset radio stations 1 Tune to a radio station See Tune to a radio station section ...

Page 24: ...ess ALB PRESET to select a preset number Tip Position the antenna as far as possible from TV VCR or other radiation source For optimal reception fully extend and adjust the position of the antenna 9 Record Note To record use only Normal IEC type I tapes on which the write protect notches tabs are not broken When you play or record a tape the sound source cannot be changed ...

Page 25: ...ton again To stop recording press Record a section of a disc to tape 1 During disc play press and hold to search then release the button To select a track press 2 Press to pause disc play 3 Press to start recording Disc play resumes automatically To pause recording press To resume press this button again To stop recording press Tip The best recording level is set automatically Change of volume and...

Page 26: ... features Set the alarm timer This Micro Hi Fi can be used as an alarm clock The DISC orTUNER is activated to play at a preset time 1 Ensure that you have set the clock correctly 2 Press and hold TIMER 3 Press DISC or TUN to select a source 4 Press TIMER to confirm The hour digits are displayed and begin to blink 5 Press to set the hour 6 Press TIMER to confirm The minute digits are displayed and ...

Page 27: ... switch to standby automatically after a set period of time 1 When the Micro Hi Fi is turned on press SLEEP repeatedly to select a set period of time in minutes When sleep timer is activated the display shows To deactivate sleep timer 1 Press SLEEP repeatedly until 0 is displayed When sleep timer is deactivated disappears on the display Listen to an external device You can listen to an MP3 player ...

Page 28: ...Rated Output Power 2X5W RMS Frequency Response 60 16kHz 3dB Signal to Noise Ratio 65dB Aux Input 0 5 V RMS 20kohm Disc Laser Type Semiconductor Disc Diameter 12cm 8cm Support Disc CD DA CD R CD RW MP3 CD WMA CD Audio DAC 24Bits 44 1kHz Total Harmonic Distortion 1 Frequency Response 60Hz 16kHz 44 1kHz S N Ratio 65dBA ...

Page 29: ...o 22 dBf 43 dBf Search Selectivity 28dBf Total Harmonic Distortion 3 Signal to Noise Ratio 55dB Tape deck Frequency response Normal tape type I 125 8000 Hz 8 dB Signal to noise ratio Normal tape type I 40 dBA Wow and flutter 0 4 JIS Speakers Speaker Impedance 4ohm Speaker Driver 3 5 woofer 0 8 tweeter Sensitivity 82dB m W ...

Page 30: ... on file name length Maximum album number 255 Supported sampling frequencies 32 kHz 44 1kHz 48 kHz Supported Bit rates 32 256 kbps variable bit rates Maintenance Clean the cabinet Use a soft cloth slightly moistened with a mild detergent solution Do not use a solution containing alcohol spirits ammonia or abrasives Clean discs When a disc becomes dirty clean it with a cleaning cloth Wipe the disc ...

Page 31: ... swab slightly moistened with cleaning fluid or alcohol You can also clean the heads by playing a cleaning tape once Demagnetise the heads Use a demagnetising tape available at your dealer 12 Troubleshooting Caution Never remove the casing of this Micro Hi Fi To keep the warranty valid never try to repair the system yourself If you encounter problems when using this Micro Hi Fi check the following...

Page 32: ...ocation No response from the Micro Hi Fi Disconnect and reconnect the AC power plug then turn on the Micro Hi Fi again Remote control does not work Before pressing any function button first select the correct source with the remote control instead of the main unit Reduce the distance between the remote control and the Micro Hi Fi Insert the batteries with its polarities signs aligned as indicated ...

Page 33: ...ween the Micro Hi Fi and your TV or VCR Fully extend the FM antenna Timer does not work Set the clock correctly Switch on the timer Clock timer setting erased Power has been interrupted or the power cord has been disconnected Reset the clock timer ...

Page 34: ... 2009 Koninklijke Philips Electronics N V All rights reserved MCM167_12_UM_V3 0_934 ...

Reviews: