background image

MCM177

Micro Hi-Fi System

User manual

Register your product and get support at
www.philips.com/welcome

MCM177_05-Eng

1/11/08, 14:18

1

Summary of Contents for MCM177

Page 1: ...MCM177 Micro Hi Fi System User manual Register your product and get support at www philips com welcome ...

Page 2: ...a possible shock hazard should it be inserted into a 13 Amp socket elsewhere How to connect a plug The wires in the mains lead are coloured with the following code blue neutral N brown live L As these colours may not correspond with the colour markings identifying the terminals in your plug proceed as follows Connect the blue wire to the terminal marked N or coloured black Connect the brown wire t...

Page 3: ...3 1 2 1 3 4 5 6 0 7 89 2 3 4 5 6 7 8 9 0 ...

Page 4: ...4 CAUTION Use of controls or adjustments or performance of procedures other than herein may result in hazardous radiation exposure or other unsafe operation ...

Page 5: ...5 English Index English 6 ...

Page 6: ...5 Basic playback controls 15 Playing an MP3 WMA disc 15 Different play modes Shuffle and Repeat 16 Programming track numbers 16 Reviewing the programme 16 Erasing the programme 16 Radio Reception Tuning to radio stations 17 Programming radio stations 17 Automatic programming Manual programming Tuning to preset radio stations 17 USB Connection Using USB connectivity 18 19 AUX Listening to an extern...

Page 7: ...tive consequences for the environment and human health Safety Information Before operating the system check that the operating voltage indicated on the typeplate or the voltage indication beside the voltage selector of your system is identical with the voltage of your local power supply If not please consult your dealer Place the system on a flat hard and stable surface Where the MAINS plug or an ...

Page 8: ...mal can actually be loud and harmful to your hearing To guard against this set your volume to a safe level before your hearing adapts and leave it there To establish a safe volume level Set your volume control at a low setting Slowly increase the sound until you can hear it comfortably and clearly without distortion Listen for reasonable periods of time Prolonged exposure to sound even at normally...

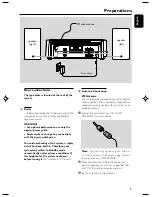
Page 9: ...tions If this happens let the system cool down before reusing it not available for all versions B Antenna Connection FM Antenna The wire antenna supplied can only be used to receive nearby stations For better reception we recommend using a cable antenna system or an outdoor antenna 1 Extend the wire antenna and fit it to FM ANTENNA as shown below Note If you are using a cable antenna system or an ...

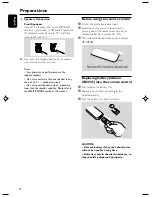
Page 10: ... supplied Please refer to the SPECIFICATIONS section of this manual Before using the remote control 1 Pull out the plastic protective sheet 2 Select the source you wish to control by pressing one of the source select keys on the remote control for example CD FM 3 Then select the desired function for example É í ë Replacing battery lithium CR2025 into the remote control 1 Push to open the battery t...

Page 11: ... and ID3 for MP3 disc during playback for clock sets the clock function 9 OPEN CLOSE0 opens closes the CD door 0 USB port connects to external USB mass storage device iR SENSOR infrared sensor for remote control AUX IN jack located on the back panel connects an external source 3 5 mm socket AUX IN 2 jacks located on the back panel connects an external source using audio cables white red HEADPHONE ...

Page 12: ...isc all programed tracks for MP3 WMA repeats a disc an album all programmed tracks REPEAT repeats a track TIMER ON OFF activates deactivates timer function CLOCK sets the clock function ALBUM PRESET for radio selects a preset radio station for MP3 WMA selects an album for clock timer adjusts the minutes for the clock timer function MUTE interrupts and resumes sound reproduction Numeric Keypad 0 9 ...

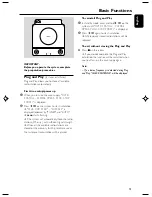
Page 13: ... radio stations FM only with sufficient signal strength When all the available radio stations are stored or the memory for 40 presets are used the last preset radio station will be played To reinstall Plug and Play 1 In standby mode press and holdÉÅ on the system until AUTO INSTALL PLEASE PRESS PLAY STOP CANCEL is displayed 2 Press ÉÅ again to start installation All previously stored radio station...

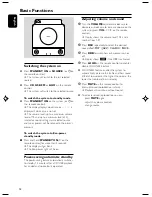
Page 14: ...roduction you can press MUTE again adjust the volume controls change source Switching the system on Press STANDBY ON or SOURCE or 2on the remote control The system will switch to the last selected source Press CD USB FM or AUX on the remote control The system will switch to the selected source To switch the system to standby mode Press STANDBY ON on the system or 2on the remote control The display...

Page 15: ...in the display To find a passage within a track 1 Press and hold down on TUNING à á on the remote control à á The disc is played at high speed and low volume 2 When you recognise the passage you want release TUNING à á on the remote control à á Normal playback continues To playback the beginning of each track Press INTRO on the remote control to play first 10 seconds of each track in sequence To i...

Page 16: ...AT modes are no longer displayed You can also press 9 to cancel your play mode Note The SHUFFLE and REPEAT functions cannot be used simultaneously Programming track numbers Programme in the STOP position to select and store your disc tracks in the desired sequence If you like store any track more than once Up to 40 tracks can be stored in the memory 1 In the stop position use the í ë to select you...

Page 17: ...PRESET on the remote control to select the preset number where programming should start Note If no preset number is selected default is preset 1 and all your presets will be overridden 2 Press PROG on the remote control for more than 2 seconds to activate programming AUTO is displayed and available stations are programmed in order of waveband reception strength The first preset automatically store...

Page 18: ...wing Empty albums an empty album is an album that does not contain MP3 WMA files and will not be shown in the display Non supported file formats are skipped This means that e g Word documents doc or MP3 files with extension dlf are ignored and will not be played AAC WAV PCM NTFS audio files DRM protected WMA files WMA files in Lossless format Playing a USB mass storage device 1 Make sure that your...

Page 19: ... are not supported because they are secured by Digital Rights Management protection DRM c File name extensions that ended with the following are not supported wav m4a m4p mp4 aac and etc 3 No Direct connection can be made from a Computer USB port to the micro system even you have either or both mp3 or wma file in your computer Listening to an external source You can listen to the sound of the conn...

Page 20: ...t is set is shown in normal standby mode To view the clock in any sound source CD or FM for example Press briefly DISPLAY CLOCK or CLOCK on the remote control Setting the clock 1 In standby mode press and hold DISPLAY CLOCK on the set or CLOCK on the remote control for 2 seconds 12 hour or 24 hour mode is displayed 2 Press PROG to select between 12 hour and 24 hour display The clock digits flash 3...

Page 21: ... W Eco Power Standby 1 W Specifications and external appearance are subject to change without notice Cleaning the Cabinet Use a soft cloth slightly moistened with a mild detergent solution Do not use a solution containing alcohol spirits ammonia or abrasives Cleaning Discs When a disc becomes dirty clean it with a cleaning cloth Wipe the disc from the centre out Do not use solvents such as benzene...

Page 22: ...rVCR Remove and reconnect the AC power plug and switch on the system again Adjust the volume Disconnect the headphones Check that the speakers are connec ted correctly Check if the stripped speaker wire is clamped Make sure the MP3 CD was recorded within 32 256 kbps bit rate with sampling frequencies at 48 kHz 44 1 kHz or 32 kHz Check the speaker connections and location WARNING Under no circumsta...

Page 23: ...trol directly towards the IR sensor Set the clock correctly PressTIMER ON OFF to switch on the timer If recording or tape dubbing is in progress stop recording Power has been interrupted or the power cord has been disconnected Reset the clock timer It is not set in the USB mode Select USB mode The device is not securely connected to MCM177 s USB port Re connect the device and make sure that the de...

Page 24: ...English Français Português Español Deutsch Nederlands Italiano Svenska Dansk Suomi Polski Printed in China CLASS 1 LASER PRODUCT MCM177 PDCC ZYL 0802 Meet Philips at the Internet http www philips com ...

Reviews: