background image

20

No disc detected


'

Insert a disc.


'

Check if the disc is inserted upside down.


'

Wait until the moisture condensation at 
the lens has cleared.


'

Replace or clean the disc.


'

†|JG  %

*##";"%!#<=;>


'

 †V
device has exceeded a certain limit. This 
phenomenon is not a malfunction.


'

   
supported.

USB device not supported


'

The USB device is incompatible with the 
unit. Try another one.

Poor radio reception


'

Increase the distance between the unit and 
your TV  or VCR.


'

Fully extend the FM antenna.

Timer does not work


'

Set the clock correctly.


'

Switch on the timer.

Clock/timer setting erased


'

Power has been interrupted or the power 
cord has been disconnected. 


'

Reset the clock/timer.

8 Troubleshooting

Warning


$

Never remove the casing of this apparatus. 

To keep the warranty valid, never try to repair 
the system yourself. 
If you encounter problems when using this 
apparatus, check the following points before 
" +*% 
unsolved, go to the Philips web site (www.
%[!'%) 
Philips, ensure that the apparatus is nearby 
and the model number and serial number are 
available.

No power


'

Ensure that the AC power cord of the unit 
is connected properly.


'

Ensure that there is power at the AC 
outlet.


'

As a power-saving feature, the system 
switches off automatically 15 minutes after 
track play reaches the end and no control 
is operated.

No sound or poor sound


'

Adjust the volume.


'

Disconnect the headphones.

No response from the unit


'

Disconnect and reconnect the AC power 
plug, then turn on the unit again.

Remote control does not work


'

V))   # 
select the correct source with the remote 
control instead of the main unit.


'

Reduce the distance between the remote 
control and the unit.


'

Insert the battery with its polarities 
;Z[›+'+ %


'

Replace the battery.


'

Aim the remote control directly at the 
sensor on the front of the unit.

EN

Summary of Contents for MCM2050

Page 1: ...Register your product and get support at www philips com welcome EN User manual DA Brugervejledning DE Benutzerhandbuch EL FI Käyttöopas FR Mode d emploi IT Manuale utente NL Gebruiksaanwijzing MCM2050 ...

Page 2: ......

Page 3: ... 12 Play from USB 12 Play options 12 Adjust sound 13 Display different information 13 5 Listen to FM radio 14 Tune to FM radio stations 14 Program FM radio stations automatically 14 Program FM radio stations manually 14 Select a preset radio station 14 Show RDS information 14 Select stereo mono broadcast 15 6 Other features 16 Set the alarm timer 16 Set the sleep timer 16 Play from external audio ...

Page 4: ...k any ventilation openings Install in accordance with the manufacturer s instructions Do not install near any heat sources such as radiators heat registers stoves or other apparatus including Protect the power cord from being walked on or pinched particularly at plugs convenience receptacles and the point where they exit from the unit Only use attachments accessories Unplug this unit during lightn...

Page 5: ... for reasonable periods of time Be careful not to adjust the volume continuously upwards as your hearing adapts Do not turn up the volume so high that you can t hear what s around you You should use caution or temporarily discontinue use in potentially hazardous situations Excessive sound pressure from earphones and headphones can cause hearing loss Caution Use of controls or adjustments or perfor...

Page 6: ...l number are on the bottom of the apparatus Write the numbers here Model No __________________________ Serial No ___________________________ 2 Your Micro System Congratulations on your purchase and support that Philips offers register your product at www philips com welcome Introduction With this unit you can enjoy audio from discs USB devices and other external devices listen to FM radio stations...

Page 7: ...y panel Show play information n Disc tray Overview of the main unit a Connect USB device b Headphone socket c Turn the unit on off Switch to standby mode d SOURCE Select a source CD FM USB or MP3 LINK e Skip to the previous next track Search within a track disc Tune to radio stations Adjust time f Start pause play VOLUME VOLUME LINK 3 MP SOURCE a g h i j b c d e f k l m n FM ANT DC IN 2 5A V 12 EN...

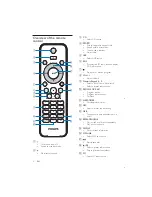
Page 8: ... Set sleep alarm timer l DSC Select a preset sound setting m DBB Turn dynamic bass enhancement on or off n REPEAT SHUFFLE Play a track or all tracks repeatedly Play tracks randomly o DISPLAY Show current information p MP3 LINK Select MP3 link source q Start pause play r Select a preset radio station Skip to previous next album s FM Select FM tuner source Overview of the remote control a Turn the u...

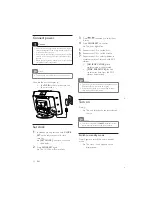
Page 9: ...atteries with correct Z 3 Close the battery compartment a b c 3 Get started Caution Use of controls or adjustments or performance of procedures other than herein may result in hazardous radiation exposure or other unsafe operation Always follow the instructions in this chapter in Placement mount the unit on a wall Mount on a wall See the wall mounting instructions included in the package Connect F...

Page 10: ... source press SOURCE repeatedly or the source selection buttons on the remote control Switch to standby mode Press again to switch the unit to standby mode display panel Connect power Caution Risk of product damage Ensure that the power supply voltage corresponds to the voltage printed on the back or the underside of the unit Risk of electric shock When you unplug the AC power cord always pull the...

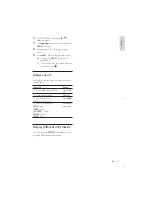
Page 11: ...nit turns to FM tuner mode and no radio stations are stored AUTO INSTALL PRESS PLAY STOP CANCEL to auto install press to cancel press Press and hold for 3 seconds to start full scan The unit automatically stores FM radio station Tip To exit storing mode press or EN ...

Page 12: ...a key on the numerical keypad Search within a track 1 During play press and hold 2 Release to resume normal play Program tracks You can program a maximum of 20 tracks 1 In CD USB mode press to stop playback then press PROG to activate the programming mode PROG 4 Play Play disc 1 Press to open the disc compartment 2 Insert a disc with the printed side facing up 3 Press to close the disc compartment...

Page 13: ...rogram when playback is stopped press Adjust sound During play you can adjust volume and select sound effects Function Action To increase decrease volume Press VOL To mute restore sound Press To turn dynamic bass enhancement on off Press DBB To select a sound effect POP JAZZ CLASSIC ROCK FLAT Press DSC repeatedly Display different information During play press DISPLAY repeatedly to view time and d...

Page 14: ... repeatedly to scroll through the Program service Program type such as NEWS SPORT POP M pop Radio text message Time 5 Listen to FM radio Tune to FM radio stations Note Position the antenna as far as possible fromTV VCR or other radiation source Ensure that you have connected and fully extended the supplied FM antenna 1 Press FM to select FM tuner mode 2 Press and hold for 3 seconds SEARCH The unit...

Page 15: ...eo mono broadcast Note Stereo broadcast is the default setting for tuner mode For stations with weak signals to improve the reception change to monaural sound In FM tuner mode press to switch between mono and stereo broadcast EN ...

Page 16: ...r This unit can be used as an alarm timer You can select disc FM tuner or USB as alarm source Note Make sure that you have set the clock correctly 1 In standby mode press and hold TIMER until SET TIMER display 2 Press TIMER SELECT SOURCE scrolls on the display 3 Press SOURCE repeatedly or the source selection buttons on the remote control to select a source disc FM tuner or USB 4 Press TIMER The h...

Page 17: ... 0V 2 5 A Operation Power Consumption 15 W Standby Power Consumption Dimensions G 400 x 235 x 98 mm Weight With Packing Main Unit 3 7 kg 2 1 kg 7 Product information Note Product information is subject to change without prior notice Rated Output Power 2 X 10 W RMS Response 80 Hz 16 kHz 3 dB Signal to Noise Ratio V MP3 Link Input 0 5V RMS 20 kohm Disc LaserType Semiconductor Disc Diameter 12 cm 8 c...

Page 18: ...ce CHILDREN Children s programs SOCIAL Social Affairs RELIGION Religion PHONE IN Phone In TRAVEL Travel LEISURE Leisure JAZZ Jazz Music COUNTRY Country Music NATION M National Music OLDIES Oldies Music FOLK M Folk Music DOCUMENT Documentary TES AlarmTest ALARM Alarm USB playability information Compatible USB devices V V V V Supported formats V and variable bit rate WMA v9 or earlier Directory nest...

Page 19: ...19 En gl i s h Supported MP3 disc formats ISO9660 Joliet Maximum title number 999 depending on Maximum album number 99 44 1 kHz 48 kHz V variable bit rates EN ...

Page 20: ... yourself If you encounter problems when using this apparatus check the following points before unsolved go to the Philips web site www Philips ensure that the apparatus is nearby and the model number and serial number are available No power Ensure that the AC power cord of the unit is connected properly Ensure that there is power at the AC outlet As a power saving feature the system switches off ...

Page 21: ...ly approved by Philips Consumer Lifestyle may void the user s This product complies with the radio Community of the following directives and guidelines 2004 108 EC 2006 95 EC Your product is designed and manufactured which can be recycled and reused When this crossed out wheeled bin symbol is attached to a product it means that the product is covered by the European Directive 2002 96 EC Please inf...

Page 22: ...22 ...

Page 23: ...171 N ed er l ands NL ...

Page 24: ... 2011 Koninklijke Philips Electronics N V All rights reserved MCM2050_12_UM_V1 1 ...

Reviews: