background image

Register your product and get support at

MCM305/12

Micro System

 EN 

User manual  

  DA 

Brugervejledning  

  DE 

Benutzerhandbuch    

       ES 

Användarhandbok  


FR 

Mode d’emploi 


 IT 

Manuale utente 


  NL 

Gebruiksaanwijzing  


 SV 

Användarhandbok  


MCM305_12_Book1.indb   1

2010-8-26   11:00:15

Summary of Contents for MCM305/12

Page 1: ...er your product and get support at MCM305 12 Micro System EN User manual DA Brugervejledning DE Benutzerhandbuch ES Användarhandbok FR Mode d emploi IT Manuale utente NL Gebruiksaanwijzing SV Användarhandbok ...

Page 2: ...12 Program tracks 12 Display play information 12 6 Listen to the radio 13 Tune to a radio station 13 Program radio stations automatically 13 Program radio stations manually 13 Select a preset radio station 13 Show RDS information 13 Set RDS clock 14 7 Adjust sound 15 Adjust volume level 15 Select a preset sound effect 15 Enhance bass 15 Mute sound 15 8 Use more of your Micro System 16 Set the slee...

Page 3: ...pparatus during lightning storms or when unused for long periods of time m Refer all servicing to quali ed service personnel Servicing is required when the apparatus has been damaged in any way such as power supply cord or plug is damaged liquid has been spilled or objects have fallen into the apparatus the apparatus has been exposed to rain or moisture does not operate normally or has been droppe...

Page 4: ...ave already experienced some hearing loss Sound can be deceiving Over time your hearing comfort level adapts to higher volumes of sound So after prolonged listening what sounds normal can actually be loud and harmful to your hearing To guard against this set your volume to a safe level before your hearing adapts and leave it there To establish a safe volume level Set your volume control at a low s...

Page 5: ...nvironmental and human health Environmental information All unnecessary packaging has been omitted We have tried to make the packaging easy to separate into three materials cardboard box paper pulp buffer and polyethylene bags protective foam sheet Your system consists of materials which can be recycled and reused if disassembled by a specialized company Please observe the local regulations regard...

Page 6: ...y music from audio discs external devices and listen to radio stations The apparatus offers you multiple sound effect settings that enrich sound with Digital Sound Control DSC and Dynamic Bass Boost DBB The apparatus supports the following media formats Note The type plate is located on the back of the apparatus What s in the box Check and identify the contents of your package Main unit Loudspeake...

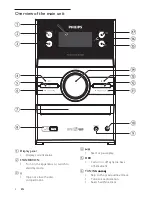
Page 7: ...nt status b STANDBY ON Turn on the apparatus or switch to standby mode c Open or close the disc compartment d Start or pause play e DBB Turn on or off dynamic bass enhancement f TUNING Skip to the previous next track Tune to a radio station Search within a track ...

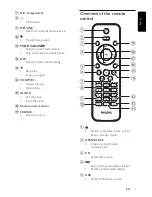
Page 8: ... sound setting m Stop play Erase a program n VOLUME Adjust volume Adjust time o CLOCK Set the clock View the clock p Remote control sensor q SOURCE Select a source Overview of the remote control a Switch to standby mode or Eco Power standby mode b OPEN CLOSE Open or close the disc compartment c CD Select disc source d Skip to the previous next album Select a preset radio station e USB Select USB d...

Page 9: ...m tracks j SLEEP TIMER Set the sleep timer Set the alarm timer Activate or deactivate timer k DSC Select a preset sound setting l DBB Turn on or off dynamic bass enhancement m REPEAT SHUFFLE Select repeat play modes Select shuf e play modes n Stop play Erase a program o Mute or restore volume p MP3 LINK Select external audio device source q Tune to a radio station Skip to the previous next track S...

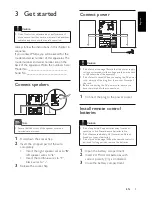
Page 10: ... wires to L Insert the red blue wires to black wires to 3 Release the socket ap Connect power Caution Risk of product damage Ensure that the power supply voltage corresponds to the voltage printed on the back or the underside of the apparatus Risk of electric shock When you unplug the AC power cord always pull the plug from the socket Never pull the cord Before connecting the AC power cord ensure ...

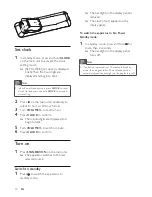
Page 11: ...its are displayed and begin to blink 5 Turn VOLUME to set the minute 6 Press CLOCK to con rm Turn on 1 Press STANDBY ON on the main unit The apparatus switches to the last selected source Switch to standby 1 Press to switch the apparatus to standby mode The backlight on the display panel is reduced The clock if set appears on the display panel To switch the apparatus to Eco Power Standby mode 1 In...

Page 12: ...cover on the front panel 2 Insert the USB plug of a USB device into the socket 3 Press USB to select the USB source Play starts automatically To pause resume play press To stop play press For MP3 WMA les to select an album press To skip to a track press To search within a track press and hold Release to resume normal play Listen to an external device You can also listen to an external audio device...

Page 13: ...racks You can program a maximum of 20 tracks 1 In CD USB mode at the stop position press PROG to activate the program mode PROG program blinks on the display 2 For MP3 WMA tracks press to select an album 3 Press to select a track number then press PROG to con rm 4 Repeat steps 2 to 3 to program more tracks 5 Press to play the programmed tracks During play PROG program is displayed To erase the pro...

Page 14: ... The rst programmed radio station is broadcast automatically Program radio stations manually Note You can program a maximum of 20 FM radio stations and 10 MW radio stations 1 Tune to a radio station 2 Press PROG to activate program mode PROG program blinks on the display 3 Press to allocate a number 1 to 20 to this radio station then press PROG to con rm The preset number and the frequency of the ...

Page 15: ...e signal broadcast together with the RDS signal to set the clock of the apparatus automatically 1 Tune to a RDS radio station that transmits time signals 2 Press and hold DISPLAY RDS for more than 2 seconds Note The accuracy of the transmitted time depends on the RDS station that transmits the time signal ...

Page 16: ...e volume level Select a preset sound effect 1 During play press DSC repeatedly to select POP pop JAZZ jazz CLASSIC classic ROCK rock Enhance bass 1 During play press DBB to turn on or off dynamic bass enhancement If DBB is activated DBB is displayed Mute sound 1 During play press to mute unmute sound ...

Page 17: ...n standby mode press and hold SLEEP TIMER for more than 2 seconds 3 Press CD TUNER or USB MP3 LINK to select a source 4 Press SLEEP TIMER to con rm The hour digits are displayed and begin to blink 5 Press VOL to set the hour 6 Press SLEEP TIMER to con rm The minute digits are displayed and begin to blink 7 Press VOL to set the minute 8 Press SLEEP TIMER to con rm The timer is set and activated Act...

Page 18: ...e 60Hz 16kHz S N Ratio 62dBA Tuner Tuning Range FM 87 5 108MHz MW 531 1602kHz Tuning grid 50 kHz FM 9 kHz MW Total Harmonic Distortion 3 Signal to Noise Ratio 50 dB Speakers Speaker Impedance 4ohm General information Specs Switching mode power supply Model GFP181T 1512 1 or GFP181DA 1512 1 Input 220 230V 50Hz Output DC15V 1 2A Operation Power Consumption 2 x 15 W Standby Power Consumption 4 W Eco ...

Page 19: ...ted formats Empty albums an empty album is an album that does not contain MP3 WMA les and is not be shown in the display Unsupported le formats are skipped For example Word documents doc or MP3 les with extension dlf are ignored and not played AAC WAV PCM audio les DRM protected WMA les wav m4a m4p mp4 aac WMA les in Lossless format Maintenance Clean the cabinet Use a soft cloth slightly moistened...

Page 20: ...nect the AC power plug then turn on the system again As a power saving feature the unit switches off automatically 15 minutes after track play reaches the end and no control is operated Remote control does not work Before you press any function button rst select the correct source with the remote control instead of the main unit Reduce the distance between the remote control and the unit Insert th...

Page 21: ... 2010 Koninklijke Philips Electronics N V All rights reserved MCM305_12_UM_V4 1cument order number ...

Reviews: