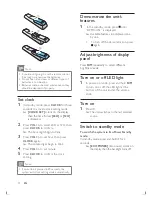
background image

16

Set the sleep timer

This unit can switch to standby automatically 
after a set period of time.

1

  When the unit is turned on, press 

SLEEP


repeatedly to select a set period of time 
(in minutes).

When sleep timer is activated, the 


»

display shows  .

To deactivate sleep timer

1

 Press 

SLEEP

 repeatedly until “SLEEP 

OFF” is displayed.

When sleep timer is deactivated, 


»


disappears on the display.

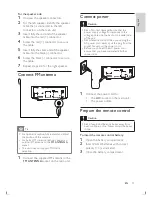
Listen to external audio 
device

You can listen to an external audio device such 
as MP3 player through this unit.

1

  Connect the audio device.

For audio device with red/white 

• 

audio output sockets:
Connect a red/white audio cable 
(not supplied) to the 

AUX IN


sockets and to the audio output 
sockets on the audio device.
For audio device with headphone 

• 

sockets:
Connect the supplied MP3 Link cable 
to the 

MP3 LINK

 socket and to the 

headphone socket on the audio 
device.

2

 Select 

MP3 LINK

/

AUX

 source.

3

  Play the device.

Listen through headphone
1

  Plug a headphone into the   socket on 

the unit.

6 Other 

features

Set alarm timer

This unit can be used as an alarm clock. You can 
select CD, FM or USB as alarm source.

Note

Make sure that you have set the clock 


correctly.

1

  In standby mode, press and hold 

TIMER


until 

[TIMER SET]

 scrolls on the display. 

2

  Press source buttons on the remote 

control to select a source: CD/MP3, 
TUNER, USB.

3

 Press 

TIMER

 to confirm.

The hour digits are displayed and begin 


»

to blink.

4

 Press 

VOL +/-

 repeatedly to set hour, 

then press 

TIMER

 again to confirm.

The minute digits are displayed and 


»

begin to blink.

5

 Press 

VOL +/-

 to set minute, then press 

TIMER

 to confirm.


»

VOL

 (volume) is displayed and begins 

to blink.

6

 Press 

VOL +/-

 to adjust volume, then 

press 

TIMER

 to confirm.

Activate/deactivate alarm timer

1

  In standby mode, press 

TIMER

 repeatedly 

to activate or deactivate timer.

If timer is activated, 


»

 is displayed.

Tip

Alarm timer is not available in MP3 LINK 


mode.
If CD/USB source is selected, yet no disc is 


placed or no USB connected, the system 
switches to the tuner source automatically.

EN

Summary of Contents for MCM7000/12

Page 1: ...ct and get support at www philips com welcome EN User manual 3 FR Mode d emploi 21 ES Manual del usuario 41 DE Benutzerhandbuch 61 NL Gebruiksaanwijzing 81 IT Manuale utente 101 PT Manual do utilizador 121 SV Användarhandbok 141 ...

Page 2: ... in standby mode in standby mode ...

Page 3: ...duct overview 8 3 Get started 10 Connect speakers 10 Connect FM antenna 11 Connect power 11 Prepare the remote control 11 Set clock 12 Demonstrate the unit s features 12 Adjust brightness of display panel 12 Turn on or off LED light 12 Turn on 12 Switch to standby mode 12 4 Play 13 Basic play operations 13 Play from disc 13 Play from USB 13 Adjust sound 14 5 Listen to FM radio 14 Plug and play ins...

Page 4: ... battery leakage which may result in bodily injury property damage or damage to the unit Install all batteries correctly and as marked on the unit Do not mix batteries old and new or carbon and alkaline etc 1 Important Safety Know these safety symbols This bolt of lightning indicates uninsulated material within your unit may cause an electrical shock For the safety of everyone in your household pl...

Page 5: ...lume as your hearing adapts Do not turn up the volume so high that you can t hear what s around you You should use caution or temporarily discontinue use in potentially hazardous situations Do not use headphones while operating a motorized vehicle cycling skateboarding etc it may create a traffic hazard and is illegal in many areas Remove batteries when the unit is not used for a long time Batterie...

Page 6: ...o this device that are not expressly approved by Philips Consumer Lifestyle may void the user s authority to operate the equipment This product complies with the radio interference requirements of the European Community Your product is designed and manufactured with high quality materials and components which can be recycled and reused When this crossed out wheeled bin symbol is attached to a prod...

Page 7: ...ulations on your purchase and welcome to Philips To fully benefit from the support that Philips offers register your product at www Philips com welcome Introduction With this unit you can enjoy audio from discs USB storage devices and other external devices listen to radio stations You can enrich sound output with these sound effects treble bass control loudness control The unit supports these medi...

Page 8: ...tion about current source k Disc compartment Hold the disc l Headphone socket Product overview Main unit a Switch to ECO Power or standby mode b SOURCE Select a source c Skip to the previous next track Skip to a preset station d Start or pause play e Search backward or forward Search to a radio station f Stop play Erase a program In standby mode Turn on off Demo mode SOURCE a b c d e f g h j i k l...

Page 9: ...rogram In standby mode Turn on off Demo mode i search backwards or forward Search to a radio station j TREBLE BASS Activate treble bass adjustment k CLOCK Set the clock Display the set clock l Numeric keypad Select a track directly m SHIFT Enter a two or three digit number with the numeric keypad m MP3 LINK Connect to an external audio device n Connect to a USB flash drive Remote control a Switch t...

Page 10: ...er wires and terminals are matched For optimal sound use the supplied speakers only Connect only speakers with impedance that is the same or higher than the supplied speakers Refer to the Specifications section of this manual For the main unit side Connect the speaker wires and the main unit as the following graphic indicates n PROGRAM Program radio stations Program tracks o VOL Adjust volume Adjus...

Page 11: ...y as indicated 3 Close the battery compartment R R AUX IN LINE OUT L L DEMO ANTENNA FM For the speaker side 1 Unscrew the speaker connectors 2 For the left speaker identify the speaker cable that is connected to the left connectors on the main unit 3 Insert fully the red end of the speaker cable into the red connector 4 Screw the red connector to secure the cable 5 Insert fully the silver end of t...

Page 12: ...co power scrolls on the display then the backlight turns off Note If you are not going to use the remote control for a long time remove the batteries Do not use old and new or different types of batteries in combination Batteries contain chemical substances so they should be disposed of properly Set clock 1 In standby mode press CLOCK for three seconds to activate clock setting mode CLOCK SET scro...

Page 13: ...n Press and hold to fast forward fast reverse the track during playback then release to resume play To pause resume play during playback INFO Select different play information REPEAT To select a repeat play mode REP repeat play current track repeatedly REP ALL repeat all play all tracks repeatedly Press again to return to normal play SHUFFLE To play tracks randomly Press again to return to normal ...

Page 14: ... Tune to FM radio stations Warning Make sure that you have connected and fully extended the supplied FM antenna 1 Press RADIO 2 Press and hold to search a radio station 3 When the frequency starts to change release the button The unit automatically stores radio stations with sufficient signal strength 4 Repeat steps 2 3 to tune to more stations To tune to a weak station Press repeatedly until you fi...

Page 15: ...nal is received NO CT is displayed Note The accuracy of the transmitted time depends on the RDS station that transmits the time signal Note STEREO is default setting for tuner mode Tip Under tuner mode you can press OK repeatedly to toggle between STEREO and MONO and the unit memorizes your setting even if you turn off the unit or turn to other sources Program radio stations automatically Note You...

Page 16: ...he device Listen through headphone 1 Plug a headphone into the socket on the unit 6 Other features Set alarm timer This unit can be used as an alarm clock You can select CD FM or USB as alarm source Note Make sure that you have set the clock correctly 1 In standby mode press and hold TIMER until TIMER SET scrolls on the display 2 Press source buttons on the remote control to select a source CD MP3...

Page 17: ...ersion 2 0 FS Dimensions Main Unit W x H x D Speaker Box W x H x D 250 x 92 x 285 mm 174 x 260 x 240 mm Weight With Packaging Main Unit Speaker Box 10 kg 2 5 kg 6 1 kg 7 Product information Note Product information is subject to change without prior notice Specifications Amplifier Rated Output Power 2 X 30 W RMS Frequency Response 20 20000 Hz 3 dB Signal to Noise Ratio 82 dBA Aux Input 1000 mV RMS 2...

Page 18: ... the AC power plug then turn on the unit again As a power saving feature the system switches off automatically 15 minutes after track play reaches the end and no control is operated Remote control does not work Before you press any function button first select the correct source with the remote control instead of the main unit USB playability information Supported USB storage devices USB flash memor...

Page 19: ... Cannot display some files in USB device The number of folders or files in the USB device has exceeded a certain limit This phenomenon is not a malfunction The formats of these files are not supported USB device not supported The USB device is incompatible with the unit Try another one Poor radio reception Increase the distance between the unit and your TV or VCR Fully extend the FM antenna Connect a...

Page 20: ... 2011 Koninklijke Philips Electronics N V All rights reserved MCM7000_12_UM_V1 1 ...

Reviews: