

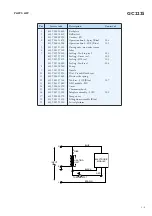


GC2225
BACKPLATE 1
BALL SWIVEL 2
SWIVEL PLATFORM 20
CORDSET 3
Remove
Screw A 1x
Remove
Backplate 1
Remove
Screw B 2x (cord clamp)
OPERATION KNOB 4
DOSING UNIT 5
INLAY 6
FILLING DOOR 19
PUMP 8
NOZZLE 9
Remove
Screw A 1x
Remove
Backplate 1
Remove
Screw B 2x (cord clamp)
Remove
Cord set 3
Remove
Dosing unit 5
Remove
Screw D 1x
Remove
Inlay 6
Remove
Operation knob 4
DISASSEMBLY ADVICE
REPAIR INSTRUCTIONS
- Due to the high voltage of the iron, ONLY the specified cordsets must be used.
- Thermostat that is fitted to the soleplate (Pos 16) was pre-adjusted by the suppliers and secured by glue.
To avoid mal-function of the iron, NEVER re-adjust the thermostat.
- No information about the type number and voltage is stamped onto the typeplate. When replacing the cover (typeplate is at the
bottom), engrave at least the type number & voltage on the typeplate with a sharp object.
- Part number 107, 108 cannot be ordered separately.
OPTIONAL (accessories)
- No specific issues
DIAL 10
RATTLE SPRING 11
TANK SET 12
TANK SEAL 106
ASO MODULE 13
Remove
Screw A 1x
Remove
Backplate 1
Remove
Screw B 2x (cord clamp)
Remove
Cord set 3
Remove
Dosing unit 5
Remove
Screw D 1x
Remove
Inlay 6
Remove
Operation knob 4
Remove
Screw C 3x
COVER 14
THERMOSTAT BUSH 15
SOLEPLATE 16
SEAL 102, 103
Remove
Screw A 1x
Remove
Backplate 1
Remove
Screw B 2x (cord clamp)
Remove
Cord set 3
Remove
Dosing unit 5
Remove
Screw D 1x
Remove
Inlay 6
Remove
Operation knob 4
Remove
Screw C 3x
Remove
Tank set 12
Remove
Screw E 3x
Remove
Cover 14
2-4


