background image

4

English

• 

Do not place the operating appliance against a wall or against other 

appliances or underneath objects that would be damaged by steam, such as 

walls and cupboards. Leave at least 10 cm free space at the back, on both sides 

and above the appliance. Do not place anything on top of the appliance.

• 

During use, hot steam is released through the air outlet openings. Keep your 

hands and face at a safe distance from the steam and from the air outlet 

openings

• 

The appliance is equipped with tempered glass, if the glass is damaged do not 

use the appliance further and contact a service centre near you.

• 

Keep the mains cord away from hot surfaces.

• 

Accessories can become hot during and after use of the appliance, always 

handle carefully.

• 

Beware of the hot steam that comes out of the appliance during cooking, in 

the keep-warm mode or when you open the lid. When you check food, always 

use kitchen utensils with long handles.

• 

Do not use the appliance for any other purpose than described in this manual 

and use only original Philips accessories.

• 

Do not use any accessories or parts from other manufacturers or that Philips 

does not specifically recommend. If you use such accessories or parts, your 

guarantee becomes invalid.

• 

Always use the dedicated accessory to process your food. Never put the food 

into direct contact with the steam generator at the bottom.

• 

Do not let the appliance operate unattended, always make sure you are in 

control over your appliance.

• 

Always use the appliance with properly closed lid.

• 

If using the sous vide function, make sure to use only high quality sous vide 

bags.

• 

Only use the sous vide function of the appliance if you use sous vide bags, 

otherwise sous vide bags could melt.

• 

Sous vide function with temperatures below 50°C is not recommended as it 

could provoke bacteria growth. 

• 

Check if the voltage indicated on the appliance corresponds to the local mains 

voltage before you connect the appliance.

• 

Do not place the appliance on or near combustible materials such as a 

tablecloth or curtain.

• 

Thoroughly clean, the parts that come into contact with food before you use 

the appliance for the first time and after every use. Refer to the instructions in 

the manual.

• 

Never steam frozen meat, poultry or seafood. Always thaw these ingredients 

completely before you steam them.

• 

Accessible surfaces may become hot during use.

• 

This appliance is designed to be used at ambient temperatures between 10°C 

and 40°C.

Summary of Contents for NX0960

Page 1: ...User manual NX0960 ...

Page 2: ...or Use 13 Using the Air Cooker 13 Cooking modes 16 Recipe guided cooking via NutriU app 16 Mode Ingredients 18 Mode cooking method 22 Mode manual 30 Accessories 30 Voice control 31 Cleaning 32 General 32 Cleaning Table 34 Use the automated cleaning programs 35 Storage 36 Recycling 36 Declaration of Conformity 37 Guarantee and Support 37 Software and firmware updates 37 Device compatibility 37 Fact...

Page 3: ...zard Only connect the appliance to an earthed wall socket Always make sure that the plug is inserted into the wall socket properly This appliance is not intended to be operated by means of an external timer or a separate remote control system The accessible surfaces may become hot during use This appliance can be used by children aged from 8 years and above and persons with reduced physical sensor...

Page 4: ...Philips does not specifically recommend If you use such accessories or parts your guarantee becomes invalid Always use the dedicated accessory to process your food Never put the food into direct contact with the steam generator at the bottom Do not let the appliance operate unattended always make sure you are in control over your appliance Always use the appliance with properly closed lid If using...

Page 5: ...es Temperature humidity and time are varying based on the type and amount of food you have placed into the appliance If the appliance is used improperly or for professional or semi professional purposes or if it is not used according to the instructions in the user manual the guarantee becomes invalid and Philips refuses any liability for damage caused To fill refill or empty the water tank please...

Page 6: ...cy fish tender meat soft bakes with up to 90 nutrient preservation Discover the joy of creating delicious healthy dishes at the touch of a button For more inspiration recipes and information about the Air Cooker visit www philips com welcome or download the free NutriU App for IOS or Android Tested on broccoli bell pepper snowpeas for 90 vitamin C on salmon for 93 omega3 6 and beef for 90 iron Lab...

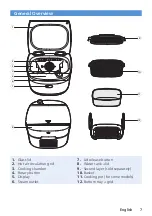
Page 7: ... 5 4 6 7 8 10 1 Glass lid 2 Hot air circulation grid 3 Cooking chamber 4 Rotary button 5 Display 6 Steam outlet 7 Lid release button 8 Water tank lid 9 Second layer sold separately 10 Basket 11 Cooking pot for some models 12 Bottom tray grid ...

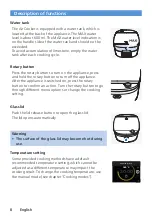
Page 8: ...e appliance is switched on press the rotary button to confirm an action Turn the rotary button to go through different menu options or change the cooking setting Glass lid Push the lid release button to open the glass lid The lid opens automatically Only appliccable BAKING GRILLING Warning The surface of the glass lid may become hot during use Temperature setting Some provided cooking methods have...

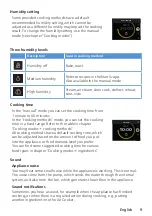
Page 9: ... you can set the cooking time in a fixed range Refer to the table in chapter Cooking modes cooking methods All cooking methods have a default cooking time which can be adjusted based on the amount of food you put into the appliance or the doneness level you prefer You can find some suggested cooking time for various food types in chapter Cooking modes ingredients 160 C 10 00 160 C 10 00 10 00 10 0...

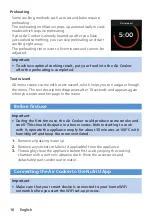
Page 10: ...menu The text description disappears after 10 seconds and appears again when you enter another page in the menu Before first use Important During the first time use the Air Cooker could produce some smoke and smell This should dissipate in a few minutes Before starting to cook with it operate the appliance empty for about 30 minutes at 160 C with humidity off and keep the room ventilated 1 Remove ...

Page 11: ...he list until the language you prefer is highlighted Back Deutsch Francais Español English 4 Press the rotary button to confirm your language selection A welcome screen is displayed Welcome to a world of flavor Your appliance works best connected to WiFi and paired to the NutriU app Continue 5 Press the rotary button to confirm and continue Note In the next screen you can decide whether to connect...

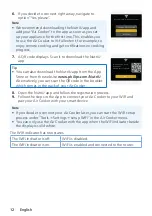
Page 12: ...also download the NutriU app from the App Store or from the website www philips com NutriU Alternatively you can scan the QR code in the booklet which comes in the pack of your Air Cooker 8 Open the NutriU app and follow the registration process 9 Follow the steps in the App to connect your Air Cooker to your WiFi and pair your Air Cooker with your smart device Note If you decide to connect your A...

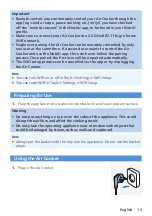
Page 13: ... paired the first user will be unpaired automatically The WiFi setup process can be cancelled via the app or by unplugging the Air Cooker Note You can turn WiFi on or off in Tools Settings WiFi Setup You can reset WiFi in Tools Settings WiFi Setup Preparing for Use 1 Place the appliance on a stable horizontal level and heat resistant surface Warning Do not put anything on top or on the sides of th...

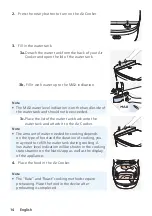
Page 14: ...not be exceeded 3c Place the lid of the water tank back onto the water tank and attach it to the Air Cooker Note The amount of water needed for cooking depends on the type of food and the duration of cooking you may need to refill the water tank during cooking A low water level indication will be shown in the cooking status banner on the NutriU app as well as the display of the appliance 4 Place t...

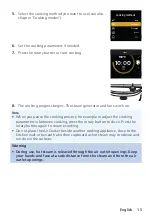
Page 15: ...or and fan switch on Note When you pause the cooking process for example to adjust the cooking parameters in between cooking press the rotary button to do so Press the rotary button again to resume cooking Do not place the Air Cooker beside another cooking appliance close to the kitchen wall or beneath a kitchen cupboard as hot steam may condense and run down the surfaces Warning During use hot st...

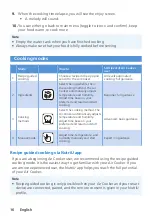
Page 16: ...t time base on your preferred end result and start cooking Beginner full guidance 3 Cooking methods Select the cooking method The Air Cooker automatically adjusts temperature and humidity Adjust time base on your preferred end result and start cooking Advanced basic guidance 4 Manual mode Adjust time temperature and humidity manually and start cooking Expert no guidance Recipe guided cooking via N...

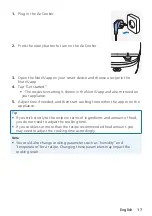
Page 17: ... Adjust time if needed and then start cooking from either the app or on the appliance Tip If you stick strictly to the recipe in terms of ingredients and amount of food you do not need to adjust the cooking time If you cook less or more than the recipe recommended food amount you may need to adjust the cooking time accordingly Note You could also change cooking parameters such as humidity and temp...

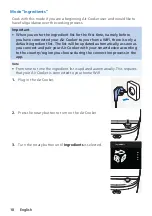
Page 18: ... default ingredient list The list will be updated automatically as soon as you connect and pair your Air Cooker with your smart device according to the country region you choose during the connection process in the app Note From time to time the ingredient list is updated automatically This requires that your Air Cooker is connected to your home WiFi 1 Plug in the Air Cooker 2 Press the rotary but...

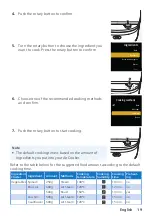
Page 19: ...sh the rotary button to start cooking Note The default cooking time is based on the amount of ingredients you put into your Air Cooker Refer to the table below for the suggested food amount according to the default cooking time Ingredient Cluster Ingredient Amount Methods Cooking temperature Cooking humidity Cooking time Preheat ing Vegetables Spinach 250g Steam 100 C 10 min no Broccoli 600g Air S...

Page 20: ...in no Potato quartered 600g Air Steam 120 C 35 min no 600g Roast 160 C 45 min yes Sweet potato orange quartered 600g Air Steam 120 C 20 min no Sweet potatoe whole 600g Roast 160 C 30 min yes Pumpkin cubes 750g Air Steam 120 C 30 min no 750g Roast 160 C 30 min yes Carrots 750g Air Steam 120 C 25 min no 750g Roast 160 C 25 min yes Grains Basmati rice 200g rice 550 ml water Air Steam 120 C 25 min no ...

Page 21: ...hicken drumsticks 400g Roast 160 C 50 min yes Duck breast 600g 2 pieces Roast 160 C 12 min yes Fish Seafood Salmon 450g Air Steam 120 C 15 min no 450g Roast 160 C 20 min yes Seabass 600g Air Steam 120 C 12 min no Shrimps 800g Air Steam 120 C 15 min no Trout 600g Air Steam 120 C 12 min no Squid 600g Air Steam 120 C 15 min no White fish fillet 600g Air Steam 120 C 12 min no Eggs Hardboiled egg 560g ...

Page 22: ...at poultry fish seafood Defrost 60 C 20 min 1 180 min Different kind of frozen food Reheat 120 C 15 min 1 90 min Different kind of leftovers Note Some cooking methods such as roast and bake require preheating If your Air Cooker is already heated up after you have just cooked something you can skip preheating and start cooking right away The preheating timer is set to five minutes and cannot be adj...

Page 23: ...in Asparagus green 750g 12 min Bell Pepper 500g 12 min Tomatoes 750g 12 min Egg plant 750g 25 min Root starchy veggies Potato whole 600g 40 min Potato quatered 600g 35 min Sweet potato orange quatered 600g 20 min Pumpkin cubes 750g 30 min Carrots 750g 25 min Grains Basmati rice 200g rice 550 ml water 25 min Jasmin rice 200g 550ml 25 min Long whole grain rice 200g 550ml 40 min Millet 200g 400ml 20 ...

Page 24: ... to the expected cooking result adjust the cooking time accordingly Ingredient Cluster Ingredient Amounts Cooking time Vegetables Spinach 250g 10 min Broccoli 600g 14 min Zucchini 500g 17 min Cauliflower 600g 17 min Green beans 500g 19 min Brussel sprouts 500g 14 min Asparagus green 750g 14 min Bell Pepper 500g 14 min Tomatoes 750g 14 min Egg plant 750g 27 min Poultry Chicken breast 550g 3 pieces ...

Page 25: ...time accordingly Ingredient Cluster Ingredient Amount Cooking time Vegetables Broccoli 600g 13 min Cauliflower 500g 20 min Eggplant 680g 20 min Tomato 750g 15 min Brussels sprouts 500g 15 min Bell pepper 500g 20 min Root starchy veggies Potato quartered 600g 45 min Pumpkin 750g 30 min Carrots 600g 30 min Sweet potato whole 600g 30 min Meat Streaky pork pork belly 1000g 60 min Pork rib 1000g 60 min...

Page 26: ...fins 20 min Cinnamon rolls 30 min Gratins Potato gratin 60 min Lasagna 50 min Quiche 45 min Bread Bread 40 min Garlic knots 25 min Slow cook In Slow cook mode you can cook food using low temperature for up to 3 hours We recommend using Slow cook for meat and chicken as well as stews or soups With this setting you will get tender and juicy results with a intense taste Tip Slow cook can also be used...

Page 27: ... Sous vide and then shortly fry it in the pan for an optimal result Warning If using the sous vide function make sure to use only high quality sous vide bags If you put food in sous vide bag make sure to select sous vide cooking method otherwise sous vide bag could melt Sous vide function at temperatures below 50 C is not recommended as it could provoke bacteria growth The cooking time given in th...

Page 28: ...C 70 80 min Silky Cheesecake 6 x 39cl glass jars with lid 80 C 80 90 min Creamy Defrost We recommend using Defrost to defrost frozen food such as vegetables meat fish and fruits The cooking time given in the table is guideline for defrosting The defrosting time depends on the amount and size of the frozen food If the frozen food is not completely defrosted add some more minutes to the defrosting t...

Page 29: ...Do not refreeze food once it has thawed Reheat We recommend using Reheat for a hassle free fast and healthy re heating of your leftovers for a juicy and homogeneous reheating results The cooking time given in the table is guideline for reheating If your food is not reheated to the expected result add some more minutes to the reheating time Ingredient Cluster Amount Reheating time Side dishes Pasta...

Page 30: ...e temperature from 60 C to 160 C There are three humidity settings which are humidity off medium humidity and high humidity Accessories Your Air Cooker comes with basic accessories and with some additional ones depending on the model you purchased See below some possibilities how you could combine them for cooking in your Air Cooker Note Always use the Air Cooker with the bottom tray and the grid ...

Page 31: ...U app to be found in your profile 2 Make sure you have downloaded the voice assistant app 3 Connect the NutriU app with your voice assistant app Note In case you do not see the option to activate voice control in NutriU itself activate the Amazon Alexa skill through your voice assistant app You can find detailed voice commands in the voice assistant app Connecting the NutriU app with your voice as...

Page 32: ...ance after every use Remove oil and fat from the cooking chamber and the lid after every use Do not fill the cooking chamber with water for cleaning 1 Press and hold the rotary button to switch off the appliance remove the plug from the wall outlet and let the appliance cool down for approximately 30 minutes with the lid open 2 Remove the bottom tray and the basket cooking pot and or second layer ...

Page 33: ...he build up of odours etc Afterwards leave the lid open until the inside of the appliance is completely dry Never store the appliance with the lid closed if the inside is not completely clean and dry Note Make sure no moisture remains on the display Dry the control panel with a cloth after you have cleaned it In case of water or moist accumulation in the cooking chamber due to any reason excessive...

Page 34: ...34 English Cleaning Table Note Use the Rinsing or Easy Clean function to thoroughly clean the inside of the cooking chamber ...

Page 35: ...ing on the appliance display Note Make sure the appliance is switched on and the cooking chamber has no residual liquid If the appliance is still hot let it cool down with the lid open for at least 30 minutes 2 Pour about 80 ml of the Philips CA6700 descaling liquid or citric acid in the empty water tank and put the water tank back to the appliance without adding additional water Note Only use Phi...

Page 36: ...If you will not use the appliance for a longer time thoroughly clean the inside before storing to avoid the build up of odours etc Afterwards leave the lid open until the inside of the appliance is completely dry Never store the appliance with the lid closed if the inside is not completely clean and dry Note Always hold the Air Cooker horizontally when you carry it Always make sure that the access...

Page 37: ...f your Air Cooker and the app Please always update the app to the latest version The Air Cooker is updating the appliance firmware automatically Note To enable the Air Cooker to update to the latest firmware version make sure your Air Cooker is connected to your home WiFi Always use the latest app and firmware Updates are made available when there are software improvements A firmware update is sta...

Page 38: ...ce is completely safe to use The appliance does not switch on The appliance is not plugged in Check if the plug is inserted in the wall outlet properly Several appliances are connected to one outlet The appliance has a high wattage Try a different outlet and check the fuses I see some peeling off spots inside my Air Cooker and on some accessories Some small spots can appear in the cooking chamber ...

Page 39: ...a default ingredient list which gets updated when you first connect to your WiFi and pair your Air Cooker with your smart device Follow the WiFi set up process by entering Tools Settings WiFi Setup on your appliance and follow the instructions on the appliance and in the app Once this is done your ingredients list will be updated automatically with the ingredients intended for your country of orig...

Page 40: ...ed to a WiFi network If you completed the WiFi Setup through the Philips NutriU app and connected your appliance to a specific WiFi network you should see a steady white WiFi symbol on the display of the appliance You might not have checked the remote consent to be found in your NutriU personal profile Got to the personal profile tab in the NutriU app and tap the remote consent check box There is ...

Page 41: ... 2022 Philips Domestic Appliances Holding B V All rights reserved ...

Reviews: