background image

14

          3 Get 

started

 Caution

 Use the controls only as stated in this user manual.


  Always follow the instructions in this chapter in sequence.


  If you contact Philips, you will be asked for the model and serial number of 
your apparatus. The model number and serial number are on the back of the 
apparatus. Write the numbers here: 
  Model No. __________________________
  Serial No. ___________________________

    Preparation

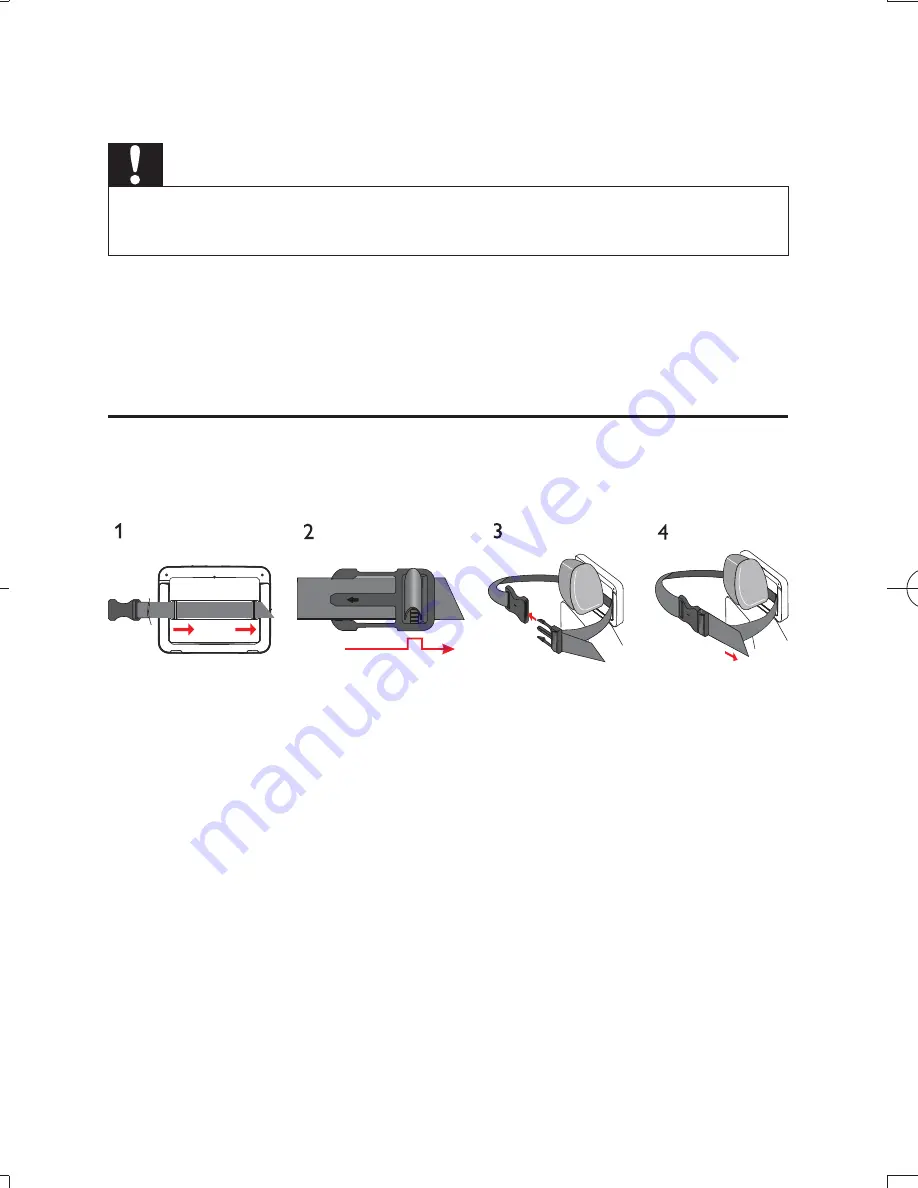
  To use the player in a car, attach the main unit and the second screen to the 
back of the front seat headrests.
    

    1


Pull the strap through the loops on the back of the main unit. 

    2

  Hold the buckle with the marked arrow facing you, then attach the 

buckle to the strap. 

    3

  Position the main unit at the back of the headrest, then fasten the 

buckle.

    4


Pull the strap to secure the main unit to the headrest. 

    To attach the second screen, repeat the above steps. 

• 

EN

PD9012_17_UM_V1.0.indb   Sec2:14

PD9012_17_UM_V1.0.indb   Sec2:14

1/24/2011   3:33:51 PM

1/24/2011   3:33:51 PM

Summary of Contents for PD9012

Page 1: ...Register your product and get support at www philips com welcome PD9012 EN User manual ES Manual del usuario FR Mode d emploi ...

Page 2: ...des Communications du Canada Cet appareil numérique de la classe B est conforme à la norme NMB 003 du Canada The set complies with the FCC Rules Part 15 and with 21 CFR 1040 10 Operation is subject to the following two conditions 1 This device may not cause harmful interference and 2 This device must accept any interference received including interference that may cause undesired operation L appar...

Page 3: ...screen 13 3 Get started 14 Preparation 14 Connect the second screen 15 Connect power 16 4 Use your player 17 Turn on 17 Select OSD language 17 Play discs 17 Play options 18 5 Adjust settings 19 Set the main unit 19 Set the second screen 20 6 Use more of your player 21 Connect additional equipment 21 Connect power from household source 22 7 Product information 23 8 Troubleshooting 24 ...

Page 4: ...aratus CAUTION To prevent electric shock match wide blade of plug to wide slot fully insert ATTENTION Pour éviter les choc élec triques introduire la lame la plus large de la fiche dans la borne correspondante de la prise et pousser jusqu au fond Congratulations on your purchase and welcome to the family Dear PHILIPS product owner Thank you for your confidence in PHILIPS You ve selected one of the...

Page 5: ...se misuse neglect misapplication or non Philips product b to damage caused by service performed by anyone other than Philips or Philips Authorized Service Location c to a product or a part that has been modified without the written permission of Philips or d if any Philips serial number has been removed or defaced or e product accessories or consumables sold AS IS without warranty of any kind by i...

Page 6: ... has two blades and a third grounding prong The wide blade or the third prong are provided for your safety If the provided plug does not fit into your outlet consult an electrician for replacement of the obsolete outlet Caution To prevent electric shock match the wide blade of the plug to the wide slot fully insert j Protect the power cord from being walked on or pinched particularly at plugs conv...

Page 7: ... This product may contain lead and mercury Disposal of these materials may be regulated due to environmental considerations For disposal or recycling information please contact your local authorities or the Electronic Industries Alliance www eiae org Warning Never remove the casing of this apparatus Never lubricate any part of this apparatus Never place this apparatus on other electrical equipment...

Page 8: ...eful not to adjust the volume as your hearing adapts Do not turn up the volume so high that you can t hear what s around you You should use caution or temporarily discontinue use in potentially hazardous situations Do not use headphones while operating a motorized vehicle cycling skateboarding etc it may create a traffic hazard and is illegal in many areas Notice Environmental information All unne...

Page 9: ...on of electrical and electronic products The correct disposal of your old product helps prevent potentially negative consequences on the environment and human health The making of unauthorized copies of copy protected material including computer programs files broadcasts and sound recordings may be an infringement of copyrights and constitute a criminal offence This equipment should not be used fo...

Page 10: ...nel sound depending on disc and playback set up You can also select sound track subtitle languages and different angle of view again depending on DVD disc Besides you can restrict the play of discs that are not suitable for children You can play the following discs on the DVD player including CD R CD RW DVD R and DVD RW DVD Video Video CD Audio CD MP3 CD Discs with JPEG files What s in the box Che...

Page 11: ... exits the setup menu c Skips to the previous or next title chapter or track d OPEN Opens the disc compartment e DISC MENU For DVD accesses or exits disc menu ForVCD turns on or off PBC Playback Control mode ForVCD version 2 0 or SVCD with PBC turned on returns to the menu E ng l i s h EN ...

Page 12: ... mode h ON OFF Turns on off DVD player i VOL Increases or decreases volume j Headphone jack k AV OUT Audio video output jack l DC IN Power supply socket m Navigates through the menus Searches backward forward at different speeds OK Confirms an entry or selection Starts pauses or resumes disc play Stops disc play EN ...

Page 13: ... second screen a DC IN Power supply socket b AV IN Audio video input jack c Headphone jack d VOL Decreases or increases volume e BRIGHTNESS Adjusts screen brightness f OFF ON Turns off on the second screen En g l i sh EN ...

Page 14: ...o __________________________ Serial No ___________________________ Preparation To use the player in a car attach the main unit and the second screen to the back of the front seat headrests 1 Pull the strap through the loops on the back of the main unit 2 Hold the buckle with the marked arrow facing you then attach the buckle to the strap 3 Position the main unit at the back of the headrest then fa...

Page 15: ... screen Caution Turn off your player before you connect the second screen A main unit B second screen 1 Connect the supplied AV cable to the AV OUT jack on the main unit the AV IN jack on the second screen E n g l i s h EN ...

Page 16: ...g the AC adapter always pull the plug from the socket Never pull the cable A main unit B second screen C car cigarette lighter 1 Connect one end of the double connector end of the AC cable to the DC IN jack on the main unit 2 Connect the other end of the double connector end of the AC cable to the DC IN jack on the second screen 3 Connect the one connector end to the car cigarette lighter socket E...

Page 17: ...ay text 1 Press SETUP The setup menu appears 2 Select General Setup Page OSD Language 3 Press to select an option 4 Press OK to confirm 5 Press SETUP to exit Play discs 1 Slide OPEN on the main unit 2 Insert the disc with label side facing up 3 Push down to close the disc compartment Play starts automatically If not press OK If a menu appears select an item then press OK to start play To pause pre...

Page 18: ... within video audio press or once or more Play options 1 During play press OPTION to select some play options For DVD Audio Subtitle Repeat Time Disp ForVCD Audio Repeat Time Disp For audio CDs Repeat One Repeat Folder Repeat Off 2 Follow the on screen instructions ...

Page 19: ... whether to start play from the point where it was last stopped Angle Mark select angle mark display options Display Setup Page Brightness Adjust screen brightness Contrast Adjust screen contrast TV Display Select display ratio Password Password Change password 3308 by default Preference Page Audio Select audio language Subtitle Select subtitle language Disc Menu Select disc menu language Parental...

Page 20: ...second screen 6 Use more of your player Connect additional equipment Caution Turn off your player before connecting to any additional equipment You can connect the player to aTV or an amplifier to enjoy DVDs or Karaoke Match the color of the AV cables the AV cable connected toTV is not supplied with the jacks the yellow cable is for the yellow video jack the red white cable is for the red white au...

Page 21: ...oltage corresponds to the voltage pointed on the back or the underside of the player Risk of electric shock When you unplug the AC adaptor always pull the plug from the socket Never pull the cable 1 Connect the AC adaptor cable to the DC IN jack on the main unit the power outlet En g l i sh Not supplied ...

Page 22: ... Power supply Input 100 240V 50 60Hz 0 3A Output DC 9 12V 0 8 A Power consumption 7 2 W Operating temperature range 0 45 C Laser wavelength 650 nm Video system NTSC Frequency response 20Hz 20KHz 1dB Signal noise ratio 80 dB Audio distortion noise 80 1KHz Channel separation 80 dB Dynamic range 80 dB Audio out analog audio Output level 2V 10 Load impedance 10 K Video out Output level 1Vp p 20 Load i...

Page 23: ...disc With a clean soft lint free cloth wipe the disc outwards from the center Make sure that the video output format of the disc is compatible with theTV Change the video output format to match yourTV or program The LCD is manufactured using high precision technology You may however see tiny black points and or bright points red blue green that continuously appear on the LCD This is a normal resul...

Page 24: ...All rights reserved PD9012_17_UM_V1 0 Philips Consumer Lifestyle A division of Philips Electronics North America Corporation P O Box 10313 Stamford CT 06904 Phone 1 888 PHILIPS 744 5477 Meet Philips at the Internet http www philips com welcome ...

Reviews: