background image

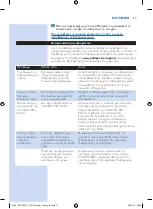
Problem

Possible cause

Solution

The ironing board 

cover becomes 

wet.

Steam has condensed on the 

ironing board cover after a 

long ironing session.

Replace the ironing board cover if the foam 

material has worn out. You can also add an extra 

layer of felt material under the ironing board 

cover to prevent condensation on the ironing 

board.

Water droplets 

come out of the 

soleplate.

The steam that was still 

present in the hose has cooled 

down and condensed into 

water.

Point the iron away from the garment and let it 

produce steam for a few seconds.

Steam and/or 

water comes out 

from under the 

EASY DE-CALC 

knob.

The EASY DE-CALC knob is 

not tightened properly.

Switch off the appliance and wait for two hours 

for steam generator to cool down. Unscrew the 

EASY DE-CALC knob reattach it properly. Note: 

When you remove the knob, water comes out 

of the steam generator. If steam continues to 

escape, switch off the appliance and contact an 

authorised Philips service centre.

Dirty water 

and impurities 

come out of the 

soleplate.

Impurities or chemicals 

present in the water have 

deposited in the steam vents 

and/or on the soleplate.

Descale the steam generator regularly. See 

section ‘Cleaning the soleplate’ in chapter 

‘Cleaning and maintenance’.

Too much scale and minerals 

have accumulated inside the 

steam generator.

Descale the steam generator regularly. See 

section ‘IMPORTANT - Descaling the steam 

generator’ in chapter ‘Cleaning and maintenance’.

The iron leaves a 

shine or an imprint 

on the garment.

The surface to be ironed was 

uneven, for instance because 

you were ironing over a seam 

or a fold in the garment.

Perfect Care is safe on all garments. The shine or 

imprint is not permanent and will come off if you 

wash the garment. Avoid ironing over seams or 

folds or you can place a cotton cloth over the 

area to be ironed to avoid imprints.

The steam 

generator does 
not produce any 
steam.

There is not enough water in 

the water tank (the ‘water tank 

empty’ light lashes).

Fill the water tank.

The steam generator is not 

hot enough to produce steam.

Wait until the ‘iron ready’ light on the iron lights 

up continuously.

You did not press the steam 

trigger.

Press the steam trigger and keep it pressed while 

you iron.

The water tank is not placed 

properly in the steam 

generator.

Slide the water tank irmly back into the steam 

generator (‘click’).

The steam 

generator 
produces a 
pumping sound.

Water is pumped into the 

boiler inside the steam 

generator. This is normal.

If the pumping sound continues nonstop, 


switch off the steam generator and remove the 

plug from the wall socket. Contact an authorised 

Philips service centre.

ENGLISH

11

4239_000_9325_1_DFU_Booklet_Luxury_v3.indd   11

30/04/14   09:44

Summary of Contents for PerfectCare Expert GC9231/02

Page 1: ...GC9500 GC9200 User manual 4239_000_9325_1_DFU_Booklet_Luxury_v3 indd 1 30 04 14 09 44 ...

Page 2: ...4239_000_9325_1_DFU_Booklet_Luxury_v3 indd 2 30 04 14 09 44 ...

Page 3: ...1 4239_000_9325_1_DFU_Booklet_Luxury_v3 indd 3 30 04 14 09 44 ...

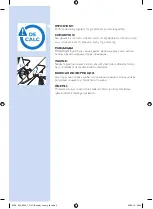
Page 4: ...Nale y regularnie usuwa kamie aby utrzyma dobre działanie funkcji pary i przedłu y okres eksploatacji urz dzenia ÖNEML Mükemmel buhar ve uzun süreli kullanım ömrü için kireç temizleme i lemini düzenli olarak gerçekle tirin 4239_000_9325_1_DFU_Booklet_Luxury_v3 indd 4 30 04 14 09 44 ...

Page 5: ...GC9500 GC9200 series ENGLISH 6 12 19 POLSKI 26 32 TÜRKÇE 38 4239_000_9325_1_DFU_Booklet_Luxury_v3 indd 5 30 04 14 09 44 ...

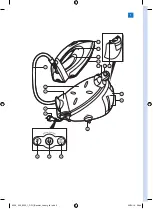
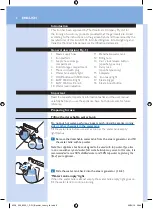
Page 6: ...k from the steam generator and ill the water tank with tap water Note Your appliance has been designed to be used with tap water If you live in an area with very hard water fast scale build up may occur In this case it is recommended to mix 50 distilled water and 50 tap water to prolong the life of your appliance 2 Slide the water tank back into the steam generator click Water tank empty light Whe...

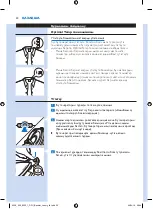
Page 7: ...eins e g polypropylene but also prints on garments Ironing 1 Place the steam generator on a stable and even surface 2 Make sure that there is enough water in the water tank see section Filling the detachable water tank 3 Put the mains plug in an earthed wall socket and press the on off button to switch on the steam generator The iron ready light starts to lash to indicate that the steam generator ...

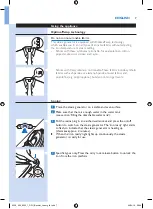
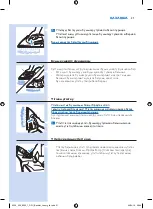
Page 8: ...experience Vertical ironing Hot steam is emitted from the iron Never attempt to remove creases from a garment that someone is wearing Do not apply steam near your or someone else s hand You can use the iron in vertical position to remove wrinkles from hanging fabrics 1 Hold the iron in vertical position press the steam trigger and touch the garment lightly with the soleplate Putting down the iron ...

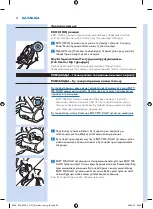
Page 9: ... light starts lashing after approx one month or 10 ironing sessions to indicate that the steam generator needs to be descaled To descale the steam generator perform the steps below Never remove the EASY DE CALC knob when the steam generator is hot 1 Press the on off button to switch off the steam generator and remove the plug from the wall socket 2 Place the steam generator on a stable table with ...

Page 10: ...til no water comes out anymore or when steam comes out Hot dirty water comes out of the soleplate 5 Switch off the steam generator and let it cool down for 2 hours 6 Remove the EASY DE CALC knob and let the water low into a cup Reinsert the EASY DE CALC knob and turn the knob clockwise to fasten it 7 Repeat steps 2 to 6 of this cleaning procedure Storage 1 Switch off the steam generator and unplug...

Page 11: ...Too much scale and minerals have accumulated inside the steam generator Descale the steam generator regularly See section IMPORTANT Descaling the steam generator in chapter Cleaning and maintenance The iron leaves a shine or an imprint on the garment The surface to be ironed was uneven for instance because you were ironing over a seam or a fold in the garment Perfect Care is safe on all garments T...

Page 12: ...The Woolmark Company Pty Ltd R1101 Woolmark 1 1 50 50 2 12 1 2 3 4 5 6 7 ECO 8 EASY DE CALC 9 EASY DE CALC 10 11 12 13 14 15 16 17 18 w 4239_000_9325_1_DFU_Booklet_Luxury_v3 indd 12 30 04 14 09 44 ...

Page 13: ...13 OptimalTemp OptimalTemp 1 2 3 2 4 4239_000_9325_1_DFU_Booklet_Luxury_v3 indd 13 30 04 14 09 44 ...

Page 14: ...5 1 OptimalTemp 14 4239_000_9325_1_DFU_Booklet_Luxury_v3 indd 14 30 04 14 09 44 ...

Page 15: ...ECO ECO 1 ECO 2 2 OptimalTemp 10 EASY DE CALC EASY DE CALC 10 EASY DE CALC 1 2 EASY DE CALC 3 EASY DE CALC EASY DE CALC EASY DE CALC 15 4239_000_9325_1_DFU_Booklet_Luxury_v3 indd 15 30 04 14 09 44 ...

Page 16: ... 2 1 2 500 ml EASY DE CALC 3 5 4 5 2 6 EASY DE CALC EASY DE CALC 7 2 6 1 2 3 4 16 4239_000_9325_1_DFU_Booklet_Luxury_v3 indd 16 30 04 14 09 44 ...

Page 17: ...5 www philips com support EASY DE CALC EASY DE CALC EASY DE CALC Philips 17 4239_000_9325_1_DFU_Booklet_Luxury_v3 indd 17 30 04 14 09 44 ...

Page 18: ... Perfect Care Philips 18 4239_000_9325_1_DFU_Booklet_Luxury_v3 indd 18 30 04 14 09 44 ...

Page 19: ...19 Woolmark Company Pty Ltd R1101 Woolmark C 1 1 50 50 2 1 2 3 4 5 6 7 ECO 8 EASY DE CALC 9 EASY DE CALC 10 11 12 13 14 15 16 17 18 4239_000_9325_1_DFU_Booklet_Luxury_v3 indd 19 30 04 14 09 44 ...

Page 20: ...20 Optimal Temp OptimalTemp 1 2 3 2 4 20 4239_000_9325_1_DFU_Booklet_Luxury_v3 indd 20 30 04 14 09 44 ...

Page 21: ...21 5 1 OptimalTemp 21 4239_000_9325_1_DFU_Booklet_Luxury_v3 indd 21 30 04 14 09 44 ...

Page 22: ...22 ECO ECO 1 ECO 2 2 OptimalTemp 10 EASY DE CALC EASY DE CALC 10 EASY DE CALC 1 2 EASY DE CALC 3 EASY DE CALC EASY DE CALC EASY DE CALC 22 4239_000_9325_1_DFU_Booklet_Luxury_v3 indd 22 30 04 14 09 44 ...

Page 23: ...23 2 1 2 500 EASY DE CALC 3 5 4 5 2 6 EASY DE CALC EASY DE CALC 7 2 6 1 2 3 4 5 23 4239_000_9325_1_DFU_Booklet_Luxury_v3 indd 23 30 04 14 09 44 ...

Page 24: ...24 www philips com support EASY DE CALC EASY DE CALC EASY DE CALC Philips Perfect Care 24 4239_000_9325_1_DFU_Booklet_Luxury_v3 indd 24 30 04 14 09 44 ...

Page 25: ...25 Philips 4 9206 123022 13 7 495 961 1111 220 240V 50 60Hz 2000 2400W 25 4239_000_9325_1_DFU_Booklet_Luxury_v3 indd 25 30 04 14 09 44 ...

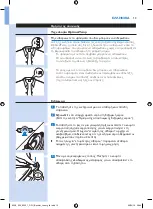
Page 26: ...ga Urządzenie jest przystosowane do wody z kranu Je li wTwojej okolicy woda jest bardzo twarda szybko osadzi si kamie W takim przypadku w celu przedłu enia ywotno ci urządzenia zaleca si wymieszanie wody z kranu z wodą destylowaną w równych proporcjach 2 Wsu ponownie zbiorniczek wody do generatora pary usłyszysz klikni cie Wska nik pustego zbiorniczka wody Gdy zbiorniczek wody jest prawie pusty za...

Page 27: ...aw generator pary na stabilnej i równej powierzchni 2 Sprawd czy w zbiorniczku jest wystarczająca ilo wody patrz rozdział Napełnianie odłączanego zbiorniczka wody 3 Podłącz wtyczk przewodu sieciowego do uziemionego gniazdka elektrycznego i naci nij wyłącznik aby włączy generator pary Wska nik gotowo ci do prasowania zacznie miga informując o nagrzewaniu si generatora pary trwa to około 2 minut Gdy...

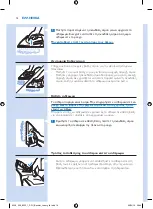
Page 28: ...azko w pozycji pionowej naci nij przycisk włączania pary i delikatnie dotykaj ubranie stopą elazka Odstawianie elazka w trakcie prasowania Podczas prasowania mo na ustawi elazko na podstawie lub w pozycji poziomej na desce do prasowania Dzi ki technologii OptimalTemp stopa elazka nie uszkodzi pokrowca deski do prasowania Oszcz dno energii Tryb ECO Korzystaj c z trybu ECO mniejsza ilo pary mo na os...

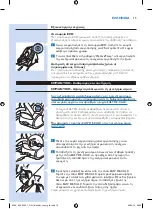
Page 29: ... z cząsteczkami kamienia zacznie spływa do szklanki Kiedy woda przestanie wypływa z generatora pary ponownie załó pokr tło EASY DE CALC Obró pokr tło w prawo aby je przymocowa i włó wtyczk z powrotem do gniazdka elektrycznego Teraz mo esz ponownie korzysta z generatora pary Czyszczenie stopy elazka Stop elazka nale y regularnie czy ci aby usun z niej plamy W celu utrzymania dobrego po lizgu stopy ...

Page 30: ...enerator pary i wyjmij jego wtyczk z gniazdka elektrycznego 2 Wyjmij zbiorniczek wody i opró nij go 3 Postaw elazko na podstawie Tylko wybrane modele naci nij przycisk blokujący na czas przenoszenia aby zablokowa elazko na podstawie 4 Zwi wą dopływowy i przewód sieciowy Umie ci je w odpowiednich schowkach 5 Tylko wybrane modele urządzenie mo na przenosi jedną r ką trzymając za uchwyt elazka Nie pr...

Page 31: ...amienia i minerałów Regularnie usuwaj kamie z generatora pary Patrz cz WA NE usuwanie kamienia z generatora pary w rozdziale Czyszczenie i konserwacja elazko pozostawia na odzie y połyskliwy lad lub odcisk Prasowana powierzchnia była nierówna czego przyczyn był np szew lub fałda materiału elazko PerfectCare jest bezpieczne dla wszystkich tkanin Połysk lub odcisk nie jest trwały i zejdzie z odzie y...

Page 32: ...32 Woolmark Pty Ltd R1101 Woolmark 1 1 2 1 2 3 4 5 6 7 ECO 8 EASY DE CALC 9 EASY DE CALC 10 11 12 13 14 15 16 17 18 4239_000_9325_1_DFU_Booklet_Luxury_v3 indd 32 30 04 14 09 44 ...

Page 33: ...OptimalTemp OptimalTemp 1 2 3 2 4 5 33 4239_000_9325_1_DFU_Booklet_Luxury_v3 indd 33 30 04 14 09 44 ...

Page 34: ... 1 OptimalTemp ECO ECO 1 ECO 2 2 OptimalTemp 10 34 4239_000_9325_1_DFU_Booklet_Luxury_v3 indd 34 30 04 14 09 44 ...

Page 35: ... EASY DE CALC EASY DE CALC 10 EASY DE CALC 1 2 EASY DE CALC 3 EASY DE CALC EASY DE CALC EASY DE CALC 2 1 2 500 EASY DE CALC 3 5 35 4239_000_9325_1_DFU_Booklet_Luxury_v3 indd 35 30 04 14 09 44 ...

Page 36: ...4 5 2 6 EASY DE CALC EASY DE CALC 7 2 6 1 2 3 4 5 www philips com support 36 4239_000_9325_1_DFU_Booklet_Luxury_v3 indd 36 30 04 14 09 44 ...

Page 37: ...EASY DE CALC EASY DE CALC 2 EASY DE CALC Philips Perfect Care Philips 4 9206 123022 13 7 495 961 1111 220 240V 50 60Hz 2000 2400W 37 4239_000_9325_1_DFU_Booklet_Luxury_v3 indd 37 30 04 14 09 44 ...

Page 38: ...ni buhar kazanlı ütüden ayırın ve su haznesini musluk suyu ile doldurun Dikkat Cihazınız musluk suyuyla kullanılmak üzere tasarlanmı tır Ya adı ınız bölgedeki suyun çok sert olması halinde kısa süre içinde kireç olu umu meydana gelecektir Bu nedenle cihazınızın kullanım ömrünü uzatmak için 50 saf su ve 50 musluk suyu karı ımı kullanın 2 Su haznesini buhar üreticideki yerine geçirin klik Su haznesi...

Page 39: ...e düz bir zemine yerle tirin 2 Su haznesinde yeterli su oldu undan emin olun bkz Sökülebilir su haznesinin doldurulması bölümü 3 Elektrik i ini topraklı bir prize takın ve buhar kazanlı ütüyü açmak için açma kapama dü mesine basın Ütü hazır ı ı ı buhar üreticinin ısınmakta oldu unu göstermek için yanıp sönmeye ba lar bu yakla ık 2 dakika sürer Ütü hazır ı ı ı sürekli olarak yanmaya ba ladı ında bu...

Page 40: ...r üretir Asla birinin üzerinde olan bir giysinin kırı ıklıklarını gidermeye çalı mayın Sizin veya ba ka birinin elinin yakınında buhar uygulamayın Ütüyü asılı giysilerinizden buru uklukları gidermek için dikey konumda kullanabilirsiniz 1 Ütüyü dik tutun buhar teti ine basın ve ütünün tabanıyla giysiye haifçe dokunun Ütü yaparken ütüyü yerle tirme Ütü yaparken ütüyü ütü platformuna ya da yatay konu...

Page 41: ... lamanız çok önemlidir EASY DE CALC ı ı ı yakla ık bir ay veya 10 ütü seansından sonra yanıp sönmeye ba layarak buhar üreticisinin kirecinin temizlenmesi gerekti ini gösterir Buhar üreticinin kirecini sökmek için a a ıdaki adımları uygulayın EASY DE CALC dü mesini buhar üreticisi sıcakken asla çıkarmayın 1 Açma kapatma dü mesine basarak buhar üreticisini kapatın ve i ini prizden çekin 2 Buhar kaza...

Page 42: ...sasına kalın bir bez parçası koyun Ütünüzü bezin üzerine yerle tirin buhar teti ini basılı tutun Buhar teti ine basarken buharla birlikte su da çıkmayana kadar ütüyü yava ça ileri geri hareket ettirin Ütünün tabanından sıcak kirli su çıkar 5 Buhar kazanlı ütüyü kapatın ve 2 saat boyunca so umaya bırakın 6 EASY DE CALC dü mesini çıkarın ve suyun bir kaba bo altın EASY DE CALC dü mesini tekrar takın...

Page 43: ...nında birikiyor Buhar kazanlı ütünün kirecini düzenli olarak temizleyin Bkz Temizlik ve bakım bölümündeki Tabanın temizlenmesi Buhar üreticinin içinde çok miktarda kireç ve mineral birikmi tir Buhar kazanlı ütünün kirecini düzenli olarak temizleyin Bkz Temizlik ve bakım bölümü ÖNEML Buhar kazanlı ütünün kirecinin temizlenmesi kısmı Ütü kuma üzerinde parlaklık veya iz bırakıyor Örne in diki leri ve...

Page 44: ...4239_000_9325_1_DFU_Booklet_Luxury_v3 indd 44 30 04 14 09 44 ...

Page 45: ...4239_000_9325_1_DFU_Booklet_Luxury_v3 indd 45 30 04 14 09 44 ...

Page 46: ...4239 000 9325 1 4239_000_9325_1_DFU_Booklet_Luxury_v3 indd 46 30 04 14 09 44 ...

Reviews: