background image

DVD Portable Player 


 PET704 / PET704P 


All version 


      3141 785 31585 


Version 

1.5 


TABLE OF CONTENTS 


Chapter 


Technical Specification & Service Tips…………..………..  1 
Safety Instructions……………………………………………..  2 
Instruction for Use……………………………………………… 3 
Mechanical Instructions………………………………………. 4 
Troubleshooting …………………………………………………5 
Overall Block Diagram…………………………………………. 6 
Electrical Diagram……………………………………………… 7 
Exploded View Diagram & Service Part List………………. 8 
Revision List…………………………………………………….  9 


©

Copyright 2005 Philips Consumer Electronics B.V. Eindhoven, The Netherlands 

All rights reserved. No part of this publication may by reproduced, stored in a 
retrieval system or transmitted, in any form or by any means, electronics, 
mechanical, photocopying, or otherwise without the prior permission of Philips 


Service Manual 


Summary of Contents for PET704

Page 1: ...ng 5 Overall Block Diagram 6 Electrical Diagram 7 Exploded View Diagram Service Part List 8 Revision List 9 Copyright 2005 Philips Consumer Electronics B V Eindhoven The Netherlands All rights reserved No part of this publication may by reproduced stored in a retrieval system or transmitted in any form or by any means electronics mechanical photocopying or otherwise without the prior permission of...

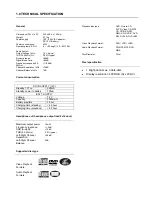
Page 2: ...ry 100uA BATT SUPPLY Voltage 7 2V Capacity 2300mAH Battery playtime 3 hour Charging time standby 4 0 hour Charging time playback 6 0 hour Headphone out headphone output load 2x16 ohm Maximum output power 10mW Frequency response 3dB SNR A wght 76dB THD 0 2 20kHz 0 2 typical Left Right Channel Separation 55dB Left Right Channel Balance 2dB Supported disc type Video Playback Formats Audio Playback Fo...

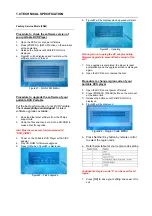
Page 3: ...er on the Portable DVD Player with AC DC adaptor 4 Play CD ROM for firmware upgrade 5 Press OK when Figure 2 is displayed Figure 2 Flash upgrade 6 Figure 3 will be displayed and upgrade will start Figure 3 Updating Warning Do not unplug the AC adaptor during firmware upgrade to prevent flash corrupt of the set 7 Once upgrade is completed the player is reset automatically and the upgrade screen is ...

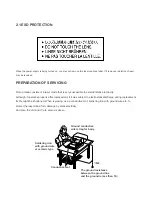
Page 4: ... caso di non osservazione della più grande cauzione alla loro manipolazione Durante le riparazioni occorre quindi essere collegato allo stesso potenziale che quello della massa dell apparecchio tramite un braccialetto a resistenza Assicurarsi che i componenti e anche gli utensili con quali si lavora siano anche a questo potenziale Pour votre sécurité ces documents doivent être utilisés par des spé...

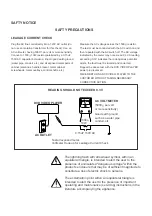
Page 5: ... operates properly after replacement if it was subject to electrostatic discharge during replacement its life might be shortened When replacing use a conductive mat soldering iron with ground wire etc to protect the laser diode form damage by static electricity And also the LSI and IC are same as above Soldering iron with ground wire or ceramic type Ground conductive wrist strap for body Conductiv...

Page 6: ...xists the fault must be located and corrected Repeat the above test with the DVD VIDEO PLAYER power plug reversed NEVER RETURN A DVD VIDEO PLAYER TO THE CUSTOMER WITHOUT TAKING NECESSARY CORRECTIVE ACTION READING SHOULD NOT EXCEED 0 3V DVD VIDEO PLAYER AC OUTLET AC VOLTMETER Test all exposed metal Voltmeter Hook up for Leakage Current Check 0 15uF 150V AC 1500 10W 5000 per volt or more sensitivity...

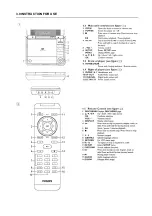
Page 7: ...3 0 INSTRUCTION FOR USE ...

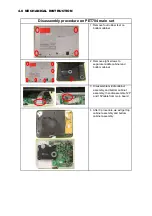
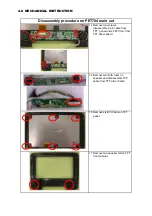
Page 8: ...binet and bottom cabinet 3 Disassemble middle cabinet assembly and bottom cabinet assembly then disassemble 12P and 15Pcable from main board 4 After 3 procedure we will get top cabinet assembly and bottom cabinet assembly Disassembly procedure on PET704 main set 4 0 MECHANICAL INSTRUCTION ...

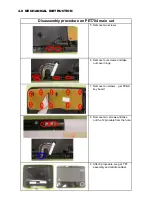
Page 9: ...ake out cover hinge 7 Remove ten screws get PCBA key board 8 Remove two screws and take out the 12pin cable from the hole 9 After 8 procedure we get TFT assembly and middle cabinet Disassembly procedure on PET704 main set 4 0 MECHANICAL INSTRUCTION ...

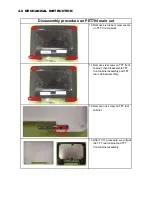
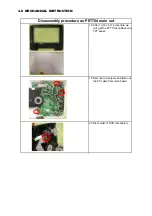
Page 10: ...front cabinet then disassemble TFT front cabinet assembly and TFT rear cabinet assembly 12 Remove one screw on TFT rear cabinet 13 After 10 11 procedure we will get the TFT rear cabinet and TFT front cabinet assembly Disassembly procedure on PET704 main set 4 0 MECHANICAL INSTRUCTION ...

Page 11: ...4 FFC foil from TFT driver board 15 Remove two EVA foam on speaker and disassemble 15P cable from TFT driver board 16 Remove six EVA foam on TFT panel 17 Remove two speaker felt on TFT front cabinet Disassembly procedure on PET704 main set 4 0 MECHANICAL INSTRUCTION ...

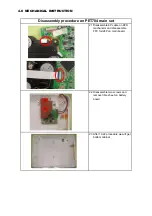
Page 12: ... procedure we will get the TFT front cabinet and TFT panel 19 Remove tow screws and take out the 5P cable from main board 20 Slot solder of DVD mechanism Disassembly procedure on PET704 main set 4 0 MECHANICAL INSTRUCTION ...

Page 13: ...hanism and disassemble FFC foil 24P on main board 22 Disassemble two screws and remove fibre sheet on battery board 23 After 19 22 procedure we will get bottom cabinet Disassembly procedure on PET704 main set 4 0 MECHANICAL INSTRUCTION ...

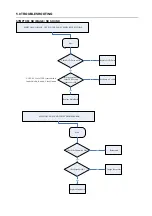
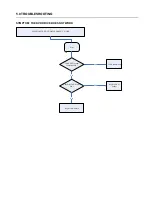
Page 14: ...t Check Battery capacity BATTERY CAN T Power ON Check charging function OK SET OK No Defect return set to Customer Check adaptor power ON OK no Check the Power ON button and cable OK Replace Main Board Replace Button or Cable yes Yes NO No Yes Yes No ...

Page 15: ...PEnote and connection is OK Replace DVD Drive Check DVD Drive work Replace Main Board Exchange AV cable NOTE AV Cable TYPE from outside to Inside L Audio R Audio Video Ground no yes no yes SYMPTOM NO SOUND COMES FROM SPEAKER Start Check the Connection OK Reinsertion Check speaker OK Replace Main Board Change the speaker no yes no yes ...

Page 16: ...ESHOOTING SYMPTOM THE DVD DRIVE DOES NOT WORK SYMPTOM THE DVD DRIVE DOESN T WORK Start Replace DVD Loader Check the DVD Loader OK Replace main board NO Yes Yes Cable Reinsertion NO Check DVD Loader connection OK ...

Page 17: ...TOM ADAPTOR CANNOT POWER ON Start Check Adaptor OK Adaptor can not Power ON Change adaptor SET OK Return set to Customer NO Check the Power ON button and cable OK Replace Main Board Replace Button or Cable Yes NO Yes No YES OK ...

Page 18: ...T WORK SYMPTOM THE REMOTE CONTROL CAN NOT WORK Start Check TOP board OK Replace main board Yes Yes Cable Reinsertion NO Check CABLE form bottom board to top board connection OK Replace IR receiver Return to custormer OK OK Replace top board NO NO OK ...

Page 19: ...5 0 TROUBLESHOOTING SYMPTOM NO SOUND FROM HEADPHONE ...

Page 20: ...DISPLAY FAILURE SYMPTOM LED Display Fail Start Check TOP board OK Replace main board NO Yes Yes Cable Reinsertion NO Check CABLE form Main board to top board connection OK Replace LED Return to custormer OK Replace top board NO OK OK ...

Page 21: ...NG SYMPTOM KEY BOTTON FAILURE SYMPTOM Key Botton Fail Start Check KEY board OK Replace main board NO Yes Yes Cable Reinsertion NO Check CABLE form board to board connection OK Return to custormer OK Replace KEY board OK ...

Page 22: ...6 0 OVERALL BLOCK DIAGRAM ...

Page 23: ...7 0 Electrical Diagram Component Layout ...

Page 24: ...7 0 Electrical Diagram Component Layout ...

Page 25: ...7 0 Electrical Diagram Component Layout ...

Page 26: ...7 0 Electrical Diagram Component Layout MAIN PCB TOP LAYER ASSEMBLY ...

Page 27: ...7 0 Electrical Diagram Component Layout MAIN PCB BOTTOM LAYER ASSEMBLY ...

Page 28: ...7 0 Electrical Diagram Component Layout MAIN PCB TOP LAYER SILKSCREEN ...

Page 29: ...7 0 Electrical Diagram Component Layout MAIN PCB BOTTOM LAYER SILKSCREEN ...

Page 30: ...7 0 Electrical Diagram Component Layout CHARGE PCB TOP LAYER ASSEMBLY ...

Page 31: ...7 0 Electrical Diagram Component Layout CHARGE PCB BOTTOM LAYER ASSEMBLY ...

Page 32: ...7 0 Electrical Diagram Component Layout CHARGE PCB TOP LAYER SILKSCREEN ...

Page 33: ...7 0 Electrical Diagram Component Layout CHARGE PCB BOTTOM LAYER SILKSCREEN ...

Page 34: ...7 0 Electrical Diagram Component Layout ...

Page 35: ...7 0 Electrical Diagram Component Layout ...

Page 36: ...8 0 EXPLODED VIEW DIAGRAM SERVICE PART LIST 110 100 380 120 130 200 205 210 220 230 310 220 230 300 340 350 320 320 370 330 360 ...

Page 37: ...704P IN PAIR 230 314017903041 SPEAKER FELT PET704 PET704P 300 314017903381 CABINET FRONT TFT ASSY PET704 300 314017905941 CABINET FRONT TFT ASSY PET704P 310 314017902901 CABINET REAR TFT PET704 310 314017906131 CABINET REAR TFT 2 PET704P 320 314017903371 CABINET MIDDLE ASSY PET704 320 314017905951 CABINET MIDDLE ASSY PET704P 330 314017750701 CABINET BOTTOM ASSY PET704 330 314017905961 CABINET BOTT...

Page 38: ...t list for PET704 75 Version 1 2 3141 785 31582 Updated service part list for PET704 58 Version 1 3 3141 785 31583 Updated service part list for PET704 98 Version 1 4 3141 785 31584 Section 8 corrected 12NC of AC DC adaptor 75 from 824041001641 to 824041006041 Version 1 5 3141 785 31585 Updated service part list for PET704P 05 ...

Reviews: