


11
10
3.
Release the Code Search button.
4.
Press and release
MODE
.
The LED blinks of
f once.
5.
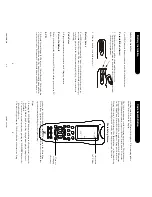
Press and release desired Mode button (TV
, VCR, SA
T
,
etc.) on the rubber keypad. The LED blinks of
f once.
6.
Press and release
CODE
.
The LED blinks of
f once.
7.
Press the CHANNEL UP button (or POWER or PLA
Y)
on the rubber keypad repeatedly until the device to be
controlled changes channel. If you overshoot the code
required, press the CHANNEL DOWN button to back-
track through the Library
. Press CHANNEL UP to
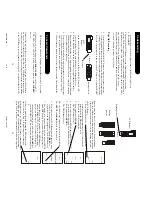
Code Identification
CHANNEL UP button.
Lets you identify codes installed in the remote.
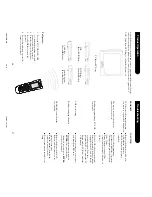
1.
Press and hold Code Search until the LED remains on
(after approximately 2-3 seconds) and the display shows
the Main Setup Screen.
2.
Release the Code Search button.
3.
Press and release
MODE
.
The LED blinks of
f once.
4.
Press and release the desired Mode button (TV
, VCR,
SA
T
, etc.) on the rubber keypad. The LED blinks of
f
once.
5.
Press and release
CODE
.
The LED blinks of
f once.
6.
Press and release the Code Search button.
The LED blinks of
f once.
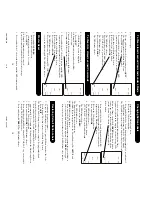
7.
The display shows the code using the LCD digits. The 3
digits are shown in sequence for 1 second each. The LED
blinks of
f for each digit displayed. This sequence is only
SET
U
P
QU
IT
MO
D
E
SL
EEP
SET
U
P
QU
IT
LE
A
RN
SC
RE
EN
KE
Y?
CO
DE
8.
Press
QUIT
.
Preprogrammed and Learned codes are not af
fected by these changes.
T
o
enter Codes directly from Library Code T
ables using the Code Search
Direct Librar
y Code Entr
y
Code Sear
c
h
button. When a valid code is entered for a Mode, that Mode
is reset to its Default Button Label screen and any learned
functions for that Mode are deleted i.e., the Mode is reset
back to its power-on default configuration.
1.
Press and hold Code Search button until the LED
remains on (after approximately 2-3 seconds) and the
display shows the Main Setup Screen.
2.
Release the Code Search button.
3.
Press and release
MODE
.
The LED blinks of
f once.
4.
Press and release the desired Mode button
(TV
, VCR, SA
T
, etc.) on the rubber keypad.
The LED blinks of
f once.
after the last digit is entered. For an invalid code, the LED flashes three times
before going of
f. In both cases, the display returns to the Main Setup Screen.
7.
Press
QUIT
.
If you can’
t find the code for your brand of product in the code list, you can
search the entire Code Library for a particular device that might not be listed
in the code list or is listed under a dif
ferent manufacturer
. When a valid code is
entered for a Mode, the Default Button Label screen is used
and any learned functions are deleted for that Mode i.e., the
Mode is reset back to its power-on default setting.
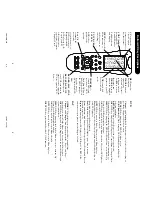
1.
T
urn on the device (TV
, VCR, etc.) to be controlled.
2.
Press and hold Code Search until the LED remains on
(after approximately 2-3 seconds) and the display shows
the Main Setup Screen.
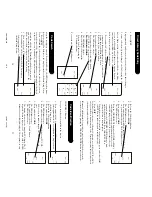
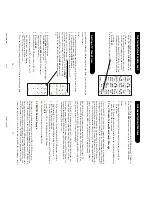
SET
U
P
QU
IT
MO
D
E
SL
EEP
SET
U
P
QU
IT
KE
Y
?
CO
DE
6
4
2
5
0
1
8
3
79
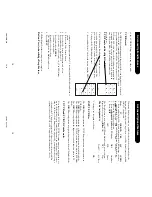
SET
U
P
QU
IT
MO
D
E
SL
EEP
SET
U
P
QU
IT
LE
A
RN
SC
RE
EN
KE
Y?
CO
DE
5.
Press and release
CODE
.
The LED blinks of
f once.
6.
Enter the 3 digit Code from the
Library Code T
ables using the
LCD number buttons.
For a valid code, the LED blinks of
f
SET
U
P
QU
IT
MO
D
E
SL
EEP
change direction to forward again.
8.
When the device to be controlled changes channel, press and release
OK
,
or MUTE on the rubber keypad to install the code.
9.
Press
QUIT
.
If the Device does not have a Channel Up button, use the Play (VCR or DVD
only) or the Power button instead. Code Search starts from the currently stored
code number under that Mode.
Reverse Code Sear
ch:
It is possible to start a manual Code Search in the
reverse direction by pressing the CHANNEL DOWN button instead of the
SET
U
P
QU
IT
LE
A
RN
SC
RE
EN
KE
Y?
CO
DE
PM8TSMD.p65
12/9/02, 4:53 PM
10-11


