


13
12
Any Mode chosen for Volume/Mute control MUST have
its own Volume/Mute function or the Volume/Mute
buttons will do nothing.
Setting ALL Volume/Mute Control to any one Mode
This routine can set all Modes to “punch-through” to
any one chosen Mode for Volume/Mute button control
without the needing to change to that Mode.
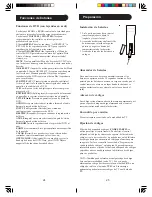
1. Press and hold the
CODE SEARCH
button until the
red indicator turns on, then release the button.
2. Press and hold the
MUTE
button until the red
indicator blinks off, then release the button.
3. Press and release the desired Mode button (
TV
,
VCR
, etc.) for Volume/Mute control, the red
indicator blinks then stays on.
4. Press and release the
MUTE
button and the red
indicator turns off. The red indicator will blink
rapidly for three seconds if the Mode you have
selected has no Volume/Mute control.
5. All other Modes will now punch-through to your
chosen Mode for Volume/Mute control.
6. All “Visual” and “Audio” programmed Modes will
now punch-through to the respective Modes you
have chosen for Volume/Mute control.
Setting any Mode to use its own Volume/Mute Control
This routine can set any Mode to use only its own
Volume/Mute control. Note - If your chosen Mode has
no Volume/Mute functions of its own then the Volume/
Mute buttons will do nothing.
1. Press and hold the
CODE SEARCH
button until the
red indicator turns on, then release the button.
2. Press and hold the
MUTE
button until the red
indicator blinks off, then release the button.
3. Press and release the desired Mode button (
TV
,
VCR
, etc.), the red indicator blinks then stays on.
4. Press and release the
VOLUME-
(Down) button, the
red indicator blinks then stays on.
5. Press and release the
MUTE
button and the red
indicator turns off.
6. All “Visual” and “Audio” programmed Modes will
now punch-through to the respective Modes you
have chosen for Volume/Mute control.
Setup, cont.
Controlling Devices Requiring Separate Power On and
Off Buttons, cont.
To turn the TV off, press and release the
POWER
button to transmit the Power Off button command. This
method can be applied similarly to any device and is
available for all Modes. Note this feature is not
supported by all codes.
VCR/DVD/DVR Punch-Through Feature
This remote allows the 6 VCR transport buttons (i.e.
PLAY
,
PAUSE
,
STOP
,
FF
,
REWIND
, and
REC
) to
Punch-Through control from any Mode programmed
with TV, SAT or Cable codes to the last
VCR
,
DVD
or
DVR
programmed Mode you used. Normally other
types of remotes only punch-through (from another
Mode) on the 6 VCR buttons to the device programmed
under the
VCR
Mode button. This is not much use if
you are using a DVD programmed under a Mode other
than VCR. For example, if you have 2 DVD, VCR or DVR
devices programmed into this remote, the last one you
accessed on the remote will be the one that has control
of the 6 VCR transport buttons when in any other
Mode. This feature will not operate if the programmed
TV, SAT or Cable code has its own VCR transport
button control e.g. a TV Combo, SAT/PVR, etc.
Volume/Mute Control and Punch-Through Feature
This remote lets you select which device Mode controls
your Volume/Mute buttons. The remote is initially set
(factory default) for all device Modes programmed with
“
Visual
” codes (e.g. TV, VCR, DVD, DVR, SAT &
CABLE) and “
Audio
” codes (e.g. CD & AUDIO) to use
their own Volume/Mute control if present. If the
programmed “
Visual
” code has no Volume/Mute
operation of its own then those buttons will punch-
through control to the
TV
Mode device without
needing to change to
TV
Mode. Please refer to the next
page for more information.
Setup, cont.


