background image

25

Forward

This key sets the belt direction to forward. Forward is the default 
direction setting when the treadmill is powered on and any time the 
console is in the idle mode. If the belt is already set in the reverse 
direction, it will change the direction of the belt to forward. If the belt 
is moving in reverse when the key is pressed the belt will slow down 
to zero speed and then speed changes in the forward direction are 
allowed. 

Reverse 

This key sets the belt direction to reverse if the belt is already set to 
forward direction. This function only operates in quick start or manual 
mode. If the belt is moving when the key is pressed the belt will slow 
down to zero speed then allow speed changes in the reverse
direction. The speed window will show a minus (-) sign indicating the 
speed is set to reverse.

Acceleration - Deceleration

This function adjusts the acceleration and deceleration rate of the 
walking belt by allowing you to change the amount of time it takes for 
the belt to change speeds. The adjustment value is in seconds. You 
can input how many seconds it takes for the belt to change 1 mph of 
speed. The default setting is 3 seconds, which means the belt will 
take 3 seconds to go from zero to 1 mph. The range can be set from 1 
second to 60 seconds. This function can be disabled in the 
Maintenance mode (see page 58).

Incline

Press this key to return to front incline function if decline function is 
active. 

Summary of Contents for ReCare 7.0 T

Page 1: ...fore operating your new treadmill and save it for future use User manual Register your product and get support at www philips com welcome PTE7000MT ReCare Treadmill 7 0 T Register your product and get support at www philips com welcome PTE7000MT ...

Page 2: ...distributors and manufacturer s representatives we will do all we can to provide many years of successful and prosperous ownership Your warranty and service needs will be addressed either through your regional sales representative or our highly trained service technicians It is their responsibility to provide you with both the technical knowledge and access to service personnel to make your owners...

Page 3: ...ions 5 Important electrical information Important operation instructions 10 Application specification 11 Operating principle 13 Significant physical characteristics 13 8 Significant performance characteristic 14 Intended user profile 15 ...

Page 4: ...r new treadmill 21 Data transfer software instructions 36 Using a heart rate transmitter 40 Assembly instructions for 7 0 T Important assembly instructions Maintenance 71 Specifications Description of packaging symbols Operating the 7 0 T 16 ...

Page 5: ... use an extension cord unless it is 12awg or larger with only one outlet on the end The treadmill should be the only appliance in the electrical circuit Do not attempt to disable the grounded plug by using improper adapters or in any way modify the cord set a serious shock or fire hazard may result along with computer malfunctions To avoid risk of electric shock this equipment must only be con nec...

Page 6: ...an for the purpose it is intended The pulse sensors are not medical devices Various factors including the user s movement may affect the accuracy of heart rate readings The pulse sensors are intended only as exercise aids in determining heart rate trends in general Heart rate monitoring system may be inaccurate Over exercise may result in injury or death If you feel faint stop exercising immediate...

Page 7: ... only Hold the handlebar for support when getting on or off the treadmill To avoid injury please observe all minimum and maximum adjustment settings Wear proper shoes High heels dress shoes sandals or bare feet are not suitable for use on the treadmill Quality athletic shoes are recommended to avoid leg fatigue A safety tether cord is provided with this unit It is a simple magnetic design that sho...

Page 8: ...or use outdoors near a pool or spa or in any other high humidity environment The treadmill is not protected against the ingress of water or partic ulate matter The treadmill is not suitable for use in an oxygen rich environment If not stated otherwise Philips devices are designed for operation in normal climatic surroundings IEC 60601 1 Temperature 10 36 C Relative humidity 30 90 non condensing Ai...

Page 9: ...rounding plug The plug must be plugged into an appropriate outlet that is properly installed and grounded in accordance with all local codes and ordinances Danger Improper connection of the equipment grounding conductor can result in a risk of electric shock Check with a qualified electrician or serviceman if you are in doubt as to whether the product is properly grounded Do not modify the plug pr...

Page 10: ...rogram Start the user at a safe exercise level Do not allow the user to be over exerted Symptoms to watch for but not limited to are Shortness of breath or difficulty in breathing pain or discomfort feeling faint Make sure the user warms up and cools down properly to avoid over taxing the cardio vascular system Allow three to five minutes of warm up and cool down during each exercise session Impor...

Page 11: ...s no particular restriction on age gender height and nationality Maximal patient s weight is 200kg Patient must be ambulatory Patient should have medical clearance before starting any rigorous exercise program This is especially important for person with a history of heart disease or other high risk factors Intended part of the body or type of tissue applied to or interacted with Contact site hand...

Page 12: ...nce standard ambient room lighting is sufficient Viewing distance 1 m Viewing angle 120 Physical Temperature range 10 C 36 C Relative humidity range 30 R H 90 R H non condensing Hygienic requirements there is no particular restriction on hygienic requirements Frequency of use Dependent on therapist s plan Location Intended for hospital use clinic use home use and research in academic institutions ...

Page 13: ...o reach the requested speed The motor drives the front roller which in turn moves the walking belt through pulleys and fan belt The incline motor is operated when the operator presses the incline keys A command is generated that is transmitted to the incline control board where a relay is energized sending AC power to the motor until it reaches the desired position Operating principle Please refer...

Page 14: ...14 Please refer to Unique uses for the 7 0 T in operating the 7 0 T Significant performance characteristic ...

Page 15: ...al therapy Professional competence The operator should have the physical therapist license Intended Installer There is no particular restriction on age gender height weight ability and culture Education High School or above Knowledge The installer shall be able to manipulate this product properly Discipline The installer shall be given a specific training by manufacturer Experience The installer m...

Page 16: ...e the patient walk to improve ambulation and range of motion after knee hip ankle surgery or neurological conditions Allow patients to perform cardiovascular exercise Unique uses for the 7 0 T The walking belt allows for both forward and reverse walking The front and rear incline allows for uphill and downhill walking Symmetry program measures distance between left and right step lengths Graphical...

Page 17: ...e heart rate function on this product is not a medical device and should not be relied on when accurate readings are necessary Some people including those in a cardiac rehab program may benefit from using an alternate heart rate monitoring system like a chest or wrist strap Various factors including movement of the user may affect the accuracy of your heart rate reading The heart rate reading is i...

Page 18: ...ents 1 Hand grips 2 Electronic console 3 Safety lanyard 4 Adjustable hand rails 5 Handrail horizontal adjustment 6 Handrail vertical adjustment 7 Handrail lift bar 8 Rear step 9 Rear incline 10 Front incline Features 10 2 3 4 5 6 7 8 9 1 ...

Page 19: ...7 0 T Use a 1 2 wrench to loosen the top nut of the leveler Adjust the levelers by hand as necessary to remove any wobble in the unit Then tighten the top nut against the bottom of the stabilizer tube Make sure the bottom nut remains cinched against the leveling foot Connecting to A C power The 7 0 T A C mains input connector is located in the front of the unit The input module has an input connec...

Page 20: ...desired position and lock the knob Adjusting the hand rail horizontal position Turn both the left and right levers counterclockwise one rotation Move the rails to the desired position and re lock the levers There are numbered scales on the tubes for repeatable settings The levers may be blocked by the rotating tube when position is changed The levers can be repositioned by pulling out and rotating...

Page 21: ... software version i e VER 1 0 and the distance window will display an odometer reading indicating how many virtual miles or Kilometers the treadmill has gone The time window displays how many hours the treadmill has been used Operation of your new treadmill Large LED matrix window 16 character messsage center Incline buttons Tablet friendly reading rack holder Heart rate profile Speed buttons 1 2 ...

Page 22: ...key is pressed the first option in the menu appears Use the up down arrows to scroll through the menu and press the enter key to select an option Set up menu Patient data Age used in VO2 and heart rate programs Gender used in VO2 program Weight used in METS and calorie calculations and VO2 program Height used in the Symmetry program Quick start This is the quickest way to start an exercise session...

Page 23: ...nt incline range 0 to 15 Rear incline range 0 to minus 10 Distance Displayed in miles or kilometers selected in Maintenance mode see page 58 Speed Displayed in mph or kph Range from minus 3 mph 5 kph to plus 10 mph 16 kph in 0 1 increments True zero speed provided by a mechanical brake when ever motor is idle The message window is the main display for programming instructions and relevant measurem...

Page 24: ...rt key If the stop reset button is pressed twice during a workout ends the program and a summary of information for the exercise session will be displayed If the stop reset key is held down for 3 seconds the console will perform a complete reset During data entry for a program the stop reset key performs a previous screen function This allows you to go back one step in the programming each time yo...

Page 25: ...s moving when the key is pressed the belt will slow down to zero speed then allow speed changes in the reverse direction The speed window will show a minus sign indicating the speed is set to reverse Acceleration Deceleration This function adjusts the acceleration and deceleration rate of the walking belt by allowing you to change the amount of time it takes for the belt to change speeds The adjus...

Page 26: ... used to raise or lower the deck for un weighing the patient Instructions for raising and lowering the deck Press the deck lift key to activate the program The grade window will display 01 which indicates the first level The starting height from the step to the deck at level 1 is 5 25 inches 13 34cm The height will be displayed in the message window The height from the floor to the step is 4 inche...

Page 27: ... up and down keys or the numeric key pad then press the enter key to accept Now you are finished editing the settings and can begin the program by pressing the start key All data calculations will use the patient information from the set up function set up key at top left of console During the manual program you will be able to scroll through the data in the message window by pressing the display ...

Page 28: ...ith the default settings All data calculations will use the patient information from the set up function set up key at top left of con sole After selecting a program press enter to set the program time The Time window will blink with the default value of 30 minutes You may use any of the up down keys to adjust the time After adjusting the time press enter Note You may press start at any time durin...

Page 29: ... the message window will show Name A if there is no name saved If the name Custom Workout had been previously saved the message window will show Name Custom Workout and the C in Custom will be blinking If there is a name saved you can change it or you may press the stop key to keep the name and continue to the next step If you want to enter a name use the up and or the down key to change the first...

Page 30: ...ously adjust ed segment Repeat the same process as the last segment then press enter Continue this process until all twenty four segments have been set The message window will then tell you to press enter to save the program After saving the program the message window says New program saved then will give you the option to start or modify the program Pressing stop will exit to the start up screen ...

Page 31: ...4 3 00 5 0mph 2 43 4 4 1 3 15 5 0mph 4 44 1 4 2 3 30 5 0mph 4 45 15 4 3 3 45 5 0mph 4 46 2 4 4 4 00 5 0mph 4 46 5 5 1 4 15 5 5mph 4 48 6 5 2 4 30 5 5mph 4 50 5 3 4 45 5 5mph 4 51 4 5 4 5 00 5 5mph 4 52 8 6 1 5 15 5 5mph 6 53 9 6 2 5 30 5 5mph 6 54 9 6 3 5 45 5 5mph 6 56 6 4 6 00 5 5mph 6 57 7 1 6 15 6 0mph 6 57 7 7 2 6 30 6 0mph 6 58 8 7 3 6 45 6 0mph 6 60 2 7 4 7 00 6 0mph 6 61 2 8 1 7 15 6 0mph ...

Page 32: ... adjust the weight setting shown in the distance window using the up and down keys then press enter to continue Now press start to begin the test During the test The console must be receiving a steady heart rate for the test to begin You may wear a heart rate chest strap transmitter The test will start with a 3 minute warm up at 3 mph 4 8 kph before the actual test begins The data shown during the...

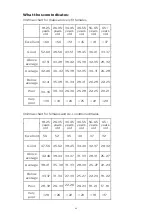
Page 33: ... 31 26 28 Below average 37 41 35 39 31 34 29 31 22 25 Poor 30 36 30 34 26 30 25 28 22 25 20 21 Very poor 30 30 26 25 22 20 18 25 26 35 36 45 46 55 56 65 65 26 29 years old years old years old years old years old years old Excellent 56 52 45 40 37 32 Good 47 56 45 52 38 45 34 40 32 37 28 32 Above average 42 46 39 44 34 37 31 33 28 31 25 27 Average 38 41 35 38 31 33 28 30 25 27 22 24 Below average 3...

Page 34: ...mmary gives the average cadence step lengths and average symmetry for the amount of time the user walked Press the symmetry key then press the enter key The message window will prompt you to enter the time for the program You may enter the time using the up and down keys or the numeric key pad then press the enter key to accept and proceed to the next screen Now you are finished editing the settin...

Page 35: ...gth numbers shown indicate that the left leg is stepping longer than the right leg 26 vs 15 inches The graph reflects the longer stride of the left leg If the step length was even only two dots would be lit on the bottom center of the graphic screen Note For some types of gaits it may be possible that the left right data can be displayed in reverse If this occurs press the symmetry program key to ...

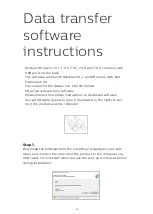
Page 36: ...co com software Please follow the website instructions to download software Use a USB cable type a to type b illustrated to the right to con nect the product and the computer Step 1 Download the software from the link http www dyaco com soft ware and connect the console of the product to the computer via USB cable Click Install when you see the pop up window as below during installation Data trans...

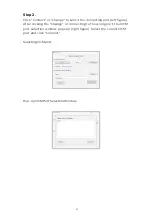
Page 37: ...ect the connecting port left figure After clicking the Change or connecting to the wrong port the COM port selection window pops up right figure Select the correct COM port and click Connect Selecting COM port Pop Up COM Port Selection Window ...

Page 38: ...ick the Record button to start collecting data Click Stop or quit the program from the console of the product to stop the data collection process The saved data can be found at the assigned destination Click record button Recording complete Philips Data Transfer V1 0 Philips Data Transfer V1 0 Philips Data Transfer V1 0 Philips Data Transfer V1 0 T T ...

Page 39: ...39 The file is saved in CSV format which can be opened by Microsoft Excel Example shown below ...

Page 40: ...ightly as possible as long as the strap is not too tight to remain comfortable Position the transmitter with the logo centered in the middle of your body facing away from your chest some people must position the transmitter slightly left of center Attach the final end of the elastic strap by inserting the round end and using the locking parts secure the transmitter and strap around your chest Posi...

Page 41: ...dy signal The length of range may vary somewhat but generally stay close enough to the console to maintain good strong reliable readings Wearing the transmitter immediately against bare skin assures you of proper operation If you wish you may wear the transmitter over a shirt To do so moisten the areas of the shirt that the electrodes will rest upon Note The transmitter is automatically activated ...

Page 42: ... oriented so the logo is right side up The antenna that picks up your heart rate is very sensitive If there is an outside noise source turning the whole machine 90 degrees may de tune the interference If there is another person wearing a chest strap within 1 meter it will interfere If you continue to experience problems contact your dealer Heart rate program operation To start the HR program follo...

Page 43: ... settings by pressing the Enter key NOTE At any time during the editing of data you can press the Stop key to go back one level or screen If you want to increase or decrease the workload at any time during the program press the Up or Down key This will allow you to change your target heart rate at any time during the program During the HR program you will be able to scroll through the data in the ...

Page 44: ...e Step 1 Step 2 Assembly instructions for 7 0 T 104 3 8 x 3 3 4 6PCS 58 3 8 x 2T x 4H 6PCS 59 3 8 x 25 x 2T 6PCS 153 3 8 x 3 4 6PCS 58 3 8 x 2T x 4H 6PCS 104 3 8 x 3 3 4 6PCS 73 M5 x12L 6PCS 59 3 8 x 25 x 2T 6PCS ...

Page 45: ...45 Step 3 Step 4 Tools 110 M5 x 10L 6PCS 112 M5 x 30L 6PCS 153 3 8 x 3 4 6PCS 59 3 8 x 25 x 2T 6PCS 226 3 8 x 2 6PCS 113 Philips screw driver 1PCS 137 5mm Allen wrench 1PCS 259 6mm Allen wrench 1PCS ...

Page 46: ...ght tube into the bracket on the base frame taking the slack out so the cable does not get pinched between the tube and the base frame Assemble one 3 8 x 3 3 4 bolt 104 3 8 split washer 58 and 3 8 flat washer 59 through the top hole in the retaining plate 21 and corresponding top hole in the upright tube and screw into the base frame Now install the other two bolts 104 and washers 58 59 and hand t...

Page 47: ... the console frame 5 to the upright tubes 18 19 with six 3 8 x 3 4 bolts 153 3 8 split washers 58 and 3 8 flat washers 59 Be careful not to pinch the computer cables Firmly tighten the six bolts 104 at the bottom of the uprights and install the two end caps 32 33 with the four M5 x 12mm screws 73 113 137 259 153 58 59 59 58 58 108 3 4 108 73 73 32 33 73 73 104 5 18 19 1 285 282 284 ...

Page 48: ...ets Items 3 4 please be sure to slide the brackets all the way towards the back of the console frame before tightening the bolts Push mounting bracket all the way towards the back of the console then tighten screws Important assemble instructions ...

Page 49: ...s in back of the console Mount the console 36 to the console frame 5 with two M5 x 30mm screws 112 in the top holes and two M5 x 10mm screws 110 in the bottom holes in the back side of the console frame 285 282 284 36 285 282 284 5 112 112 110 110 113 ...

Page 50: ...nd tighten them Thread the eight 3 8 x 2 bolts 226 into the sides of the handrails Once all the bolts are installed tighten all of them securely Install the Lift Bars 192 to the parallel bars and secure with the knobs 207 Install the rear step 181 by sliding into the receiving tubes under the rear of the deck and secure with the two pins 217 Raising the rear incline may make it easier to line up t...

Page 51: ...212 212 213 213 66 66 66 66 198 198 198 198 199 199 200 200 60 203 203 203 203 206 206 206 206 214 214 214 214 214 214 207 207 207 216 216 216 216 217 217 218 218 218 218 218 218 218 218 221 221 51 51 231 41 134 223 223 224 224 224 226 226 226 153 227 227 228 228 228 228 40 40 40 40 230 230 231 222 77 148 139 36 153 73 125 73 125 125 73 281 62 62 153 58 58 59 58 59 134 119 119 119 119 119 119 119 ...

Page 52: ...ler w pulley Rear roller Running deck Running belt Cushion a Middle Cushion b front rear Drive motor belt poly V 1380m m_aluminum foot rail Aluminum upright l Aluminum upright r Upright fixing plate l Upright fixing plate r Ø82 Ø14 35m m_transportation wh Eel Incline rubber foot 800m m_safety key Front motor cover Motor top cover Top motor cover plate Motor base cap r Motor base cap l Foot rail ca...

Page 53: ...head cap bolt M5 10m m_phillips head screw M5 30m m_phillips head screw Phillips head Screw driver Ø3 5 12m m_tapping screw M5 1 5t_split washer M5_star washer M8 p1 25 35m m_flat head countersink bolt Ø3 8m m_tapping screw Ø10 Ø24 3 0t_nylon washer 3 8 Unc16 2 _socket hea D cap bolt L allen wrench 3 8 Unc16 2 1 4 _socket head cap bolt Inverter mountingbracket M3 10m m_sheet metal screw Ø10 Ø14 14...

Page 54: ...handgrip foam Ground isolation cap 3 8 3 4 _hex head bolt M10 P1 5 65m m_hex head bolt M10 P1 5 50m m_hex head bolt Ø10 1 5t_split washer Ø10 Ø19 1 5t_flat washer M10 P1 5 8 0t_nyloc nut 3 8 Unc16 1 1 2 _socket head cap bolt Ø3 8 2 0t_split washer Ø3 8 Ø25 2 0t_flat washer M8 P1 25 45M m_socket head cap bolt Ø8 1 5t_spl It washer Ø8 Ø16 1 0t_flat washer M8 P1 25 110m m_socket head cap bolt M8 P1 2...

Page 55: ... handle bar l Parallel Handle bar r P Bar lift assist handle Fan back plate Fan mounting plate Ø14 Ø10 25m m_podwer metallurgy sleeve Ø20 Ø13 4 41m m_podwer metallurgy sleeve M14 17m m_seat handlebar adj Locking lever Ø54 25m m_transportation wheel Ø60 15m m_rubber foot Ø37 3 8 _adjustment foot pad Ø55 3 8 _adjustment foot pad Plastic tube insert 30m m 30m m_square end cap 30m m 60m m_square end c...

Page 56: ...d socket bolt 1 2 Unc13 2 1 4 _hex head bolt Ø13 Ø26 2 0t_flat washer 1 2 Unc20 8 0t_nyloc nut Ø3 8 Ø35 2 0t_flat washer 3 8 Unc16 1 3 4 _socket head cap bolt Ø14 Ø20 2 0t_flat washer M5 15m m_socket head cap bolt Ø5 Ø12 1 0t_flat washer M6 P1 0 5 0t_nut M5 30m m_socket head cap bolt M5 35m m_socket head Cap bolt Ø15_c ring U Joint step sensor U Joint mountingplate Step magnet holder Plunger step ...

Page 57: ...m_connecting wire white 150m m_connecting wire black Lower control board Inverter a C Motor Encoder a C Motor Fan motor cooling 500m m_motor fan connecting cable black 500m m_motor fan connecting cable white Drive motor Front incline motor Rear inclinemotor Inverter signal cable 2100m m Inverter to lcb cable 800m m Rear inclinecable 2100m m Rs 485 communication cable Step sensor board Step sensor ...

Page 58: ...298 299 300 302 303 304 305 1 1 1 2 1 1 1 Ferrite core 21 4m m Ferrite core 30m m 80m m_connecting cable of motor Ø16 Ø35 1t_flat washer 300m m_connectingwire white 300m m_connectingwire black Ø5 2 0 4t 14 5l_constrict spring ...

Page 59: ...sh will clean the top of the textured belt Allow the belt to dry before using General cleaning Dirt dust and carpet fibers can block air inlets and accumulate on the running belt On a monthly basis vacuum underneath your treadmill to prevent buildup Once a year you should remove the motor hood and vacuum out dirt that may accumulate Unplug power cord before this task Belt adjustments Tread belt te...

Page 60: ...failure Treadbelt tracking adjustment The performance of your treadmill is dependent on the frame running on a reasonably level surface If the frame is not level the front and back roller cannot run parallel and constant belt adjustment may be necessary The treadmill is designed to keep the tread belt reasonably centered while in use It is normal for some belts to drift near one side while the bel...

Page 61: ...sulting from improper tracking tension adjustments is not covered under the warranty Maintenance menu in console software The console has built in maintenance diagnostic software The soft ware will allow you to change the console settings from English to Metric and turn off the beeping of the speaker when a key is pressed for example To enter the maintenance menu may be called Engi neering mode de...

Page 62: ...ne keys for front use speed keys for rear then switch to VR display below Incline keys operate front motor speed keys operate rear motor Hold down up down key to operate motor stop when key is released Motor is allowed to move until limit switch activated MW displays A D values for both position sensors Example of the readings F920 R 70 F Front incline sensor and R Rear incline sensor The readings...

Page 63: ...shows AD _ _ _ TGT 65 Speaker will beep slowly when magnet distance is too far quickly when near and steady when correct User press enter or stop to end calibration Acceleration key lock MW show accel key press enter then MW shows accel locked This is the default If the user presses the up or down key the MW shows accel unlocked Press enter to exit Speed limit setting MW shows speed limit press en...

Page 64: ...enter Default value is 3 0 mph and can be adjusted down to 1 0 mph and up to 5 0 mph Adjust belt speed acceleration time per each 1 0 mph The default is 0 03 seconds and will be shown in the Time window The time can be adjusted down to 0 01 and up to 1 00 minute Adjust belt speed deceleration time per each 1 0 mph The default is 0 03 seconds and will be shown in the Time window The time can be adj...

Page 65: ...rake locked Deck Lube Bad Drive Bad Motor E9 Over I Speed Check Brake Deck Lube Bad Drive Bad Motor E10 Over I Accel Deck Lube Bad Drive Bad Motor E11 Over I Decel Deck Lube Bad Drive Bad Motor E12 EPROM RD Check AC Line V Reset Power Bad Drive E13 EPROM WR Check AC Line V Reset Power Bad Drive E14 Ext Fault Reset Power E15 U Phase I Reset Power Bad Drive E16 W Phase I Reset Power Bad Drive E17 HW...

Page 66: ...Bad Drive E29 I Signl Stop Reset Power Bad Drive E30 CPU Error Electronic circuit fault E31 Fan Drive Fan Bad E32 Analog In Check Wiring Bad Drive E33 Over Trque Mechanical Deck Lube Brake Bad Motor Bad Drive E34 Thrm Ovrld 2 Brake locked Deck Lube Bad Drive Bad Motor E35 Motor Sel Motor Wiring E36 LV Bus Run Check AC Line V Bad Drive E37 LV Bus Check AC Line V Bad Drive E38 Ext BB Para Settings E...

Page 67: ... 36 91 4 cm Height 56 5 143 5cm Product weight 514 8 Lbs 234 Kgs Fuse on inverter Voltage 125 Vac Current 1A Operating Speed 0 4 1 0 sec Breaking Capacity 50A 125 Vac Size 2 65mm X 7 1mm Speed Forward 0 0 to 10 0 mph 0 0 to 16 kph Reverse 0 0 to 3 0 mph 0 0 to 5 kph Readouts Time Grade Distance Speed Pause METS Calories Pace Cadence Left and Right Step Length Symmetry Index Disposal Reference shou...

Page 68: ...60601 1 14 CE conformity to EN 60601 1 EMC Compliance to EN 60601 1 2 Classification Class I measuring Type B ordinary equipment continuous operation This product is classed as ordinary equipment according to IEC EN UL60601 1 and is not protected against the ingress of water Manufacturer ...

Page 69: ... location in a typical commercial or hospital environment Radiated RF IEC 61000 4 3 3 V m 80 MHz to 2 5 GHz 3 V m d 1 2 80 MHz to 800 MHz d 2 3 800 MHz to 2 5 GHz Where P is the maximum output power rating of the transmitter in watts W according to the transmitter manufacturer and d is the recommended separation distance in meters m Field strengths from fixed RF transmitters as determined by an el...

Page 70: ...t of a typical commercial or hospital environment Note If the device is interfered by power or signal cable image quality may be reduced or abnormally displayed Such kind of interference images could be easily identified and differentiated from the physi ological characteristics of patient and longer clinical time consumed but wouldn t have any diagnostic accuracy issue If there is a certain frequ...

Page 71: ...y damaged if dropped or handled without care and attention The contents are fragile Do not use forklift truck here Do not use Spade truck here Do not use Razorback truck here Hand truck only Description of packaging symbols Indicates that the package is heavy and two or more people are required to lift W a r n i n g W a r n i n g ...

Page 72: ...72 Indicates that an object is capable of being recycled not that the object has been recycled or will be accepted in all recycling collection systems Top This side up ...

Page 73: ...d parts as determined by Dyaco at its sole and absolute discretion and covering the cost of labor deemed necessary by Dyaco at its sole and absolute discretion to remedy faults giving rise to applicable warranty claims The war ranty periods set out below are subject to the performance of proper care and maintenance as set out in this user manual by the original purchaser of the equipment Warrantie...

Page 74: ...ial damages so this limitation or exclusion may not apply to you Service call reimbursement to the consumer Service call reimbursement to the dealer that does not involve malfunction or defects in workmanship or material for units that are beyond the warranty period for units that are beyond the service call reimbursement period or units not requiring component replacement Damages caused by servic...

Page 75: ...sfunction increase joint mobility muscle performance and neuromuscular performance Physical therapists select prescribe and implement the use of biophysical agents when the examination findings diagnosis and prognosis indicate the use of these agents to reduce risk factors and complications enhance health wellness or fitness enhance or maintain physical performance or prevent or remediate impair m...

Page 76: ...oduct is shipped to a service center freight charges to and from the service center will be the customer s responsibility For replacement parts shipped while the product is under warranty the customer will be responsible for shipping and handling charges The owner is responsible for adequate packaging upon return to Dyaco Dyaco is not responsible for damages in shipping Make all freight damage cla...

Page 77: ...ips Shield Emblem are registered trademarks of Koninklijke Philips N V used under license This product has been manufactured by and is sold under the responsibility of Dyaco Commercial Medical North America LLC and Dyaco Commercial Mediacl North America LLC is the warrantor in relation to this product ...

Reviews: