background image

3

Institutional Disinfection

For multi-patient use in the hospital/institutional environment, use the Disinfection Guide 
to reprocess the mask between patients. These instructions can be obtained by visiting us 
online at www.philips.com/respironics or by contacting Philips Respironics Customer 
Service at 1-724-387-4000 or Respironics Deutschland at +49 8152 93060.

Dishwasher Instructions

 Caution: 

Use a mild liquid dishwashing detergent only

1.  Remove the headgear. Do not wash the headgear in the dishwasher.
2.  Wash in the top shelf of the dishwasher.
3.  Air dry. Make sure the mask is dry before use.
4.  Inspect all parts for damage or wear; replace any parts that have visibly deteriorated (cracking, 

crazing, tears, etc). Replace the mask if the cushion becomes hardened.

System One Resistance Control

This mask uses the System One Resistance Control setting 

This symbol may appear on your therapy device. This symbol 

represents the level of mask resistance compensation. Match the 

setting to the mask if appropriate.

 Important Notes:


• Verify the System One setting if the mask or mask cushion 

changes. 


• The System One setting is not compatible with masks requiring a 

separate/additional exhalation device.

If your provider has locked the resistance compensation setting, 

you can view the setting but cannot change it, and the screen will 

display a lock symbol. If your provider has disabled the resistance 

compensation, you will not see this setting. 

Putting on the Mask

1.  Loosen the side headgear straps by peeling back the tabs and open the straps to a larger size.
2.  Disconnect one or both of the bottom headgear clips. Grasp the clip with the thumb and index finger 

and in a turning motion, lift the clip upwards with the thumb while pulling the clip away from the  

mask faceplate.

3.  Hold the mask against your face. The top of the cushion will contact your face just above the 

eyebrows. The bottom of the cushion will contact your face just above the chin. Be sure your mouth 

remains slightly open.

4.  Pull the headgear over your head.
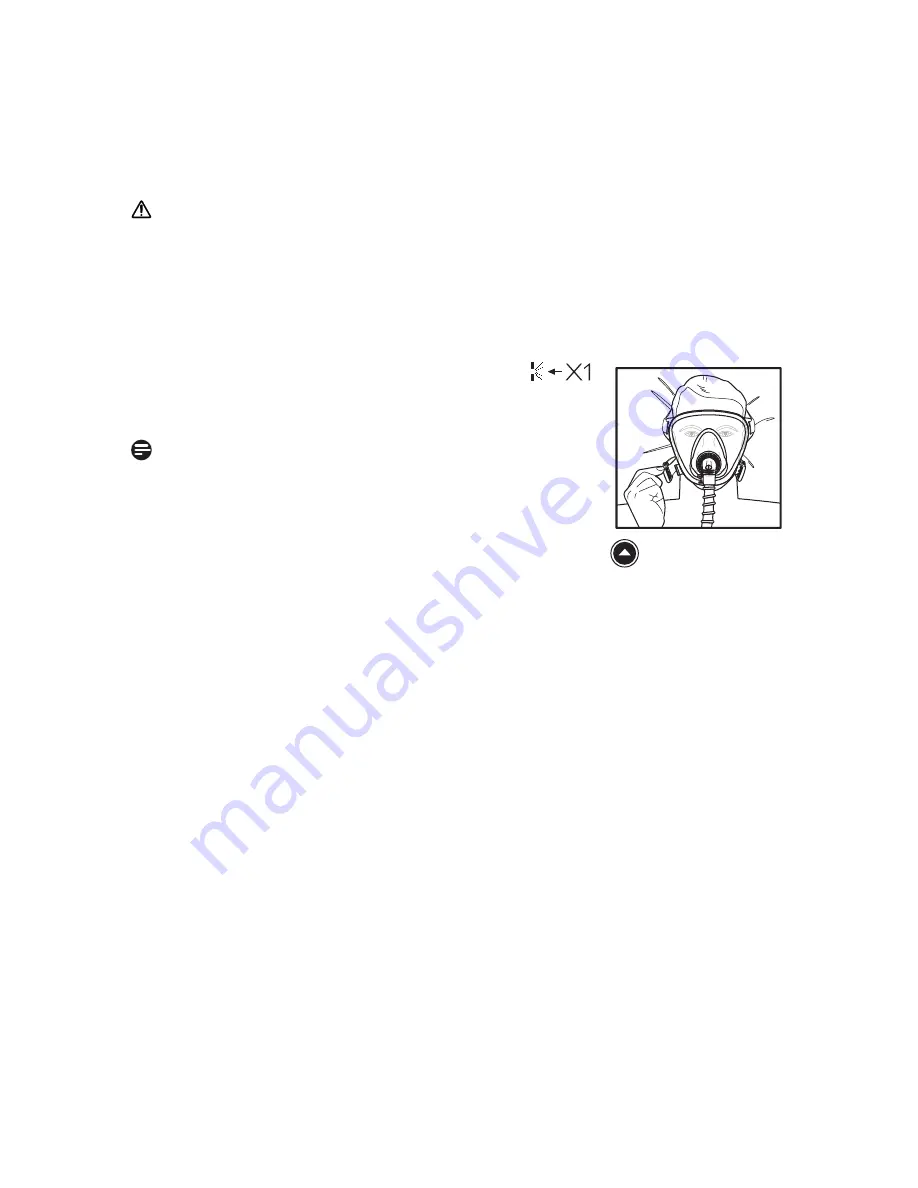
5.  Attach one or both bottom headgear clips by finding the tab on the lower part of the mask faceplate 

with your thumb (Figure 3). Guide and gently push the headgear clip onto the tab with your middle 

and index fingers until it clicks into place.

Achieving the Right Fit

1.  Tighten the side headgear straps. The top strap should lie at the crown of the head. The cross-

strap should sit low on the back of the head.

2.  Tighten the bottom headgear straps. 
3.  Adjust the top headgear strap, if necessary. If the side headgear straps are resting on your ears, 

adjust the top headgear strap to lift the straps slightly off of your ears. DO NOT over tighten 

as it may cause the headgear to slip.

4.  Connect the accessory swivel to the mask elbow.
5.  Connect the tubing that is included with your CPAP or bi-level device to the accessory swivel.
6.  With the airflow on, lie down and breathe normally with your mouth slightly open. Re-seat 

the mask by pulling it directly away from your face and gently setting it back into place. 

7.  Assume different sleeping positions and move your head around.

 Figure 3

Summary of Contents for Respironics FitLife

Page 1: ...Z 2 4 2015 Respironics Inc 1001 Murry Ridge Lane Murrysville PA 15668 USA Respironics Deutschland Gewerbestrasse 17 82211 Herrsching Germany Manufactured for 2015 Koninklijke Philips N V All rights reserved FitLife ...

Page 2: ...the Mask 1 Loosen the side headgear straps by peeling back the tabs and open the straps to a larger size 2 Disconnect one or both of the bottom headgear clips Grasp the clip with the thumb and index finger and in a turning motion lift the clip upwards with the thumb while pulling the clip away from the mask faceplate 3 Hold the mask against your face The top of the cushion will contact your face j...

Page 3: ...s and pull over the top of your head Figure 4 By undoing the headgear clips instead of the tabs you will preserve your adjustments Replacing the Mask Elbow To remove Hold the faceplate swivel and gently pull the elbow from the faceplate swivel Figure 5 To replace Press the mask elbow into the faceplate swivel Do not use excessive force or any tools 6SHFLÀFDWLRQV Warning The technical specification...

Page 4: ... Asphyxia Valve Open to Atmosphere 50 L min Inspiratory Resistance 1 5 cm H2 O Expiratory Resistance 0 9 cm H2 O Deadspace Volume Small 375 mL Large 550 mL Extra Large 717 mL Sound Levels ZHLJKWHG 6RXQG 3RZHU HYHO G ZHLJKWHG 6RXQG 3UHVVXUH HYHO DW P G Storage Conditions Temperature 20 to 60 C Relative Humidity 15 to 95 non condensing Disposal Dispose of in accordance with local regulations ...

Page 5: ...than Respironics Respironics disclaims all liability for economic loss loss of profits overhead or indirect consequential special or incidental damages which may be claimed to arise from any sale or use of the Product Some jurisdictions do not allow the exclusion or limitation of incidental or consequential damages so the above limitation or exclusion may not apply to you THIS WARRANTY IS GIVEN IN...

Page 6: ...oužíván kyslík přítok kyslíku musí být uzavřen pokud není zařízení v činnosti Vysvětlení varování Pokud zařízení není v provozu a přítok kyslíku se ponechá otevřený kyslík dodaný do hadic ventilátoru se může hromadit v prostoru zařízení Při nashromáždění kyslíku v prostoru zařízení hrozí riziko požáru Kyslík podporuje hoření Při používání kyslíku se nesmí kouřit ani v blízkosti zacházet s otevřený...

Page 7: ...ém proudění vzduchu zkontrolujte zda klapka leží naplocho takže okolní vzduch může proudit dovnitř a ven portem pro přívod vzduchu obrázek 2A Poté zapněte proudění vzduchu klapka by nyní měla zakrýt přívod vzduchu a vzduch ze zařízení CPAP nebo z dvojúrovňového zařízení by měl proudit do masky obrázek 2B Jestliže se klapka nezavře nebo nefunguje správně masku vyměňte Varování Přídechový ventil a e...

Page 8: ... poskytovatel zdravotní péče kompenzaci odporu deaktivoval toto nastavení neuvidíte Nasazení masky 1 Uvolněte boční popruhy hlavového dílu tak že odtrhnete poutka a rozevřete popruhy na větší velikost 2 Odpojte jednu nebo obě spony v dolní části hlavového dílu Uchopte sponu mezi palec a ukazováček otáčivým pohybem zvedejte sponu nahoru palcem a současně ji tlačte směrem od přední desky masky 3 Drž...

Page 9: ... horní část hlavy masku sejměte obrázek 4 Když uvolníte spony hlavového dílu a nikoli poutka zůstane zachováno vaše nastavení masky Výměna kolena masky Vyjmutí Držte otočnou část přední desky masky a jemně vytáhněte koleno z otočné části přední desky masky obrázek 5 Výměna Zatlačte koleno masky do otočné části přední desky masky Nepoužívejte nadměrnou sílu ani žádné nástroje Specifikace Varování T...

Page 10: ...ťujícím proti asfyxii otevřeným do okolního prostředí 50 l min Inspirační odpor 1 5 cm H2O Exspirační odpor 0 9 cm H2O Objem mrtvého prostoru Malá 375 ml Velká 550 ml Extra velká 717 ml Hladiny hlučnosti Hladina výkonu zvuku při zátěži A 38 dBA Hladina akustického tlaku v 1 m při zátěži A 30 dBA Podmínky skladování Teplota 20 až 60 C Relativní vlhkost 15 až 95 nekondenzující Likvidace Likvidujte v...

Page 11: ...cem společnosti Respironics Společnost Respironics neodpovídá za žádné ekonomické ztráty ztráty zisku režijní náklady ani nepřímé následné zvláštní nebo náhodné škody které by mohly být nárokovány v souvislosti s prodejem nebo použitím tohoto výrobku V některých jurisdikcích není povoleno vyloučení nebo omezení náhodných nebo následných škod takže výše uvedené omezení nebo výjimka se na vás nemusí...

Reviews: