4
CONTROLS
Note: This recorder has a battery to maintain display functions
and recording mode within 2 weeks in the event of power loss.
When the recorder is received, the unit must be connected to
power source for 48 hours to assure the battery has been
adequately charged.
Safety
Should any solid object or liquid fall into the cabinet,
turn off the unit and have it checked by qualified
personnel before operating it any further.
To disconnect the power cord, pull it out by the plug.
Never pull the cord itself.
Installation Requirements:
Choose a location in which air can pass through the
ventilation holes in the bottom, top and back of the unit
to prevent it from overheating.
Do not install the unit near sources such as radiators or air
ducts or in a place subject to direct sunlight, excessive
dust, mechanical vibrations or shock.
Never bring a magnet or magnetized object near the VCR
because it will adversely affect the performance of the
VCR.
Do not install the unit in an inclined position. The unit is
designed for operation in a horizontal position.
Operation:
Condensation: If you pour a cold liquid into a glass, water
vapor in the air will condense on the surface of glass. This
is the condensation of moisture. Condensation on the
head drum, one of the most crucial parts of the VCR, will
cause damage to the tape. The VCR should not be
operated for at least 2 hours after being moved from a cold
to a hot environment to avoid condensation from
occurring on the head drum.
Cleaning:
Be careful: When surface of the case is wiped with a
volatile agent such as benzine, alcohol, thinner, etc., or a
chemically processed cloth, the surface finish may be
degraded or its coating may peel off.
Repacking:
It is wise to save the packing materials and box in case you
ever need to ship or store your unit.
4.1
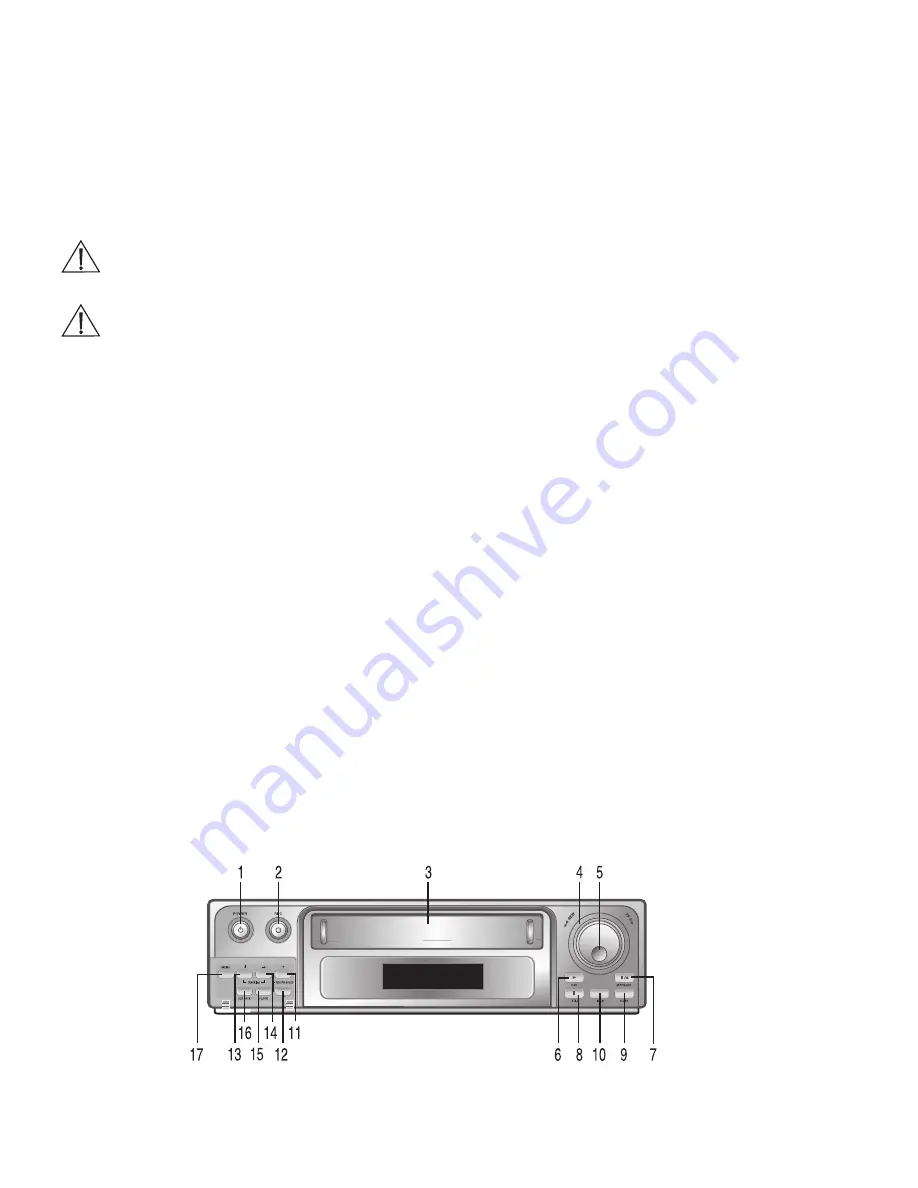
Controls and Functions
Operational Controls:
1. POWER button - Press for on; press again for off.
The display window becomes brighter when the VCR is
switched on.
When you select power off, the timer program is
operational if the option has been setup.
2. REC (RECORD) button - Press to begin recording.
3. Cassette loading slot - Cassette tape is inserted in this slot.
4. Shuttle Ring - The shuttle ring is the outer dial. When the
VCR is in STOP mode, the shuttle ring can be rotated to
the left or right then released, and the VCR will engage in
the REWIND or FAST FORWARD function. While in
the REWIND or FAST FORWARD mode, the shuttle
ring can be rotated and held to engage the LOGIC search
mode. Releasing the shuttle ring returns it to the
REWIND or FAST FORWARD function. Refer to
paragraph 5.6.1 for detailed operation.
5. Jog Ring - The jog ring is the center dial of the jog-shuttle
ring. This ring is used to advance or reverse the video by
single field when in the still mode. Refer to paragraph
5.6.1 for detailed operation.
6. PLAY button - Press to play back a previously recorded
tape. Pressing this button while recording provides
confirmation of the recording operation. The tape plays
back the last 4 seconds of video then returns to the
recording mode.
7. STOP button - Press once to discontinue all tape related
functions. Press a second time to eject the cassette.
8. STILL button - When pressed during recording, tape
movement stops temporarily. Press again to continue the
recording. When pressed during playback, tape movement
stops. Press again to advance by still frame. Press the PLAY
button to continue playback.
9. CLEAR button - Press to delete the information stored on
the screen display, such as Alarm review, Power fail and
Timer program. It can also be used to stop the buzzer
sound.
1-4
PHILIPS
High Density Video Cassette Recorder
D
FIG. 1 - RT30A & RT960A FRONT
Summary of Contents for RT30A
Page 2: ......
Page 26: ...1 24 ...


