background image

3

PL1IRR Remote Control

User’s Guide

PREFACE

About this Guide

The document provides installation and operation instructions for the following product:

• PL1IRR Remote Control (includes two AAA batteries and user’s guide)

Please read all instructions before using this product. 

Retain this manual for future reference

. Additional information

for PL1 LED Luminaires including product descriptions may be downloaded at www.seleconlight.com

Product Description

The PL1IRR Remote Control is used to remotely program and control presets (1 through 6 and Off) of PL1 LED
luminaires (IR-enabled models only) over an unobstructed range of approximately 100 feet. IR-enabled PL1 LED
Luminaires have an integrated infrared (IR) receiver that allows them to receive IR commands from the PL1IRR
Remote Control. Using the Remote, colors (full color mixing)/presets/intensity can be programmed/selected, raised
and lowered, and fixtures may be turned On and Off.

Before Using the Infrared Remote

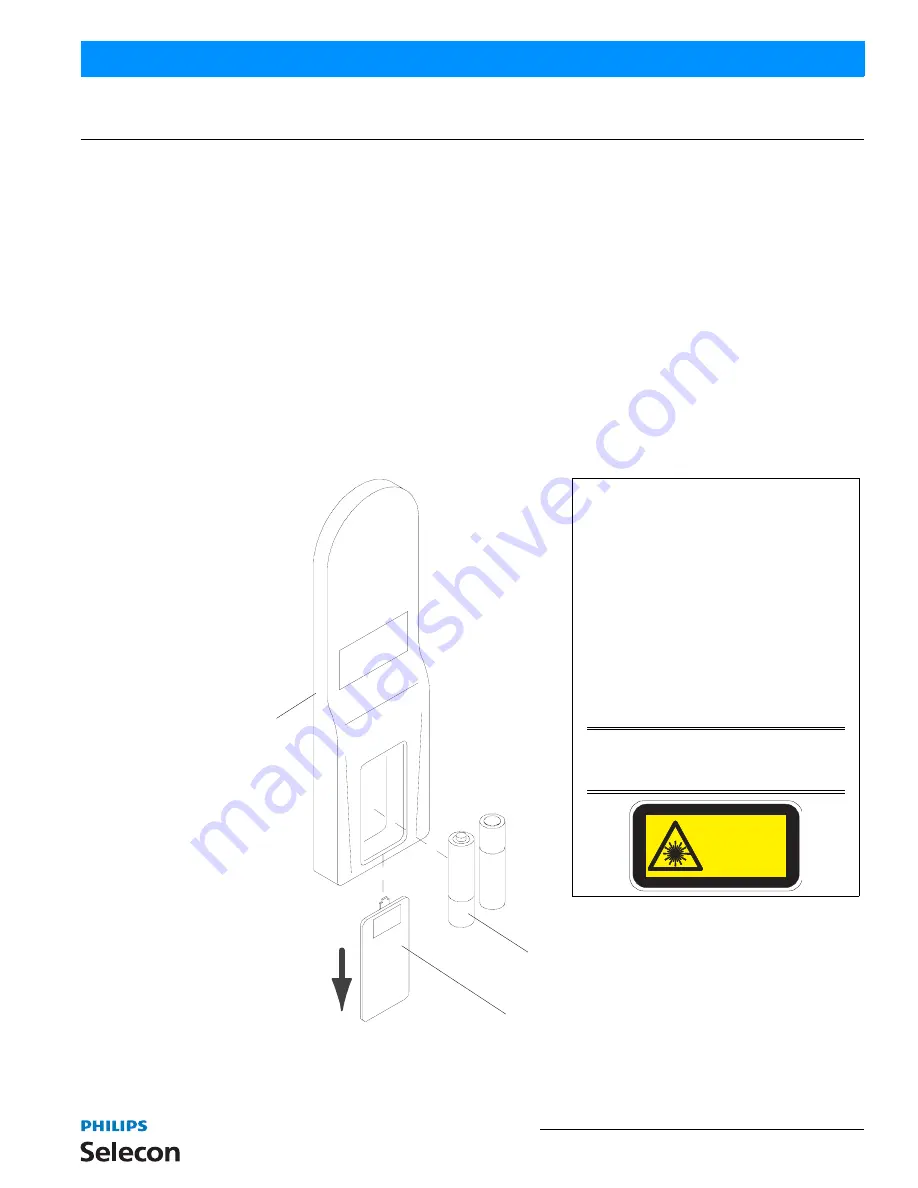
Install two AAA batteries (included) before operation. Refer to 

Figure 1

 for more information.

Figure 1:  PL1IRR Remote Battery Installation

PL1IRR Remote

Battery Compartment 
Access Panel

AAA Battery (2 each - 
supplied with remote)

+

_

To install two AAA batteries (included) 
in PL1IRR remote:

Step 1. At rear of remote, remove battery 

access panel by sliding it as 
indicated.

Step 2. Note orientation of batteries as 

indicated in battery compartment 
of remote.

Step 3. Install batteries.

Step 4. Reinstall battery access panel.

Step 5. Remote is ready for use.

WARNING!  

PL1IRR Remote contains a 

Class 2 laser. Do not stare or look directly 
into laser beam.

+

_

Slide battery access panel away 
from remote to install batteries.

LASER RADIATION

DO NOT STARE INTO BEAM

CLASS 2 LASER PRODUCT

LASER DIODE

WAVELENGTH: 630 - 680 nm

MAX OUTPUT: <5 mW

Summary of Contents for SELECON PL1IRR

Page 1: ......

Page 2: ... information seulement et est sujet à changements sans préavis La compagnie Philips Selecon n assume aucune responsibilité sur toute erreur ou ommission inscrite dans ce manuel Pour tous commentaires ou suggestions concernant des corrections et ou les mises à jour de ce manuel veuillez s il vous plait contacter le bureau de Philips Selecon le plus proche Note Information contained in this document...

Page 3: ...NS WARNING You must have access to a main circuit breaker or other power disconnect device before installing any wiring Be sure that power is disconnected by removing fuses or turning the main circuit breaker off before installation Installing the device with power on may expose you to dangerous voltages and damage the device A qualified electrician must perform this installation WARNING Refer to ...

Page 4: ...tices 1 Philips Selecon Limited Three Year Warranty 1 TABLE OF CONTENTS PREFACE About this Guide 3 Product Description 3 Before Using the Infrared Remote 3 PL1IRR PROGRAMMING REMOTE OVERVIEW Infrared Remote Control Features 4 OPERATION AND PROGRAMMING Using the PL1IRR Infrared Remote Control 5 Troubleshooting 5 ...

Page 5: ... Using the Remote colors full color mixing presets intensity can be programmed selected raised and lowered and fixtures may be turned On and Off Before Using the Infrared Remote Install two AAA batteries included before operation Refer to Figure 1 for more information Figure 1 PL1IRR Remote Battery Installation PL1IRR Remote Battery Compartment Access Panel AAA Battery 2 each supplied with remote ...

Page 6: ...olor Adjustment Allows the raising or lowering of individual LED colors Press top button to change color and bottom button to lower it Tap the up for 2 increase or tap down for a 1 decrease Press and hold top or bottom button for sequential raise lower Program Enter After the luminaire to be programmed is selected by Laser press Enter to set the luminaire to programming mode Laser Luminaire Select...

Page 7: ...ttings hit Learn button and then hit any Preset button except Off Off cannot be programmed Preset is now saved To cancel programming hit Cancel button Step 5 After programming or adjustments are complete hit Exit button Repeat as desired on additional luminaires to be programmed adjusted Note Refer to PL1 LED Luminaire Installation User s Manual for additional information This manual is available ...

Page 8: ......

Reviews: