background image

49BDL5055P

55

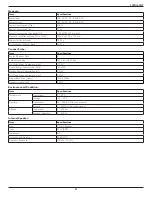
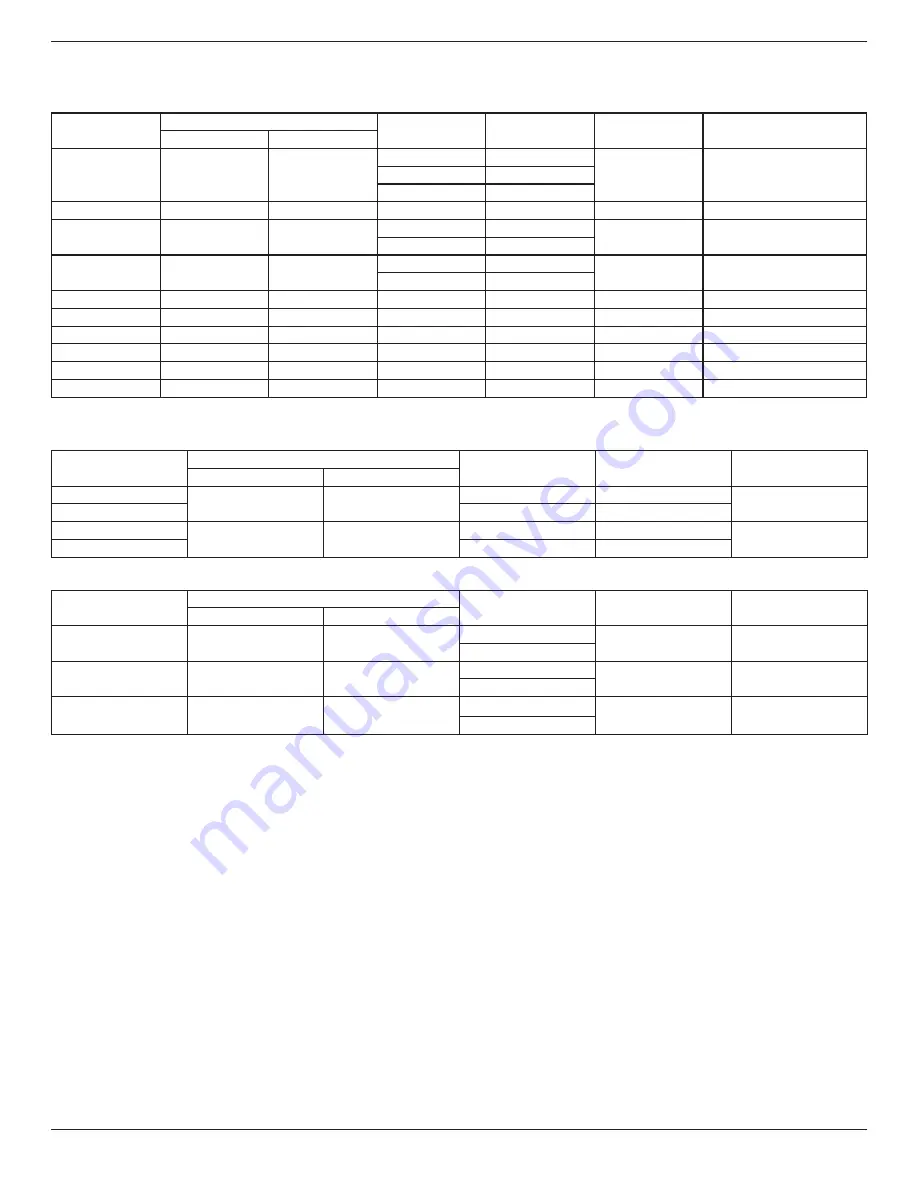
8.  Input Mode

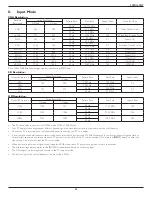
VGA Resolution:

Standard 

Resolution

Active Resolution

Refresh Rate

Pixel Rate

Aspect Ratio

Stand for Mode

H Pixels

V Lines

VGA

640

480 

60 Hz 

25.175 MHz 

4:3

Video Graphic Array

72 Hz 

31.5 MHz 

75 Hz 

31.5 MHz 

WVGA

720

400 

70 Hz 

33.75 MHz 

16:9

Wide Video Graphic Array

SVGA

800

600 

60 Hz 

40 MHz 

4:3

Super VGA

75 Hz 

49.5 MHz 

XGA

1024

768 

60 Hz 

65 MHz 

4:3

Extended Graphic Array

75 Hz 

78.75 MHz 

WXGA

1280

768

60 Hz

79.5 MHz

5:3

Wide XGA

WXGA

1280

800

60 Hz

79.5 MHz

16:10

Wide XGA

SXGA

1280

1024

60 Hz

108 MHz

5:4

Super XGA

WXGA

1360

768

60 Hz

85.5 MHz

16:9

Wide XGA

UXGA

1600

1200

60 Hz

162 MHz

4:3

Ultra XGA

HD1080

1920

1080

60 Hz

148.5 MHz

16:9

HD1080

Note: 1280x768/60Hz can be supported but not shown in EDID table.

SD Resolution:

Standard Resolution

Active Resolution

Refresh Rate

Pixel Rate

Aspect Ratio

H Pixels

V Lines

480i

720

480

29.97 Hz

13.5 MHz

4:3

480p

59.94 Hz

27 MHz

576i

720

576

25 Hz

13.5 MHz

4:3

576p

50 Hz

27 MHz

HD Resolution:

Standard Resolution

Active Resolution

Refresh Rate

Pixel Rate

Aspect Ratio

H Pixels

V Lines

720p

1280

720

50 Hz

74.25 MHz

16:9

60 Hz

1080i

1920

1080

25 Hz

74.25 MHz

16:9

30 Hz

1080p

1920

1080

50 Hz

148.5 MHz

16:9

60 Hz

•  The PC text quality is optimum in HD 1080 mode (1920 x 1080, 60Hz).
•  Your PC display screen might appear different depending on the manufacturer (and your particular version of Windows).
•  Check your PC instruction book for information about connecting your PC to a display.
•  If a vertical and horizontal frequency-select mode exists, select 60Hz (vertical) and 31.5KHz (horizontal). In some cases, abnormal signals (such as 

stripes) might appear on the screen when the PC power is turned off (or if the PC is disconnected). If so, press the [

INPUT

] button to enter the 

video mode. Also, make sure that the PC is connected.

•  When horizontal synchronous signals seem irregular in RGB mode, check PC power saving mode or cable connections.
•  The display settings table complies to the IBM/VESA standards, and based on the analog input.
•  The DVI support mode is regarded as same to the PC support mode.
•  The best timing for the vertical frequency to each mode is 60Hz. 

Summary of Contents for SignageSolutions 49BDL5055P

Page 1: ...www philips com welcome 49BDL5055P V1 01 User Manual English ...

Page 2: ...ver use organic solvent such as alcohol or ammonia based liquids to clean your display To avoid the risk of shock or permanent damage to the set do not expose the display to dust rain water or an excessively moist environment If your display becomes wet wipe it with dry cloth as soon as possible If a foreign substance or water gets in your display turn the power off immediately and disconnect the ...

Page 3: ...power has been switched off Be aware that the after image symptom cannot be repaired and is not covered under warranty CE Declaration of Conformity This device complies with the requirements set out in the Council Directive on the Approximation of the Laws of the Member States relating to Electromagnetic Compatibility 2014 30 EU Low voltage Directive 2014 35 EU RoHS directive 2011 65 EU and Radio ...

Page 4: ...onductor of the room s electrical installation should have a reserve short circuit protection device in the form of a fuse with a nominal value no larger than 16 amperes A To completely switch off the equipment the power supply cable must be removed from the power supply socket which should be located near the equipment and easily accessible A protection mark B confirms that the equipment is in co...

Page 5: ...NEUTRAL N BROWN LIVE L GREEN YELLOW EARTH E 1 The GREEN YELLOW wire must be connected to the terminal in the plug which is marked with the letter E or by the Earth symbol or coloured GREEN or GREEN YELLOW 2 The BLUE wire must be connected to the terminal which is marked with the letter N or coloured BLACK 3 The BROWN wire must be connected to the terminal which marked with the letter L or coloured...

Page 6: ...O O O O O O 电源线 X O O O O O 其他线材 X O O O O O 遥控器 X O O O O O 电路板组件包括印刷电路板及其构成的零部件 如电阻 电容 集成电路 连接器等 本表格依据SJ T 11364的规定编制 O 表示该有害物质在该部件所有均质材料中的含量均在 GB T 26572 标准规定的限量要求以下 X 表示该有害物质至少在该部件的某一均质材料中的含量超出 GB T 26572 标准规定的限量要求 上表中打 X 的部件中 应功能需要 部分有害物质含量超出GB T 26572规定的限量要求 但是符合欧盟 RoHS法规要求 属于豁免部分 备注 上表仅做为范例 实际标示时应依照各产品的实际部件及所含有害物质进行标示 10 環保使用期限 此標識指期限 十年 電子电气產品中含有的有害物質在正常使用的條件下不會發生外泄或突變 電子电气產品用戶使用該電子电气產品不會對...

Page 7: ...指該項限用物質之百分比含量未超出百分比含量基準值 備考2 係指該項限用物質為排除項目 液晶面板 警語 使用過度恐傷害視力 注意事項 1 使用30分鐘請休息10分鐘 2 未滿2歲幼兒不看螢幕 2歲以上每天看螢幕不要超過1小時 警告使用者 此為甲類資訊技術設備 於居住環境中使用時 可能會造成射頻擾動 在此種情況下 使用者會被要 求採取某些適當的對策 Turkey RoHS Türkiye Cumhuriyeti EEEYönetmeliğine Uygundur Ukraine RoHS Обладнання відповідає вимогам Технічного регламенту щодо обмеження використання деяких небезпечних речовин в електричному та електронному обладнанні затвер...

Page 8: ... an ENERGY STAR Partner we have determined that this product meets the ENERGY STAR guidelines for energy efficiency Restriction on Hazardous Substances statement India This product complies with the E Waste Management Rules 2016 CHAPTERV rule 16 sub rule 1 Whereas New Electrical and Electronic Equipment and their components or consumables or parts or spares do not contain Lead Mercury Cadmium Hexa...

Page 9: ...method of disposal of the used battery According to EU directive 2006 66 EC the battery can t be disposed improperly The battery shall be separated to collect by local service Após o uso as pilhas deverão ser entregues ao estabelecimento comercial ou e ou baterias rede de assistência técnica autorizada Information for EAC Month and year of manufacturing please refer information in Rating label Imp...

Page 10: ...oses only 3 License Restrictions Except as provided otherwise herein you shall not rent lease sublicense sell assign loan or otherwise transfer the Software You shall not and you shall not permit any third party to reverse engineer decompile or disassemble the Software except to the extent that applicable law expressly prohibits the foregoing restriction You may not remove or destroy any product i...

Page 11: ...NO CIRCUMSTANCES WILL MMD OR ITS LICENSORS BE LIABLE FOR ANY CONSEQUENTIAL SPECIAL INDIRECT INCIDENTAL OR PUNITIVE DAMAGES WHATSOEVER INCLUDING WITHOUT LIMITATION DAMAGES FOR LOSS OF PROFITS OR REVENUES BUSINESS INTERRUPTION LOSS OF BUSINESS INFORMATION LOSS OF DATA LOSS OF USE OR OTHER PECUNIARY LOSS EVEN IF MMD OR ITS LICENSORS HAVE BEEN ADVISED OFTHE POSSIBILITY OF SUCH DAMAGES IN NO EVENT SHAL...

Page 12: ...arty In case open source software is used MMD provides source attribution where applicable When required by the terms of the open source license MMD published the relevant parts of the source code for the product on http licenses cmnd io MMD hereby offers to deliver upon request a copy of the complete corresponding source code for the copyrighted open source packages used in this product for which...

Page 13: ...49BDL5055P xiii Step 3 ...

Page 14: ...2 Change Picture Format 18 4 3 Overview 18 4 4 Media Player introduction 19 4 5 Browser manual 21 4 6 PDF reader play 24 4 7 CMND Play 25 4 8 Custom App 26 5 Signage display 27 5 1 Setting 27 5 2 Ethernet 27 5 3 Proxy 27 5 4 Data usage 28 5 5 More 28 5 6 Signage Display 29 5 7 SystemTools 38 5 8 Clone Media File 39 5 9 Display 39 5 10 Storage 39 5 11 Apps 40 5 12 Security 40 5 13 Date time 40 5 14...

Page 15: ...nment Kit 1 Edge Alignment Kit 2 Differences according to regions Display design and accessories may differ from those illustrated above NOTES For all other regions apply a power cord that conforms to the AC voltage of the power socket and has been approved by and complies with the safety regulations of the particular country Type H05W F 2G or 3G 0 75 or 1 mm2 should be used You might like to save...

Page 16: ...ace down on the protective sheet 4 After inserting the stand in the guide block tighten the screws on both sides of the display NOTE The longer side of the stand should face the front of the display To remove table stands 1 Power off the display 2 Spread a protective sheet on a flat surface 3 Place the display face down on the protective sheet 4 Remove screws using a screwdriver and place them in ...

Page 17: ...the wall mounting kit use M6 mounting screws having a length 10 mm longer than the thickness of the mounting bracket and tighten them securely 5 Unit without base weight 19 0 kg The equipment and its associated mounting means still remain secure during the test For use only with UL Listed Wall Mount Bracket with minimum weight load 19 0 kg 1 5 1 VESA Grid 49BDL5055P 400 H x 400 V mm Caution To pre...

Page 18: ...old and press the guider with your left hand Put the logo sticker with its adhesive side down into the logo hole with your right hand and press to make it stick tightly onto the front bezel 3 Remove the guider 1 2 3 1 6 2 How to remove the logo 1 Prepare a piece of paper with a cutting area of logo as a protector to prevent the front bezel from scratching 2 Using a knife carefully remove the logo ...

Page 19: ...on adjacent two displays Install the Edge Alignment Kit 1 with 2 PCS of M3 screw Using Edge Alignment Kit 2 on adjacent four displays NOTE When installing the edge alignment kit please consult a professional technician for proper installation We accept no liability for installations not performed by a professional technician ...

Page 20: ...D menu is on 7 button Move the highlight bar down to adjust the selected item while OSD menu is on 8 MENU button Return to previous menu while OSD menu is on or to activate the OSD menu when OSD menu is off 9 Remote control sensor and power status indicator Receives command signals from the remote control Indicates the operating status of the display without OPS Lights green when the display is tu...

Page 21: ...6 RS232C IN 7 RS232C OUT RS232C network input output for the loop through function 8 LINE IN Audio input forVGA source 3 5mm stereo phone 9 AUDIO OUT Audio output to external AV device 10 HDMI1 IN 11 HDMI2 IN HDMI video audio input 12 DVI I IN DVI D video input 13 DVI OUT VGA OUT DVI orVGA video output 14 DisplayPort IN 15 DisplayPort OUT DisplayPort video input output 16 RJ 45 LAN control functio...

Page 22: ...d Group ID number Main Menu go to previous level menu Source Menu Exit source menu Volume Menu Decrease AudioVolume Main Menu go to next level menu or set selected option Source Menu Go to selected source Volume Menu Increase AudioVolume 7 button Root Menu Go to IR daisy chain OSD in Primary Secondary mode Main Menu Confirm an entry or selection 8 ADJUST button Go to Auto Adjust OSD forVGA only 9 ...

Page 23: ...control For example press 0 and 1 for display No 1 press 1 and 1 for display No 11 The numbers available are from 01 255 2 Not pressing any button within 10 seconds will exit the ID Mode 3 If an error pressing of buttons other than the digits occured wait 1 second after the red LED lights off and then lights up again then press the correct digits again 4 Press ENTER button to confirm The red LED b...

Page 24: ...to pause playing 5 All media or pdf files should be put at the folder which is named philips with sub folder under the root directory of the specified storage internal USB SD Card All sub folders video photo music pdf are named by media types and shouldn t be changed videos root dir of storage philips video photos root dir of storage philips photo music root dir of storage philips music pdfs root ...

Page 25: ...r Compose Edit or new add playlist press to open toolbox Toolbox will be slide from the left side of the screen 2 PDF Player Compose Edit or new add playlist press to open toolbox Toolbox will be slide from the left side of the screen 16 VOLUME button Adjust volume The buttons are only controlled by Scalar 2 3 4 Inserting the batteries in the remote control The remote control is powered by two 1 5...

Page 26: ...Use the remote control within a distance of less than 8m 26ft from the display s sensor and a horizontal and vertical angle of less than 30 degrees NOTE The remote control may not function properly when the remote control sensor on the display is under direct sunlight or strong illumination or when there is an obstacle in the path of signal transmission 30 30 ...

Page 27: ...L5055P 13 3 Connecting External Equipment 3 1 Connecting External Equipment DVD VCR VCD 3 1 1 Using HDMI video input DVD VCR VCD HDMI Out HDMI IN 3 2 Connecting a PC 3 2 1 Using DVI input PC DVI Out DVI IN ...

Page 28: ...UsingVideo Source input PC VGA AUDIO IN Audio Out 3 2 3 Using DisplayPort input DisplayPort Out DisplayPort IN PC 3 3 Connecting Audio Equipment 3 3 1 Connecting an external audio device Stereo Amplifier AUDIO OUT Audio In ...

Page 29: ...ys can be used 3 4 1 Display control connection Connect the RS232 OUT connector of DISPLAY 1 to the RS232 IN connector of DISPLAY 2 DISPLAY 1 PC DISPLAY 2 RS 232C IN RS 232C RS 232C OUT RS 232C IN DISPLAY 1 PC DISPLAY 2 RJ 45 RS 232C OUT RS 232C IN RJ 45 3 4 2 Digital video connection Connect the DVI OUT DVI I OUT connector of DISPLAY 1 to the DVI IN connector of DISPLAY 2 PC DVI IN DVI DVI VGA OU...

Page 30: ...DMI DVI OUT DVI IN DVD VCR VCD 3 4 3 Analog video connection Connect the DVI I OUT connector of DISPLAY 1 to the DVI I IN connector of DISPLAY 2 PC DISPLAY 1 DISPLAY 2 DVI I IN VGA DVI I OUT DVI I IN 3 4 4 OPS video connection Connect OPS OUT connector to HDMI1 HDMI2 connector and then select the corresponding HDMI input source for OPS video HDMI 1 HDMI 2 IN OPS OUT ...

Page 31: ...IR IN IR OUT DISPLAY 1 DISPLAY 2 NOTE 1 This display s remote control sensor will stop working if the IR IN is connected 2 IR loop through connection can support up to 9 displays 3 6 IR Pass through Connection DVD VCR VCD DVD VCR VCD Remote Control IR OUT IR IN ...

Page 32: ...ideo mode Full 4 3 1 1 16 9 21 9 Custom 4 3 Overview 1 Android PD launcher Android PD launcher is black page as below Every apps leave by press back key the screen will go to android PD launcher When you return to android PD launcher the screen will show hint image the hint image only show 5 second as below The hint image will notify you can press source key to change source 2 Admin mode You can p...

Page 33: ...etween FILE 1 and FILE 7 The pencil icon means the playlist is non empty 3 Select Compose on home page first you should choose one playlist to edit between FILE 1 and FILE 7 The pencil icon means the playlist is non empty 4 If an empty playlist is chosen the app will guide you to select the media source All media files should be placed in philips of root directory For example videos in root philip...

Page 34: ...playlist save abort save or abort playlist back return 7 If you choose Sort in the slide bar you can change the order of files one by one 8 Press info key after you choose desired file you will get the detail information 9 Press play key after you choose desired file you will play the media file directly 10 If you make a playlist with all images files before saving the app will ask you if you want...

Page 35: ...a files to photo video and music folder under philips folder internal storage only Ex storage emulated legacy philips photo xxx jpg storage emulated legacy philips video yyy mp4 storage emulated legacy philips photo zzz mp3 Step 4 Start media player app it will auto import media player text file Note Once the playlist file text is imported if an user change playlist by remote controller this chang...

Page 36: ...ontains urls Import file and url will show on list File format for import Format should be like below with file extension txt 4 2 Export Click export Choose storage Dialog shows path file will be saved and file s name Press save button then urls on list will be saved ...

Page 37: ...ddress home web page data to local storage If network is disconnect and OSD schedule open browser app browser app will auto open Url 1 address home page in local storage If browser can not to find Url 1 address home page data in local storage the screen will be black Note a Browser app only can save Url 1 address home page data other Url 2 to Url 7 can not to save b Local storage storage emulated ...

Page 38: ...les should be placed in philips of root directory For example pdfs in root philips pdf 5 You could edit or delete a non empty playlist just choose the desired playlist which is with pencil icon 6 Once you start to edit a playlist you will see below screen Source files in storage Playlist files in playlist There are 4 icons which map to the keys of remote controller Option key launch slide bar Play...

Page 39: ...t File Step 1 Create pdf player text file File name pdfplaylistX txt X means playlist number 1 2 3 4 5 6 7 Ex pdfplaylist1 txt pdfplaylist2 txt Content Step 2 Copy pdfplaylistX txt to philips folder of internal storage You may use FTP to do this File path storage emulated legacy philips for DL PL Ex storage emulated legacy philips pdfplaylist1 txt Step 3 Prepare pdf files to pdf folder under phili...

Page 40: ...2 Function Introduction Save Select the App click the Save will perform the function of storage Forget After press the Forget can remove previously stored information Cancel Don t do any change directly closed Windows If no customer installed apk the list will be blank The list will be blank and Save Forget will be gray and useless If customer installed apk user can select customer installed apk i...

Page 41: ...P mode 1 Cannot modify IP Address Netmask DNS Address and Gateway 2 If connect successfully it will display current network configuration 5 2 2 Static IP In Static IP mode user can input IP Address Netmask DNS address and Gateway Note IP address netmask DNS address and gateway address input limitation 1 Format I number 0 9 II decimal point 5 3 Proxy Browser connect to Proxy server and ask Proxy se...

Page 42: ...nection through the proxy server with TCP port 80 443 5228 Proxy server with authentication on Windows Sever Series is not support 5 4 Data usage Only show up when 4G module connected 5 5 More Enable Disable to turn on off 4G network Note 1 Only show up when 4G module connected 2 Network info will be different due to different carrier Tethering portable hotspot Cellular networks Preferred network ...

Page 43: ...torage 6 Other A TeamViewer Support B Platform Web API 5 6 1 General Settings 1 Signage Display Name Set up PD name PD_ Ethernet Mac Address Note Input limitation 1 length Max 36 characters 2 format no limit 2 Boot Logo 1 Scalar OSD menu to control Android boot logo enable disable Scalar OSD menu operation RCU Home Configuration2 Logo On Off User In user mode user can choose their own boot logo an...

Page 44: ... PD does not find any bootanimzation zip file under SD and USB The list will be blank Save and Forget button will be gray and useless Case 2 The users do not settle customized boot logo PD find bootanimzation zip file under SD and USB The screen will show bootanimzation zip and select the first file automatically Case 3 The user settle customized boot logo the screen will show data local bootanimz...

Page 45: ...ime Note 1 If no End time the screen will show current time automatically 2 Start time cannot be newer than End time It will show error toast 4 Repeat Set screenshot repeat cycle User can choose screenshot time frame Multiple selection 5 Save to Set up screenshot save path Internal storage SD card or USB storage Note picture storage path 1 In root of internal storage usb storage sd card PD will cr...

Page 46: ...n User can set Gmail account or other mail account User can select other mail account and set up SMTP server Security type and port item Note Password input limitation 1 Length 6 20 characters 2 Format no limit 3 unavailable port 5000 Gmail safety setting If Gmail is not working when setting is complete please test Gmail account via PC and link below URL https www google com settings security less...

Page 47: ... PD can share FTP files 1 Account Set up FTP account Note Input limitation 1 Length 4 20 characters 2 Format I English a z and A Z II Number 0 9 2 Password Set up FTP password Note Input limitation 1 Length 6 20 characters 2 Format I English a z and A Z II Number 0 9 FTP password display 1 Will show symbol to instead password if set up password via remote control 2 After set up the password text w...

Page 48: ...3 Format Number 0 9 4 Unavailable port 5000 5 The port number must more than 1024 3 Remote Control Via Enable Disable to Control Remote Control On Off User can input Server address If server does not registered it will ask user for PIN code Bind status 1 Will show network is disconnected if not yet connects to network 2 Will show Server is disconnected if network connected but remote control serve...

Page 49: ...er Player List edit page 2 Open Media Player slideshow effect edit page 2 Browser Can edit Bookmark configuration 1 Open Browser setting page 3 CMND Play 1 Server Setup CMND Play server address 2 Account Setup CMND Play account 3 PIN Code Setup CMND Play PIN code 4 Version There are two options Ver 2 andVer 3 Ver 2 Use 2 0 2 2 agreement Ver 3 Use 3 0 3 1 agreement 5 Content There are internal stor...

Page 50: ... up system pre install app Scalar OSD menu operation RCU Source Custom If set up customer APK PD will open customer app when switch source to Customer mode If no set up customer APK PD will show Black screen when switch source to Customer mode Function introduction 1 Save Select App and press Save key to save it 2 Forget Press Forget key to clean previous stored data 3 Cancel No change close windo...

Page 51: ...w App name Case2 Setup Custom App there is a checked circle on right 5 6 4 Additional Settings When the customer payment can get activate code after successful input can enable the function of tiling tool 5 6 5 Security 1 External Storage Lock Unlock external storage 5 6 6 Others 1 TeamViewer Support Enable DisableTeamViewer support 2 Platform Web API Enable Disable Platform Web API ...

Page 52: ... default settings Press OK to execute Reset function automatically 5 7 3 Import Export The function of Import Export PD settings Notes 1 Settings db Saved file name settings db 2 Will save to Philips folder in storage 5 7 3 1 Export Signage Display Settings Will export to Philips folder under USB or SD card 1 Export settings db 2 Export 3rd party apk to Philips app Note If no Philips folder exists...

Page 53: ...ension name is cms Clone Source 1 Internal storage a check FTP b check Philips 2 SD USB Files under root Target Location 1 Internal storage Save to Philips 2 SD USB Save to root 5 9 Display User can modify the font size can choose Small Normal Large Huge 5 10 Storage Display current PD Android storage information Note 1 User option key on RCU to show setting option SD CARD and USB STORAGE Need to ...

Page 54: ...edentials 3 Install from SD card 4 Clear credentials 5 13 Date time Via Scalar OSD menu to control AutoTime On Off Note Add new NTP server to display current server IP 5 14 Developer options Android developer options 5 15 About Main info in About 1 System updates 2 Legal information 3 Android version 4 Kernel version 5 Build number 5 15 1 System updates 1 Will automatically search update zip in US...

Page 55: ...e desc txt file 1 The image folder These contain PNG images named in numbers starting from something like 0000 png or 0001 png and proceeding with increments of 1 There has to be at least one folder and there is no known upper limit to the number of folders 2 The desc txt file This file defines how the images in the folder s are displayed during the boot animation in the following format Width Hei...

Page 56: ...here are 3 ways to install your own android app a Via File Manager in Admin Mode 1 If you have apk already 1 1 copy your apk to USB disk or SD card and then plug them into Philips Android Signage Display 1 2 Go to Admin Mode Apps File Manager 1 3 Using File Manager and find out your apk and then you can install Just press ok on the selected apk 2 Download apk by Chromium browser and then go to int...

Page 57: ...2 API Request URL http localhost 9988 platform getinfo 3 API Response Status Status Code Description Success 0 Request success Error 1 Request failure Result in JSON format interfaces list all of network interface s MAC address family the address family within an IPv4 or IPv6 mac network interface s MAC address ip network interface s IP address currentip current IP address of device sn serial numb...

Page 58: ...Configuration 1 Contrast Sharpness Color Tint Brightness Black level Gamma selection Color temperature Color control Noise reduction 50 50 50 50 Native Native Medium Brightness Picture Adjust the overall image and background screen brightness backlight Contrast Adjust the image contrast ratio for the input signal Sharpness This function is digitally capable to keep crisp image at any timings It is...

Page 59: ...Auto adjust Screen reset 50 50 50 50 Action Action Zoom Full H position Control Horizontal Image position within the display area of the LCD Press button to move screen to right Press button to move screen to left V position ControlVertical Image position within the display area of the LCD Press button to move screen to up Press button to move screen to down Clock Press button to expand the width ...

Page 60: ...lower pitched sounds Volume Adjust to increase or decrease the audio output level Audio out line out Adjust to increase or decrease line out output level Maximum volume Adjust your own limitation for the maximum volume setting This stops the volume from being played too loudly Minimum volume Adjust your own limitation for the minimum volume setting Mute Turn the mute function on off Audio source S...

Page 61: ...e next time you connect the power cord Power off The display will remain off when the power cord is connected to a wall outlet Forced on The display will turn on when the power cord is connected to a wall outlet Last status The display will return to the previous power status on off standby when removing and replacing the power cord Panel saving Choose to enable the panel saving functions and thus...

Page 62: ...scalar Philips logo and android animation Philips logo will show 2 If Log set to OFF neither scalar Philips logo nor android animation logo will not show 3 If Logo set to USER custom logo option in android is not set then there will be no boot logo when power on 4 If Logo set to USER custom logo option in android is set there will be only custom logo when power up Logo will NOT rotate with rotatio...

Page 63: ...e Auto signal detection Power Save HDMI with One Wire Action Action Auto Action Action Action Off Off Action Mode 4 Input resolution Set the resolution of theVGA input This is only required when the display is unable to detect theVGA input resolution correctly NOTE This item is functional for VGA input only The options are 1024x768 1280x768 1360x768 1366x768 1400x1050 1680x1050 1600x1200 1920x1200...

Page 64: ...per region or country when to adjust the clock To solve this the user must be able to set the daylight saving start en stop date When daylight saving correction is on user selectable then the real time clock should be adjusted at the moment in time set in the daylight saving on and off date At daylight start date the clock should be put forward 1 hour at 2 o clock At daylight stop date the clock s...

Page 65: ...over 1 User defined setting Default HDMI 1 Failover 2 User defined setting Default HDMI 1 Failover 3 User defined setting Default HDMI 1 Failover 4 User defined setting Default HDMI 1 Failover 5 User defined setting Default HDMI 1 Failover 6 User defined setting Default HDMI 1 Failover 7 User defined setting Default HDMI 1 Failover 8 User defined setting Default HDMI 1 Failover 9 User defined sett...

Page 66: ...all settings except Date and Time in the Advanced option menu to factory preset values 1 Press OK or button to enter the submenu 2 Press or button to select Reset and press the OK button to restore settings to factory preset values 3 Press the button or select Cancel and press the OK button to cancel and then return to the previous menu ...

Page 67: ...FLV V Supported Image Size 48x48pixels to 1920x1088pixels Maximum Frame Rate 30fps Maximum Bit Rate 57 2Mbps Audio Codec MP2 MP3 AAC PCM 1 Not support MBAFF GOOGLE VP8 VP8 File Format WEBM V Supported Image Size 48x48pixels to 1920x1088pixels Maximum Frame Rate 30fps Maximum Bit Rate 38 4Mbps Audio Codec OggVorbis Motion JPEG MJPEG File Format AVI MOV V Supported Image Size 48x48pixels to 1920x108...

Page 68: ... MaximumSupported Image Size 4096x4096 pixels GIF GIF File Format GIF V Resolution No Restriction PNG PNG File Format PNG V Resolution No Restriction NOTES Sound or video may not work if the contents have a standard bit rate frame rate above the compatible Frame sec listed in the table above Video content with a Bit rate or Frame rate larger than the rate specified in the table above can cause cho...

Page 69: ...Resolution Standard Resolution Active Resolution Refresh Rate Pixel Rate Aspect Ratio H Pixels V Lines 720p 1280 720 50 Hz 74 25 MHz 16 9 60 Hz 1080i 1920 1080 25 Hz 74 25 MHz 16 9 30 Hz 1080p 1920 1080 50 Hz 148 5 MHz 16 9 60 Hz The PC text quality is optimum in HD 1080 mode 1920 x 1080 60Hz Your PC display screen might appear different depending on the manufacturer and your particular version of...

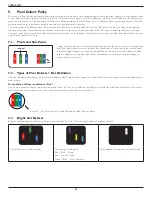
Page 70: ...xel or picture element is composed of three sub pixels in the primary colors of red green and blue Many pixels together form an image When all sub pixels of a pixel are lit the three colored sub pixels together appear as a single white pixel When all are dark the three colored sub pixels together appear as a single black pixel Other combinations of lit and dark sub pixels appear as single pixels o...

Page 71: ...ome liquid crystal display LCD panels This is known within the industry as Mura which is a Japanese term for unevenness It is used to describe an irregular pattern or area in which uneven screen uniformity appears under certain conditions Mura is a result of the deterioration of the liquid crystal alignment layer and is most commonly caused by long term operation under high ambient temperatures It...

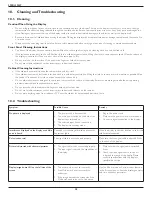
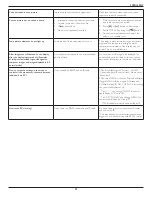
Page 72: ...e is dry Do not allow any water or detergent to come into contact with the surface of the display If water or moisture gets inside the unit operating problems electrical and shock hazards may result Do not scratch or hit the cabinet with fingers or hard objects of any kind Do not use volatile substances such as insert sprays solvents and thinners on the cabinet Do not place anything made from rubb...

Page 73: ...res include logos video games computer images and images displayed in 4 3 normal mode A still picture is displayed for an over extended period of time Do not allow a still image to be displayed for an extended period of time as this can cause a permanent after image to remain on the display How to setup the settings in the menu to control all the monitors at the same time and individually via RC D...

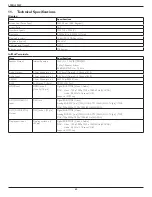
Page 74: ...ck x 1 0 5V rms Normal 2 Channel L R RS232C 2 5mm Phone jack x 2 RS232C in RS232C out RJ 45 RJ 45 Jack x 1 8 pin 10 100 LAN Port HDMI Input HDMI Jack x 2 Type A 18 pin Digital RGB TMDS Video Audio MAX Video 720p 1080p 1920 x 1080 60 Hz WUXGA Audio 48 KHz 2 Channel L R Supports LPCM only DVI I DVI D VGA Input DVI I jack Digital RGB TMDS Video Analog RGB 0 7V p p 75Ω H CS V TTL 2 2kΩ SOG 1V p p 75Ω ...

Page 75: ...reen Size 123 2 cm 48 50 inch On Mode Power Consumption W 110 W Annual Energy Consumption kWh 160 kWh Standby Power Consumption W 0 50 W Off Mode Power Consumption W 0 50 W Display Resolution Pixels 1920 x 1080p Network Standby W 0 69 W Environmental Condition Item Specifications Temperature Operational 0 40 C Storage 20 60 C Humidity Operational 20 80 RH No condensation Storage 5 95 RH No condens...

Page 76: ...s N V All rights reserved Philips and the Philips Shield Emblem are registered trademarks of Koninklijke Philips N V and are used under license from Koninklijke Philips N V Specifications are subject to change without notice ...

Reviews: