background image

9

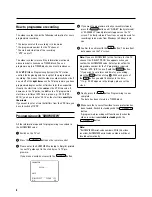
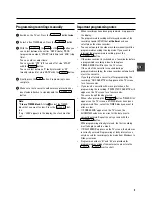
Programming recordings manually

1

Switch on the TV set. Press the

TIMER

k

button

twice

.

2

Select a free TIMER block. Press the

TIMER

k

button.

3

With the

TIMER

k

, the

C

or the

D

button you

can select between the entries ’DATE’ (date), ’PROG’
(programme number), ’START’ (start time) and ’END’ (stop
time).
You can enter or adjust data.
You can switch ’VPS’ (V/P) on and off at step ’START’
with the

SELECT

button.

You can select between ’D’ (daily intervals) or ’W’
(weekly intervals) at step ’DATE’ with the

SELECT

button.

4

Finally, press the

OK

button. Programming is now

complete.

5

Make sure that a cassette without erase protection has
been loaded. Switch to standby with the

STANDBY

m

button.

Note:

*

Clear a TIMER block:

At step

1

select the TIMER

block that you want to clear. Press the

CLEAR (CL)

but-

ton.
If e.g.: ’20:00’ appears in the display, the clock must be
set.

Important programming notes

When recordings have been programmed,

k

appears in

the display.

The programmed recording will always be made at the
recording speed (SP/LP) that

at the time

has been

selected on the video recorder.

You cannot operate the video recorder manually while a
programmed recording is being made. If you want to
interrupt the programmed recording, press the

STANDBY

m

button.

If the video recorder is switched on a few minutes before
a programmed recording is due to take place,
’TIMER RECORD’ will flash on the TV screen.

If the end of the cassette is reached during a
programmed recording, the video recorder automatically
ejects the cassette.

If you forget to load a cassette, after programming the
recording, ’NO CASSETTE’ will appear on the TV screen
for a few seconds.

If you insert a cassette with erase protection, after
programming the recording, ’PROTECTED CASSETTE’ will
appear on the TV screen for a few seconds.
The cassette will then be ejected.

When, after pressing the

TIMER

k

button ’TIMER FULL’

appears on the TV screen, all TIMER blocks have been
programmed. Then, select the TIMER block you want to
alter or clear.

If ’CODE ERROR’ appears on the TV screen, the
SHOWVIEW code was incorrect or the date was in-
correctly entered. Repeat the entry or end with the

STANDBY

m

button.

With programming at daily intervals, the first recording
must take place within a week.

If ’DAILY ERROR’ appears on the TV screen, the date was
incorrectly entered. Programming at daily intervals can
only be used for recordings to be made from Mondays to
Fridays inclusive.

Programme numbers ’E1’ and ’E2’ are provided for
programmed recordings from external sources (via the

EXT.1

or

EXT.2

scart socket).

Summary of Contents for VR 675CG

Page 1: ... STILL R Still picture SYSTEM TV system selection EJECT Eject SP LP SP LP selection Additional TV functions Only function with televisions with the same remote control code TV Sp TV volume TV y TV sound off TV m Switch off TV TV P p Programme number Front of the video recorder RECORD n Record PROGRAMME r Down Minus programme number PROGRAMME q Up Plus programme number STANDBY m Standby EJECT J Cas...

Page 2: ... clock 6 Finally press the OK button Programming is now complete The data has been stored in a TIMER block 7 Make sure that a cassette without erase protection has been loaded Switch to standby with the STANDBY m button A programmed recording will function only when the video recorder is switched to standby with the STANDBY m button How to programme a recording manually 1 Switch on the TV set Pres...

Page 3: ...make use of the facilities available in your country for disposing of the packaging of the video recorder in a way that helps to protect the environment This electronic equipment contains many materials that can be recycled Please inquire about the possibilities for recycling your old set SHOWVIEW is a trademark of Gemstar Development Corpora tion SHOWVIEW is manufactured under licence from Gemsta...

Page 4: ...deo cassette is played back If the television does not switch automatically you will have to select the EXT 0 or AV programme number on the TV set manually Keep your video recorder connected to the mains and the power switch in on position at all times to ensure that programmed recordings can be made and that the television functions normally The power consumption required is low The video recorde...

Page 5: ...onfirm Select Use the P r or the P q button Enter Adjust Use the P r or the P q button or the 0 9 buttons Confirm Use the OK button Automatic Channel Search 1 Switch on the TV set Press the AUTOINSTALL button on the video recorder 2 Select the required OSD language The video recorder display always shows English text 3 Confirm with the OK button on the remote control 4 The automatic channel search...

Page 6: ...nish press the STANDBY m button Note When NOTV no signal from TV set appears in the display the TV channels can not be allocated automatically Then read further in the next paragraph Manual channel number allocation If you allocated the wrong TV channel at step 5or 8you can go back one step with the CLEAR CL button Manual Channel Number Allocation You can allocate any desired programme number to t...

Page 7: ...till Picture Scanning This helps to protect the cassette and prevent unnecessary power consumption The picture quality will deteriorate during Picture Scanning The sound is turned off With this video recorder you can play back cassettes that have been recorded on other video recorders in the NTSC standard This only works for PAL television sets which are suitable for a picture frequency of 60 Hz D...

Page 8: ...se code marks on the tape Once the video recorder finds the code mark or a blank space it will automatically switch to playback 1 Press the INDEX E button and then press the I button to select the next code mark or the H button for the previous code mark Note You cannot use the function Index search with recordings made on another video recorder that does not have this code mark function Eliminati...

Page 9: ... the RECORD n button again The display shows at what time the recording will stop With each subsequent press of the RECORD n button you can add 30 minutes to this time You can return to the normal recording status by pressing the CLEAR CL button Stereo reception This video recorder can record stereo transmissions The playback of HiFi recordings has HiFi quality Erase protection So that you don t a...

Page 10: ...to 9 digits printed in your TV guide next to the start time of a TV pro gramme If you make a mistake clear with the CLEAR CL button SHOWVIEW 53124 ONCE D WgSELECT CLEAR gCL 0 9 OK 4 If you want to programme at daily or weekly intervals press the SELECT button until D DAILY daily intervals or W WEEKLY weekly intervals appears on the TV screen The daily intervals function can only be used for record...

Page 11: ...interrupt the programmed recording press the STANDBY m button If the video recorder is switched on a few minutes before a programmed recording is due to take place TIMER RECORD will flash on the TV screen If the end of the cassette is reached during a programmed recording the video recorder automatically ejects the cassette If you forget to load a cassette after programming the recording NO CASSET...

Page 12: ...s or if you record from an external source the automatic TV system switch over may not always work properly 1 Before recording or during playback select the TV system with the SYSTEM button 2 If you select a different programme number or eject the cassette the video recorder switches back to auto matic Externally controlled TIMER recording Do you have another device e g a satellite receiver which ...

Page 13: ...el S 30 enter 9 30 Allocating a decoder If you want to allocate a decoder press the INDEX E button at step 3until DEC appears in the display This video recorder can receive HI FI sound transmis sions in NICAM At step 3 you can switch NICAM off or on with the SELECT button If the picture or sound quality is poor you might have selected the wrong TV system Press the SYSTEM button at step 3to change ...

Page 14: ...made Technical disturbance disconnect from the mains for 30 sec onds then re connect If this does not have any effect you can 1 Disconnect from mains 2 Re connect to mains whilst holding down the STANDBY m button on the video recorder All stored data will be reset cleared Cassette jammed Don t use force Pull out the mains plug for a moment Remote control does not operate Remote control not pointed...

Reviews: