background image

3

G

G

etting 

C

C

onnected 

U

U

p

4

VCR

TV

VCR/TV

QUICK PROGRAMMING

POWER

STILL/SLOW

SMARTPICTURE

CH

VOL

MENU

TIMER

EJECT

TURBO

AUDIO /

MUTE

OK/STATUS

-

+

CBL / DBS

1

2

3

4

5

6

7

8

9

START

STOP

DATE

DBS

DAILY

     PLAY

REW

FF

    STOP

WEEKLY

/OTR

REC

-

+

-

+

ALT

0

CLEAR

.............

.............

........

........

TIMER

SKIP

SEARCH SEARCH

REC END

SPEED

DBS

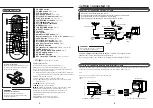
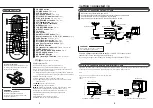
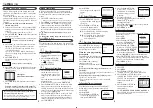
To insert the batteries:

Install two AA batteries R6 (SUM-3)/AA
- matching the polarity indicated inside
the battery compartment.

1

1

1

1

1

2

2

2

2

2

3

3

3

3

3

4

4

4

4

4
5

5

5

5

5
6

6

6

6

6
7

7

7

7

7

8

8

8

8

8

9

9

9

9

9
0

0

0

0

0

!

!

!

!

!

@

@

@

@

@

#

#

#

#

#

)

)

)

)

)

w

w

w

w

w
e

e

e

e

e
r

r

r

r

r

t

t

t

t

t

^

^

^

^

^

*

*

*

*

*

$

$

$

$

$
%

%

%

%

%

(

(

(

(

(

q

q

q

q

q

&

&

&

&

&

Remote Control

CAUTION
On Battery Replacement
Do not mix old and new batteries.
(Also never mix alkaline batteries with
manganese batteries.)

y

y

y

y

y

u

u

u

u

u

1

1

1

1

1

CBL/DBS button

2

2

2

2

2

POWER button 

(

P.7, P.12)

3

3

3

3

3

VCR/TV button 

(

P.7)

4

4

4

4

4

ALT/SPEED button 

(

P.7, P.12)

5

5

5

5

5

STILL/SLOW – /

 button 

(

P.8)

6

6

6

6

6

PLAY 

3

5

 button 

(

P.5, P.7, P.8)

7

7

7

7

7 1

 (REWIND)/

2

button 

(

P.5, P.7)

8

8

8

8

8

STOP 

7

 button 

(

P.5, P.7)

9

9

9

9

9

VOL (volume) 

5

 button

0

0

0

0

0

MENU button 

(

P.5)

!

!

!

!

!

TURBO TIMER button 

(

P.13)

@

@

@

@

@ 0

 EJECT button 

(

P.7)

#

#

#

#

#

TV button

$

$

$

$

$

VCR button

%

%

%

%

%

SMARTPICTURE button 

(

P.9)

^

^

^

^

^

Number buttons  (0, 1, 2, 3, 4, 5, 6, 7, 8 and 9) 

(

P.12)

&

&

&

&

&

CLEAR button 

(

P.6, P.8, P.12)

*

*

*

*

*

STILL/SLOW 

0

 button 

(

P.7, P.8)

(

(

(

(

(

STILL/SLOW + /

£

 button 

(

P.8)

)

)

)

)

)

3

(Fast Forward) /

3

 button 

(

P.7)

q

q

q

q

q

OK/STATUS button

w

w

w

w

w

CH (channel) 

5

 / 

 button 

(

P.4, P.5, P.10, P.14)

e

e

e

e

e

TIMER button 

(

P.12)

r

r

r

r

r

REC (ord) END SEARCH button  

(

P.9)

t

t

t

t

t

SKIP SEARCH button  

(

P.8)

y

y

y

y

y

AUDIO/MUTE button

u

u

u

u

u

REC (record)/ OTR button  

(

P.7, P.10, P.14)

Note:
Button 

 does not function on this VCR.

To Operate your TV.

You can use this remote control to operate some of
PHILIPS TV’s. To operate other manufacturer’s TV, you
have to set the code. Refer to page 15 for setting code instructions.
Followings are the operative buttons.
TV: Makes the remote control ready for operating the TV. Make sure

you press this button before pressing the other operative buttons.

POWER: Turns the TV on or off.
VCR/TV: Selects TV mode or Auxiliary mode at TV.
ALT (for PHILIPSTV only): Goes back to the previously selected

channel on TV.

VOL

5

5

5

5

5 ∞

∞ : Changes the TV volume.

CH

5

5

5

5

5 ∞

∞ : Changes the TV channels.

5

5

5

5

5 ∞

; :

, MENU (for PHILIPS TV only): Operates the TV menu.

OK/STATUS - For PHILIPS TV : Displays the on- screen
information. For other manufacturer's TV; functions as an
ENTER button after pressing the number buttons while
selecting channels.
AUDIO/MUTE: Turns off the TV sound.
NUMBER buttons: To select channels on TV.

RF OUT

ANT.IN

IN

OUT

AUDIO

VIDEO

VHF

UHF

RF OUT

Cable

ANT. IN

RF coaxial
cable

Back of TV

Back of VCR

Indoor antenna

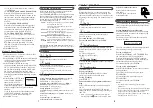
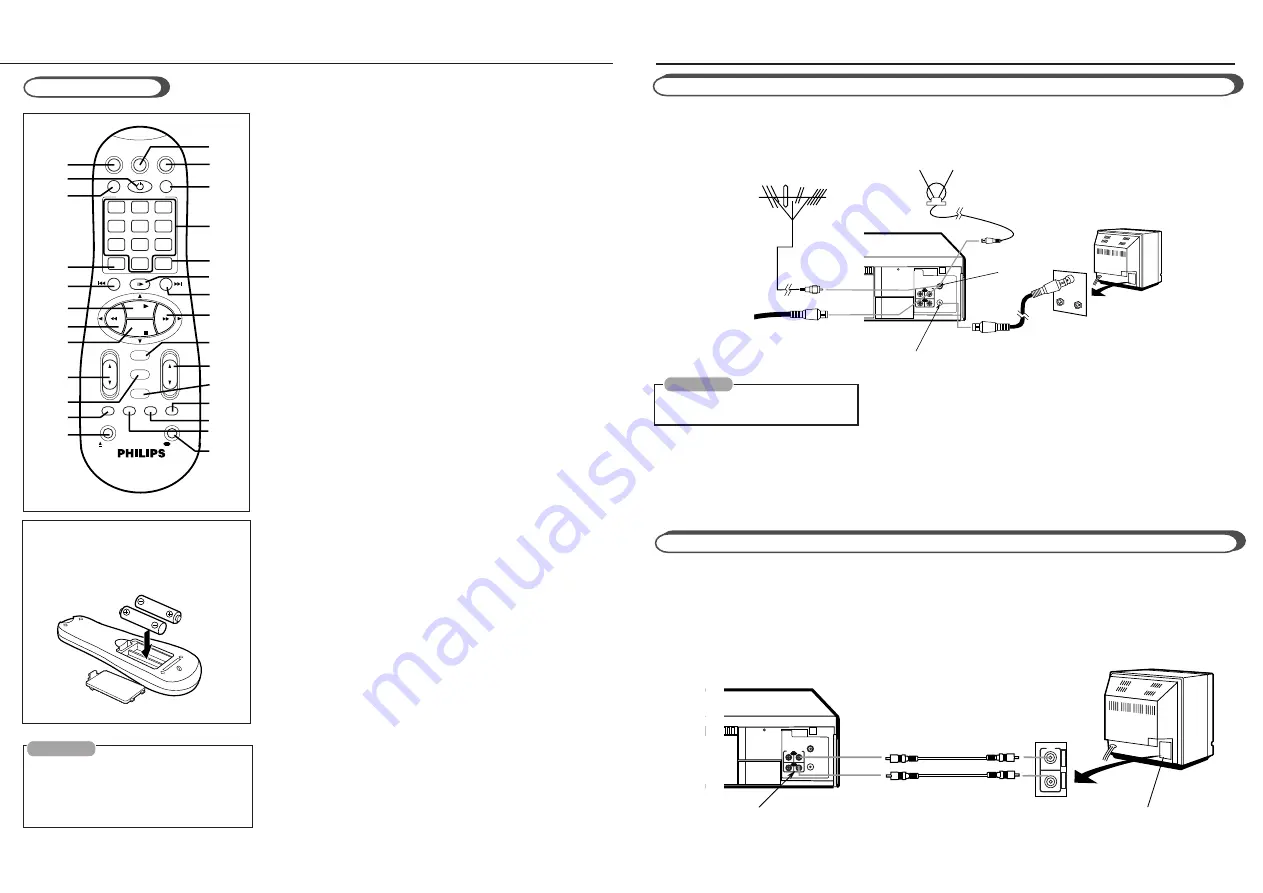
VCR to TV Connection Using RF Cable

1

1

1

Disconnect the antenna cable from the TV.

2

2

2

Connect the antenna cable to the ANT. IN terminal on the back of the VCR.

3

3

3

Connect the VCR to the TV using the RF coaxial cable.

4

4

4

Plug the AC power cords of the VCR and TV into the AC outlets.

CAUTION
Do not plug the AC power cords until
all connections are completed.

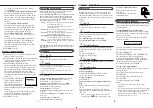
VCR to TV Connection Using AUDIO/VIDEO Cable

If your TV has audio/video connectors, complete the connection below to get better pictures and sounds when playing
back a tape. To watch a picture from this VCR on the TV, select the AV mode on the TV.

Outdoor antenna

Note;

Even if you are using this AV connection, you must also
complete the RF connection
above.

To watch a picture from this VCR on the TV, select UHF E36 channel (video
channel of this VCR when shipped from the factory).
If you want to change video channel, see “Setting the Video Channel.” (

P.5)

RF OUT

ANT.IN

IN

OUT

AUDIO

VIDEO

IN

A
U
D

I

O

V

I

D
E
O

Back of TV

Back of VCR

To VIDEO/AUDIO OUT jacks

To video and audio input jacks

Audio cable

Video cable

Summary of Contents for VR220/55

Page 1: ...minal to TV P 4 CHANNEL REC OTR MENU POWER PLAY OK STATUS COLOUR MODE VIDEO AUDIO STILL PAUSE STOP EJECT When the equipment is installed in a cabinet or a shelf make sure that it has sufficient space on all sides to allow for ventilation 10 cm or more on both side on top and at the rear When discarding batteries environmental problems must be considered and the local rules or laws governing the di...

Page 2: ...minal to TV P 4 CHANNEL REC OTR MENU POWER PLAY OK STATUS COLOUR MODE VIDEO AUDIO STILL PAUSE STOP EJECT When the equipment is installed in a cabinet or a shelf make sure that it has sufficient space on all sides to allow for ventilation 10 cm or more on both side on top and at the rear When discarding batteries environmental problems must be considered and the local rules or laws governing the di...

Page 3: ...age 15 for setting code instructions Followings are the operative buttons TV Makes the remote control ready for operating the TV Make sure you press this button before pressing the other operative buttons POWER Turns the TV on or off VCR TV Selects TV mode or Auxiliary mode at TV ALT for PHILIPSTV only Goes back to the previously selected channel on TV VOL5 5 5 5 5 Changes the TV volume CH5 5 5 5 ...

Page 4: ...age 15 for setting code instructions Followings are the operative buttons TV Makes the remote control ready for operating the TV Make sure you press this button before pressing the other operative buttons POWER Turns the TV on or off VCR TV Selects TV mode or Auxiliary mode at TV ALT for PHILIPSTV only Goes back to the previously selected channel on TV VOL5 5 5 5 5 Changes the TV volume CH5 5 5 5 ...

Page 5: ...IRM OK END MENU To Delete or Edit Receivable Channels 1 Press VCR 2 Press MENU 3 Press PLAY 5or STOP to select TUNER SET UP then press OK STATUS 4 Press PLAY 5or STOP to select CHANGING TUNER SET UP then press OK STATUS The programmed channel information list appears 5 Press PLAY 5or STOP until the desired channel setting flashes 5 1 TO DELETE UNWANTED CHANNELS Press CLEAR Repeat this step until y...

Page 6: ...IRM OK END MENU To Delete or Edit Receivable Channels 1 Press VCR 2 Press MENU 3 Press PLAY 5or STOP to select TUNER SET UP then press OK STATUS 4 Press PLAY 5or STOP to select CHANGING TUNER SET UP then press OK STATUS The programmed channel information list appears 5 Press PLAY 5or STOP until the desired channel setting flashes 5 1 TO DELETE UNWANTED CHANNELS Press CLEAR Repeat this step until y...

Page 7: ...ork well choose the other settings below NTSC3 58 To record the NTSC signals or playback an NTSC3 58 tape on an NTSC TV NTSC4 43 To record the NTSC signals or playback an NTSC4 43 tape on a PAL TV NTSC PAL TV ONLY FOR PLAYBACK To playback an NTSC3 58 tape on a PAL TV PAL To record PAL signals or playback a PAL TV MESECAM To record SECAM signals or playback a MESECAM tape When playing back an NTSC ...

Page 8: ...ork well choose the other settings below NTSC3 58 To record the NTSC signals or playback an NTSC3 58 tape on an NTSC TV NTSC4 43 To record the NTSC signals or playback an NTSC4 43 tape on a PAL TV NTSC PAL TV ONLY FOR PLAYBACK To playback an NTSC3 58 tape on a PAL TV PAL To record PAL signals or playback a PAL TV MESECAM To record SECAM signals or playback a MESECAM tape When playing back an NTSC ...

Page 9: ...ogramme in its entirety first perform the following steps 1 Press and hold STILL SLOW or PAUSE STILL 8on the front panel and press REC OTR to engage the RECORD PAUSE mode The VCR then automatically checks the condition of the tape and after approximately 7 seconds re enters RECORD PAUSE 2 Press REC OTR again to start recording If you want to bypass the DSPC system and begin recording immediately s...

Page 10: ...ogramme in its entirety first perform the following steps 1 Press and hold STILL SLOW or PAUSE STILL 8on the front panel and press REC OTR to engage the RECORD PAUSE mode The VCR then automatically checks the condition of the tape and after approximately 7 seconds re enters RECORD PAUSE 2 Press REC OTR again to start recording If you want to bypass the DSPC system and begin recording immediately s...

Page 11: ... START or Number button 1 or 4 Each time you press the button the set time changes by 1 minute intervals If you hold the button the set time changes by 30 minute intervals Select Stop Time Press STOP or Number button 2 or 5 Each time you press the button the set time changes by 1 minute intervals If you hold the button the set time changes by 30 minute intervals 1 2 3 4 5 Select Tape Speed Press A...

Page 12: ... START or Number button 1 or 4 Each time you press the button the set time changes by 1 minute intervals If you hold the button the set time changes by 30 minute intervals Select Stop Time Press STOP or Number button 2 or 5 Each time you press the button the set time changes by 1 minute intervals If you hold the button the set time changes by 30 minute intervals 1 2 3 4 5 Select Tape Speed Press A...

Page 13: ...the power is supplied again to this VCR after the power failure set the clock time and turn off the VCR Each timer program you have made will start unless its start time already passes 1 Insert a source tape in the playing VCR and a blank tape in the recording VCR If a tape without the record tab is inserted in the play ing VCR playback automatically starts In this case press the STOP button 2 Tur...

Page 14: ...the power is supplied again to this VCR after the power failure set the clock time and turn off the VCR Each timer program you have made will start unless its start time already passes 1 Insert a source tape in the playing VCR and a blank tape in the recording VCR If a tape without the record tab is inserted in the play ing VCR playback automatically starts In this case press the STOP button 2 Tur...

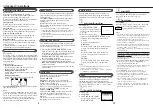
Page 15: ...se to operate your TV are explained on page 3 1 2 TV Manufacturers Codes PHILIPS 01 02 03 EMERSON 14 GOLDSTAR 04 GRUNDIG 24 25 HITACHI 12 JVC 05 MITSUBISHI 13 26 PANASONIC 07 17 19 20 RCA 10 SAMSUNG 18 SANYO 11 SHARP 16 SONY 09 THOMSON 21 22 23 TOSHIBA 08 ZENITH 06 15 G e n e r a l G e n e r a l G e n e r a l Mains voltage AC 110 V 240 V Mains frequency 50 Hz 60 Hz Power consumption Approx 14W Amb...

Page 16: ...se to operate your TV are explained on page 3 1 2 TV Manufacturers Codes PHILIPS 01 02 03 EMERSON 14 GOLDSTAR 04 GRUNDIG 24 25 HITACHI 12 JVC 05 MITSUBISHI 13 26 PANASONIC 07 17 19 20 RCA 10 SAMSUNG 18 SANYO 11 SHARP 16 SONY 09 THOMSON 21 22 23 TOSHIBA 08 ZENITH 06 15 G e n e r a l G e n e r a l G e n e r a l Mains voltage AC 110 V 240 V Mains frequency 50 Hz 60 Hz Power consumption Approx 14W Amb...

Reviews: