Service modes, Repair tips
GB 49
VR120
5.
5.
Service modes, Repair tips
5.1
Special functions
5.1.1
Erasing the EEPROM
–
Disconnect from mains
–
Push and hold down the Standby key, reconnect to
mains and keep the Standby key depressed for a further
3 sec.
All EEPROM data will then be erased and initialised (timer
and transmitter channels). The internal processor RAM will
also be erased, but the option codes, deck parameters and
adjustment values are maintained.
5.1.2
After changing the EEPROM or Motherboard the
following steps must be carried out:
Step 40: Option code input
Step 51: Gap position adjustment
Step 52: Studio Picture control‘ adjustment
Step 53: Input of clock correction
Step 62: Adjustment of Audio Linear Playback Level
Step 99: Clock frequency output
5.2
Service test program
5.2.1
Introduction
The software program for the control, deck and operating
microprocessors includes a service test program. It was
divided into the following steps, with the following ‘modes‘:
Step 00: Display of mask version number
Step 01: Check of the drive positions
Step 02: Display of the deck - error codes
Step 03: Deck - sensors and manual tracking
Step 04: Display of operating hours counter
Step 05: Display of the IIC-Bus Communication
Step 10: Operation without drive - dummy mode
Step 40: Option code input
Adjustment Steps in the service test program:
Step 51: Gap position adjustment
Step 52: ‘Studio Picture control‘ adjustment
Step 53: Input of clock correction
Step 62: Adjustment of Audio Linear Playback Level
Step 98: Display test
Step 99: Clock frequency output
In the service test program, all drive functions apart from the
channel search and channel change mode can be carried
out. The program position set before entering the service
test program is maintained.
5.2.2
Activating the service test program
Press and hold down the STOP key on the remote control.
Then press the PLAY key on the recorder and keep it
depressed for at least 5 sec. The STOP key on the remote
control may be released whilst the PLAY key on the recorder
is pressed.
The service test program can be selected in any operating
mode apart from the channel search, install, clock set-up and
cassette length calculation mode. The recorder and all drive
functions are fully operational in the service mode.
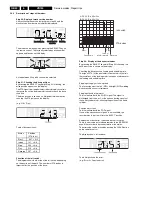
The display shows, for instance:
By pressing the SELECT key on the remote control, all step
modes may be left and the currently selected step number
appears and flashes.
Other service steps are selected with the UP and DOWN
keys or the numerical remote control keys. By pressing the
SELECT key on the remote control whilst the Step is flashing,
the respective mode can be entered or left.
If a step is selected to which no mode is assigned, the
displays shows - - and flashes.
To leave the service program, press the STAND-BY key or
disconnect recorder from mains.
5.2.3
Service mode functions
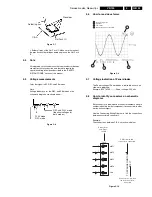
Endurance test
In the service test program, the recorder can be endurance
tested. For this purpose, use a cassette and activate “PLAY”
or “REC”. The functions are then repeated continuously. In
RECORD, the recorder does not move to EJECT at the tape
end, but to REWIND, after which it starts to RECORD again.
This test serves to detect intermittent faults. The last error is
stored in the EEPROM. (The fault remains stored even after
a power failure).
The endurance test is ended by pressing STOP or leaving
the service test program.
Prod. ID No.
ident. No. for A 13 (31, 32, 37)
Centr. Contr. Mask No. µP mask No.
Build No.
continually state No.(software)
Central control
mask No.
Product ID. No.
Build No.
PLAY
TAPE END
RECORD
TAPE BEGIN
REWIND
TAPE BEGIN
Summary of Contents for VR570
Page 12: ...Direction for use GB 12 VR120 3 3 Direction for use RT111 RT116 RT112 RT114 RT123 RT121 RT128 ...
Page 15: ...Direction for use GB 15 VR120 3 SAT VR870L VR870CC VR720 Set width 435 mm ...
Page 56: ...Service modes Repair tips GB 56 VR120 5 Engineer s remarks ...
Page 79: ...Circuit diagrams and PWB layouts Wiring diagram 79 VR120 7 7 16 Wiring Diagram Motherboard ...
Page 81: ...Circuit diagrams and PWB layouts Wiring diagram 81 VR120 7 Engineer s remarks ...
Page 82: ...82 VR120 7 Circuit diagrams and PWB layouts Wiring diagram Engineer s remarks ...
Page 83: ...Circuit diagrams and PWB layouts Wiring diagram 83 VR120 7 7 18 Mother board component side ...
Page 119: ...Tape deck GB 119 VR120 10 ...
Page 123: ...Tape deck GB 123 VR120 10 Engineer s remarks ...

