Service modes, Repair tips
GB 50
VR120
5.
5.2.4
Description of steps with modes:
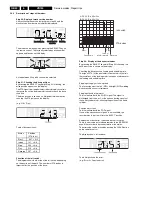
Step 00: Display of mask version number
After activating the service test program, step 00 and the
mask version number are automatically displayed.
The mode can be left again by pressing the SELECT key on
the remote control. The currently selected position number
appears and flashes on the display.
A step between 00 and 99 can now be selected
Step 01: Checking the drive positions
By pressing the SELECT key whilst Step 01 is flashing, the
drive position appears on the display.
The FTA signal from the photoelectric barriers which controls
the revolutions of the loading motor is used to check the drive
condition.
The drive position is shown as a 3-digit decimal number by
counting the FTA pulses on the display.
(e.g. 213 = Play)
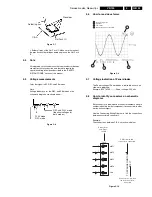
Table of drive positions:
Function of the Init switch:
The diagram shows the function of the Init switch, depending
on the position of the deck. The number of FTA pulses is
important for the position of the drive.
Step 02: Display of the deck error codes
By pressing the SELECT key whilst Step 02 is flashing, the
deck error code is shown on the display.
Checking the drive function Loading and unloading time
The signal (FTA) of the photoelectric barrier which controls
the revolutions of the loading motor is used as a reference for
the loading and unloading time.
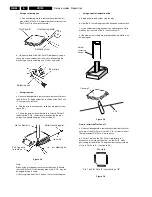
Stopping of supply or take-up reels
The tacho signals of the left (WTL) and right (WTR) winding
disks are used as control reference.
Stopping of head drum motor
This is monitored with the PG/FG signal. The signal is
discharged from the e.m.f. of the non-conducting spools of
the head cylinder motor, showing the position of the head
cylinder.
Capstan motor fault
This is monitored with the FGD signal.
If one of the above sensor signals is not available, the
recorder tries to put the lift into the “EJECT” position.
Explanation of deck error codes and deck error status
The last error code is stored and remains in the EEPROM,
even if the recorder is disconnected from the mains.
The error code can be erased by pushing the CLEAR button
on the remote control.
The display shows, for instance:
The left digit shows the error:
(e.g.: Error 2 = Capstan error)
Central control
mask No.
Product ID. No.
Build No.
Status
Position
(FTA dec)
Eject
007 +2/-2
Index
191 +0/-2
Stop
200 +4/-4
Play
213 +4/-4
Reverse
237 +2/-0
A
B
A: DC, 2 V/Div, 0.5 s/Div
B: DC, 2 V/Div, 0.5 s/Div
Eject
Cass down
I n d e x /
w i n d - r e w i n d
Play
Reverse
Init switch
FTA pulses
Summary of Contents for VR570
Page 12: ...Direction for use GB 12 VR120 3 3 Direction for use RT111 RT116 RT112 RT114 RT123 RT121 RT128 ...
Page 15: ...Direction for use GB 15 VR120 3 SAT VR870L VR870CC VR720 Set width 435 mm ...
Page 56: ...Service modes Repair tips GB 56 VR120 5 Engineer s remarks ...
Page 79: ...Circuit diagrams and PWB layouts Wiring diagram 79 VR120 7 7 16 Wiring Diagram Motherboard ...
Page 81: ...Circuit diagrams and PWB layouts Wiring diagram 81 VR120 7 Engineer s remarks ...
Page 82: ...82 VR120 7 Circuit diagrams and PWB layouts Wiring diagram Engineer s remarks ...
Page 83: ...Circuit diagrams and PWB layouts Wiring diagram 83 VR120 7 7 18 Mother board component side ...
Page 119: ...Tape deck GB 119 VR120 10 ...
Page 123: ...Tape deck GB 123 VR120 10 Engineer s remarks ...


