background image

F10

WelcomeEye Comfort / Compact / 08/17

WelcomeEye Lock - 

DES 1100 EDL (réf: 531009)

WelcomeEye Power - 

DES 1000 DPS (réf: 531010)**

WelcomeEye TAG - 

DES 1000 ACI (réf: 531011)**

** Réferez-vous à la notice complète WelcomeEye Connect/Touch disponible sur le site 
www.philips.com pour plus d’informations.
* Réferez-vous à la notice complète WelcomeEye Comfort/Compact disponible sur le site 
www.philips.com pour plus d’informations.

8. ASSISTANCE TECHNIQUE - GARANTIE

La FAQ est disponible dans la notice complète téléchageable sur www.philips.com.

Cet appareil est garanti, pièces et main d’œuvre dans nos ateliers. 
La garantie ne couvre pas : les consommables (piles, batteries, etc.) et les dégâts occasionnés 
par : mauvaise utilisation, mauvaise installation, intervention extérieure, détérioration par 
choc physique ou électrique, chute ou phénomène atmosphérique. 
• Ne pas ouvrir l’appareil afin de ne pas perdre le couvert de la garantie.
• Lors d’un éventuel retour en SAV, protéger l’écran afin d’éviter les rayures.
• Entretien avec un chiffon doux seulement, pas de solvants. La garantie s’annule si vous 

démontez les pièces. Avant le nettoyage, débranchez ou mettez l’appareil hors tension.

Attention :


N’employez aucun produit ou essence d’épuration carboxylique, alcool 

ou similaire. En plus de risquer d’endommager votre appareil, les vapeurs sont également 
dangereuses pour votre santé et explosives.
N’employez aucun outil pouvant être conducteur de tension (brosse en métal, outil pointu...
ou autre) pour le nettoyage.

Le ticket de caisse ou la facture fait preuve de la date d’achat.

En cas de besoin, les contacts et les horaires d’ouverture de nos centres d’assistance 
technique sont disponible sur le site 

www.philips.com.

CARTE DE GARANTIE

M/Mme :                                                                                                       

Numéro de téléphone :                                                                                      

Adresse :                                                                                                       


E-mail :                                                                                                       

Date d’achat :                 /                     /                 (JJ/MM/AAAA)

Revendeur :                                                                                                       

Téléphone du revendeur :                                                                                                      

Adresse du revendeur :                                                                                      

Numéro de série    PHI/1031/

Important :

 veuillez conserver précieusement cette carte de 

garantie, ainsi que votre preuve d’achat.

Summary of Contents for WelcomeEye Comfort DES9500VDP

Page 1: ...nos produits FR Notice téléchargeable sur philips com IT Il manuale è disponibile anche su www philips com ES Manual que puede descargar en philips com PT Manual de instruções disponível no site philips com GB Downloadable instructions at phillips com NL De handleiding kan gedownload worden op philips com D Anleitung kann auf philips com heruntergeladen werden PL Instrukcja do pobrania na philips ...

Page 2: ... 08 17 Fig 1 DES 9900 VDP 1 3 2 4 Made in P R C CFI Extel ZI de Fétan 01600 Trévoux FRANCE 1 2 3 4 5 6 1 2 7 8 1 2 1 2 Made in P R C CFI Extel ZI de Fétan 01600 Trévoux FRANCE IP44 120 m max Of On Master On ZZZ Off Off Off ZZZ 1 2 ...

Page 3: ... FRANCE DES 9900 VDP 1 3 2 4 Made in P R C CFI Extel ZI de Fétan 01600 Trévoux FRANCE DES 9900 VDP 1 3 2 4 Made in P R C CFI Extel ZI de Fétan 01600 Trévoux FRANCE 120 m max Of On Master On Z Z Z On Master On On Z Z Z Of On Master On Z Z Z On Slave On On Z Z Z Of On Master On Z Z Z On Slave On On Z Z Z 1 2 1 2 1 1 2 3 4 5 6 1 2 7 8 1 2 1 2 Made in P R C CFI Extel ZI de Fétan 01600 Trévoux FRANCE I...

Page 4: ...Z Z Z Of On Master On Z Z Z On Slave On On Z Z Z Of On Master On Z Z Z On Slave On On Z Z Z 120 m max 120 m max 1 2 1 2 1 2 DES 9900 VDP 1 3 2 4 Made in P R C CFI Extel ZI de Fétan 01600 Trévoux FRANCE DES 9900 VDP 1 3 2 4 Made in P R C CFI Extel ZI de Fétan 01600 Trévoux FRANCE DES 9900 VDP 1 3 2 4 Made in P R C CFI Extel ZI de Fétan 01600 Trévoux FRANCE DES 9900 VDP 1 3 2 4 Made in P R C CFI Ext...

Page 5: ...blage 2 Paramétrage de la platine 3 Installation du moniteur principal ou supplémentaire 4 Installation de la platine de rue principal ou supplémentaire 5 Installation d une caméra en option 6 Pour aller plus loin 6 CARACTÉRISTIQUES TECHNIQUES p 8 7 ACCESSOIRES p 9 8 ASSISTANCE TECHNIQUE GARANTIE p 10 9 MESURES DE SÉCURITÉ p 11 ...

Page 6: ... technicien autorisé Mesures de sécurité Pour une exploitation en toute sécurité de ce système il est essentiel que les installateurs utilisateurs et techniciens suivent toutes les procédures de sûreté décrites dans ce manuel Des avertissements spécifiques et des symboles d attention sont indiqués sur les éléments si nécessaire 2 CONTENU DU KIT 1 Moniteur 7 WelcomeEye Comfort 2 Support mural 3 Ali...

Page 7: ...atisme La technologie WelcomeEye vous permet de partager la platine de rue entre 2 familles Chaque famille peut posséder jusqu à 3 moniteurs Le système peut comporter un maximun d une caméra et 2 platines de rue Pour un usage efficace veuillez lire attentivement ce manuel d instructions La notice complète est téléchargeable sur www philips com 4 NOMENCLATURE Moniteur Écran Bornier d alimentation B...

Page 8: ...2 3 4 5 6 1 2 7 8 1 2 1 2 Made in P R C CFI Extel ZI de Fétan 01600 Trévoux FRANCE IP44 1 2 3 4 5 6 1 2 7 8 1 2 1 2 Made in P R C CFI Extel ZI de Fétan 01600 Trévoux FRANCE IP44 1 2 3 4 5 6 1 2 7 8 1 2 1 2 Made in P R C CFI Extel ZI de Fétan 01600 Trévoux FRANCE IP44 Notes Lorsque l on appuie sur le bouton d appel le moniteur sonne à l intérieur et la vidéo s affiche Pour changer l étiquette du po...

Page 9: ...siophone moniteur platine de rue et caméra voir fig 1 fig 2 ou fig 3 Fils à utiliser 2 fils 0 75 mm2 jusqu à 80 m ou 2 fils 1 5 mm2 jusqu à 120 m Bien raccorder les fils en respectant un des schémas de câblage en fonction de la configuration souhaitée Bien se référer à l étiquette collée au dos du moniteur et au dos de la platine de rue En fonction de la configuration choisie paramétrer les switch...

Page 10: ...Réglage du volume de la platine Tourner le réglage volume à l aide d un tournevis cruciforme afin de régler le niveau sonore de la platine 3 Installation du moniteur principal ou supplémentaire 1m60 DES 9900 VDP 5 8 1 0 2 3 24V 550mA 1 3 2 4 WiĮ 2 4GHz DES 9900 VDP 5 8 1 0 2 3 Made in P R C CFI Extel ZI de Fétan 01600 Trévoux FRANCE 1 2 4 7 5 6 3 1 Positionner le support mural en faisant en sorte ...

Page 11: ... l ensemble du cablage est terminé un paramétrage de l interface peut être necessaire Pour plus d information référez vous à la notice complète téléchargeable sur www philips com Attention à cette étape ne pas relier l alimentation au 230V AC 4 Installation de la platine de rue principal ou supplémentaire Attention Le produit ne doit pas être relié à l alimentation avant la fin du câblage DES 9900...

Page 12: ...cas d une deuxième platine de rue penser à configurer le s moniteur s On 11 Mettre un joint silicone entre la visière et le mur afin d éviter le ruissellement de l eau Ne pas utiliser de silicone à base d acide acétique odeur de vinaigre 5 Installation d une caméra en option Raccorder les fils en respectant le schéma de câblage Choisisser un emplacement approprié pour l installation de la caméra S...

Page 13: ...e réf 531003 2 fils Ecran 7 Résolution 800 x 480 Courant consommé 460mA Puissance consommé 11 1W 6 sonneries 85dB Dimensions 142 h x 210 l x 15 p WelcomeEye AddCompact moniteur supplémentaire réf 531005 2 fils Ecran 4 3 Résolution 480 x 272 Courant consommé 400mA Puissance consommé 9 6W 6 sonneries 85dB Dimensions 116 h x 146 l x 16 p WelcomeEye Cam caméra supplémentaire réf 531007 capteur C MOS c...

Page 14: ...erdre le couvert de la garantie Lors d un éventuel retour en SAV protéger l écran afin d éviter les rayures Entretien avec un chiffon doux seulement pas de solvants La garantie s annule si vous démontez les pièces Avant le nettoyage débranchez ou mettez l appareil hors tension Attention N employez aucun produit ou essence d épuration carboxylique alcool ou similaire En plus de risquer d endommager...

Page 15: ...ons électriques Dans les écoles les équipements de formation les ateliers la présence d un personnel qualifié est nécessaire pour contrôler le fonctionnement des appareils électroniques Observez les consignes d utilisation des autres appareils reliés au système Veuillez contacter une personne expérimentée au cas où vous auriez des doutes au sujet du mode de fonctionnement ou de la sûreté des appar...

Page 16: ...LATURE p 3 5 PRODUCT INSTALLATION p 5 1 Wiring 2 Configuring the intercom 3 Installing the main or additional monitor 4 Installing the main or additional intercom panel 5 Installing a camera optional 6 Get more out of your device 6 TECHNICAL CHARACTERISTICS p 8 7 ACCESSORIES p 9 8 TECHNICAL ASSISTANCE WARRANTY p 10 9 SAFETY PRECAUTIONS p 11 ...

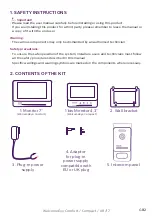
Page 17: ... may only be dismantled by an authorised technician Safety precautions To ensure the safe operation of the system installers users and technicians must follow all the safety procedures described in this manual Specific warnings and warning symbols are marked on the components where necessary 2 CONTENTS OF THE KIT 1 Monitor 7 WelcomeEye Comfort 2 Wall bracket 3 Plug in power supply 5 Intercom panel...

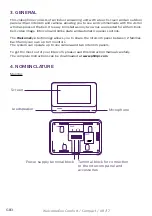
Page 18: ... opener controls The WelcomeEye technology allows you to share the intercom panel between 2 families Each family can own up to 3 monitors The system can operate up to one camera and two intercom panels To get the most out of your intercom please read this instruction manual carefully The complete instructions can be downloaded at www philips com 4 NOMENCLATURE Monitor Screen Power supply terminal ...

Page 19: ...s 1 2 3 4 5 6 1 2 7 8 1 2 1 2 Made in P R C CFI Extel ZI de Fétan 01600 Trévoux FRANCE IP44 1 2 3 4 5 6 1 2 7 8 1 2 1 2 Made in P R C CFI Extel ZI de Fétan 01600 Trévoux FRANCE IP44 1 2 3 4 5 6 1 2 7 8 1 2 1 2 Made in P R C CFI Extel ZI de Fétan 01600 Trévoux FRANCE IP44 Notes When someone presses the call button the inside monitor rings and the video is displayed To change the nameplate label rem...

Page 20: ...length Make sure to connect the wires in accordance with one of the wiring diagrams depending on the desired configuration Refer to the label stuck to the back of the monitor and the back of the intercom panel Configure the switches on the back of the intercom panel as well as the monitor interface according to the chosen configuration see section 2 intercom configuration b Connecting a gate motor...

Page 21: ...I Extel ZI de Fétan 01600 Trévoux FRANCE 1 2 4 7 5 6 3 1 Position the wall bracket so that the screen of the monitor is approximately 1 60m above the ground 2 Mark the location of the holes using the U bolt 3 Drill 4 Use pegs adapted to the bracket those supplied are suitable for solid walls 5 Attach the wall bracket 6 Connect the 2 intercom panel wires and the 2 power supply wires in accordance w...

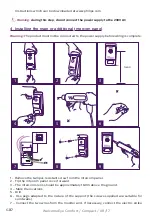
Page 22: ...5 6 1 2 7 8 1 2 1 2 DES 9900 VDP 5 1 0 0 6 3 Made in P R C CFI Extel ZI de Fétan 01600 Trévoux FRANCE IP44 20V 110mA RFID 125kHz 1m60 1 1 2 2 1 2 4 7 5 3 6 8 9 1 Remove the tamper resistant screw from the intercom panel 2 Tip the intercom panel cover forward 3 The intercom s lens should be approximately 1 60m above the ground 4 Mark the locations 5 Drill 6 Use pegs adapted to the nature of the sup...

Page 23: ...ptional Connect the wires in accordance with the wiring diagram Choose a suitable place to install the camera Ensure that nothing gets in the way of the installation Screw the wall section with the screws provided for solid walls Point the camera in the desired direction and tighten the retainer screw Configure the monitor s On 6 Get more out of your device To find out more about your Philips Welc...

Page 24: ...5 2 wires 4 3 screen 480 x 272 Resolution Current consumption 400mA Power consumption 9 6W 6 chimes 85dB Dimensions 116 h x 146 l x 16 d WelcomeEye Cam additional camera ref 531007 C MOS colour sensor 900TVL viewing angle H95 V75 operating temperature 20 C 50 C protection index IP66 7 ACCESSORIES WelcomeEye AddCompact DES 9300 DDE ref 531005 WelcomeEye AddComfort DES 9500 DDE ref 531003 WelcomeEye...

Page 25: ...guarantee is void if parts have been dismantled Before cleaning it disconnect the equipment or switch it off at the mains Warning Do not use any gasoline or carboxylic acid alcohol or similar treatment In addition to damaging your device the fumes are also hazardous to your health and are explosive Do not use any tool that can conduct voltage wire brush or other sharp tool etc for cleaning The til...

Page 26: ...ls training facilities workshops etc qualified personnel must be on hand to monitor electronic equipment operation You must follow the instructions for use of any other devices connected to the system Please contact an experienced person if you have any doubts regarding equipment operation or safety Never plug in or unplug electrical equipment with wet hands When installing this product check that...

Page 27: ...ON DES PRODUKTS S 5 1 Verkabelung 2 Parametrierung der Sprechanlage 3 Installation des Haupt oder Zusatzmonitors 4 Installation der Haupt oder Nebentürsprechanlage 5 Installation einer Kamera optional 6 Für weitergehende Informationen 6 TECHNISCHE MERKMALE S 8 7 ZUBHÖR S 10 8 TECHNISCHER KUNDENDIENST GARANTIE S 10 9 SICHERHEITSMASSNAHMEN S 11 ...

Page 28: ... ausschließlich durch einen Techniker mit entsprechender Zulassung demontiert werden Sicherheitsmaßnahmen Für einen sicheren Betrieb dieses Systems müssen die Installateure Benutzer und Techniker sämtliche in dieser Anleitung beschriebenen Sicherheitsmaßnahmen befolgen Auf den Teilen sind gegebenenfalls Warnsymbole und spezifische Warnungen angebracht 2 INHALT DES SETS 1 Monitor 7 WelcomeEye Comfo...

Page 29: ...euerung von Türöffner und Automatik Die WelcomeEye Technik ermöglicht die Türsprechanlage mit zwei Familien gemeinsam zu nutzen Jede Familie kann bis zu 3 Monitore haben Das System kann maximal eine Kamera und 2 Türsprechanlagen umfassen Bitte lesen Sie für eine ordnungsgemäße Verwendung dieserAnlage diese Betriebsanleitung aufmerksam durch Die vollständige Anleitung kann auf www philips com herun...

Page 30: ...5 6 1 2 7 8 1 2 1 2 Made in P R C CFI Extel ZI de Fétan 01600 Trévoux FRANCE IP44 1 2 3 4 5 6 1 2 7 8 1 2 1 2 Made in P R C CFI Extel ZI de Fétan 01600 Trévoux FRANCE IP44 1 2 3 4 5 6 1 2 7 8 1 2 1 2 Made in P R C CFI Extel ZI de Fétan 01600 Trévoux FRANCE IP44 Hinweise Wenn die Klingeltaste gedrückt wird klingelt der Monitor im Innenrohr und zeigt das Videobild Um das Namensschild an der Tür zu w...

Page 31: ... und Kamera Siehe Abb 1 Abb 2 oder Abb 3 Zu verwendende Kabel 2 Kabel 0 75 mm2 bis 80 m oder 2 Kabel 1 5 mm2 bis 120 m Kabel ordnungsgemäß und unter Beachtung eines der gewünschten Konfiguration entsprechenden Kabelschemas anschließen Bitte beachten Sie genau das Etikett das sich auf der Rückseite des Monitors und der Türsprechanlage befindet Stellen Sie die Schalter auf der Rückseite der Türsprec...

Page 32: ...rechts c Einstellen der Lautstärke der Sprechanlage Zum Einstellen der Lautstärke der Sprechanlage den Lautstärkeregler mithilfe eines Kreuzschlitzschraubenziehers drehen 3 Installation des Haupt oder Zusatzmonitors 1m60 DES 9900 VDP 5 8 1 0 2 3 24V 550mA 1 3 2 4 WiĮ 2 4GHz DES 9900 VDP 5 8 1 0 2 3 Made in P R C CFI Extel ZI de Fétan 01600 Trévoux FRANCE 1 2 4 7 5 6 3 1 Wandhalterung befestigen un...

Page 33: ... und je nach gewählter Konfiguration kann ein Einstellen der Schnittstelle erforderlich sein Für weitere Informationen siehe vollständige Anleitung die Sie auf www philips com herunterladen können Achtung zu diesem Zeitpunkt nicht an die 230V AC Stromversorgung anschließen 4 Installation der Haupt oder Nebentürsprechanlage Achtung Das Gerät darf nicht vor Ende der Verkabelung an die Stromversorgun...

Page 34: ...tenden Normen NFC 15 100 für Frankreich genügende Installation an Prüfen Sie das ordnungsgemäße Funktionieren Videoruf Denken Sie im Fall einer zweiten Türsprechanlage daran den die Monitor e zu konfigurieren Ein 11 Bringen Sie eine Silikonfuge zwischen dem Schutz und der Mauer an um das Eindringen von Wasser zu verhindern Kein Silikon auf Essigsäurebasis verwenden Essiggeruch 5 Installation einer...

Page 35: ... 12V 2A RFID 125 kHz IP44 Betriebstemperatur 20 C 50 C Abmessungen 168 H x 82 B x 38 T WelcomeEye AddComfort Zusatzmonitor Ref 531003 2 Kabel 7 Bildschirm Auflösung 800 x 480 Stromverbrauch 460mA Leistungsaufnahme 11 1W 6 Klingeltöne 85 dB Abmessungen 142 H x 210 B x 5 T WelcomeEye AddCompact Zusatzmonitor Ref 531005 2 Kabel 4 3 Bildschirm Auflösung 480 x 272 Stromverbrauch 400mA Leistungsaufnahme...

Page 36: ...en Arten verursacht wurden unsachgemäße Verwendung unsachgemäße Installation externer Eingriff Beschädigung durch Stoß oder Stromschlag Sturz oder eine atmosphärische Erscheinung Um den Garantieschutz nicht hinfällig werden zu lassen darf das Gerät nicht geöffnet werden Wenn das Gerät an den Kundendienst eingeschickt werden soll muss der Bildschirm zum Schutz vor Kratzern entsprechend geschützt we...

Page 37: ...sanweisungen eingetreten sind Dieses Gerät wurde unter Einhaltung aller Sicherheitsanweisungen hergestellt Zur AufrechterhaltungdiesesZustandsundderGewährleistungoptimalerBetriebsbedingungen muss der Benutzer die in dieser Betriebsanleitung enthaltenen Sicherheitsanweisungen und warnungen einhalten Dieses Symbol weist auf ein Stromschlag oder Kurzschlussrisiko hin Dieses Gerät darf nur mit einer S...

Page 38: ...tallation für das fest mit dem Stromnetz verbundenen Gerät muss sich eine schnell zugängliche Unterbrechungsvorrichtung befinden Netzschalter Unterbrecher gleichwertige Vorrichtungen Um das Gerät herum muss ein minimaler Freiraum beibehalten werden um ausreichende Ventilation zu gewährleisten Die Ventilation darf nicht durch Bedecken der Ventilationsöffnung mit einem Gegenstand wie einem Papier ei...

Page 39: ...INSTALLATIE VAN HET PRODUCT p 5 1 Bedrading 2 Instelling van de straatunit 3 Installatie van het hoofdscherm of extra scherm 4 Installatie van de hoofd of extra straatunit 5 Installatie van een camera optie 6 Voor meer informatie 6 TECHNISCHE EIGENSCHAPPEN p 8 7 TOEBEHOREN p 10 8 TECHNISCHE BIJSTAND GARANTIE p 10 9 VEILIGHEIDSMAATREGELEN p 11 ...

Page 40: ...ogen alleen worden gedemonteerd door een erkende vakman Veiligheidsmaatregelen Voor een veilig gebruik van dit systeem is het noodzakelijk dat de installateurs gebruikers en technici alle veiligheidsprocedures volgen die in deze handleiding beschreven worden Er worden zo nodig specifieke waarschuwingen en attentiesymbolen aangegeven op de onderdelen 2 INHOUD VAN DE KIT 1 Scherm 7 WelcomeEye Comfor...

Page 41: ...ening slot en automatische poort De WelcomeEye technologie stelt u in staat de straatunit te delen tussen 2 families Elke familie kan over maximaal 3 schermen beschikken Het systeem kan uit maximaal een camera en twee straatunits bestaan Lees voor een efficiënt gebruik deze handleiding zorgvuldig door De complete handleiding kan gedownload worden op www philips com 4 NOMENCLATUUR Scherm Scherm Voe...

Page 42: ...1 2 Made in P R C CFI Extel ZI de Fétan 01600 Trévoux FRANCE IP44 1 2 3 4 5 6 1 2 7 8 1 2 1 2 Made in P R C CFI Extel ZI de Fétan 01600 Trévoux FRANCE IP44 1 2 3 4 5 6 1 2 7 8 1 2 1 2 Made in P R C CFI Extel ZI de Fétan 01600 Trévoux FRANCE IP44 Opmerkingen Wanneer men op de belknop drukt gaat binnen bij het scherm een beltoon over en wordt het videobeeld weergegeven Demonteer om het etiket van he...

Page 43: ...gebruiken draden 2 draden 0 75 mm2 tot 80 m of 2 draden 1 5 mm2 tot 120 m Sluit de draden stevig aan volgens een van de bekabelingsschema s naargelang de gewenste configuratie Raadpleeg zorgvuldig het etiket op de achterzijde van het scherm en op de achterzijde van de straatunit Stel naargelang de gekozen configuratie de switches in op de achterzijde van de straatunit en stel de scherminterface in...

Page 44: ...raai met een kruisknopschroevendraaier de stelschroef van de volumeregeling in de gewenste stand 3 Installatie van het hoofdscherm of extra scherm 1m60 DES 9900 VDP 5 8 1 0 2 3 24V 550mA 1 3 2 4 WiĮ 2 4GHz DES 9900 VDP 5 8 1 0 2 3 Made in P R C CFI Extel ZI de Fétan 01600 Trévoux FRANCE 1 2 4 7 5 6 3 1 Breng de wandhouder zodanig aan dat het scherm op een hoogte van ongeveer 1 60 m staat 2 Teken d...

Page 45: ...e interface nodig zijn Raadpleeg voor meer informatie de complete handleiding die gedownload kan worden op www philips com Let op bij deze stap de 230V AC voeding niet aansluiten 4 Installatie van de hoofd of extra straatunit Let op Het apparaat mag niet op de voeding aangesloten worden voordat de bekabeling voltooid is DES 9900 VDP 5 1 0 0 6 3 1 2 3 4 5 6 1 2 7 8 1 2 1 2 DES 9900 VDP 5 1 0 0 6 3 ...

Page 46: ...de regelgeving voor Frankrijk NFC 15 100 Controleer de goede werking bel video Vergeet niet in geval van een tweede straatunit het de scherm en in te stellen On 11 Breng een silicone pakking aan tussen de afdekplaat en de muur om insijpeling van water te voorkomen Gebruik geen siliconen op basis van azijnzuur ruikt naar azijn 5 Installatie van een camera optie Sluit de draden aan volgens het bedra...

Page 47: ...schakelvermogen 12V 2A RFID 125kHz IP44 Bedrijfstemperatuur 20 C 50 C Afmetingen 168 h x 82 b x 38 d WelcomeEye AddComfort extra scherm ref 531003 2 draden Scherm 7 Resolutie 800 x 480 Stroomverbruik 460mA Verbruikt vermogen 11 1 W 6 beltonen 85dB Afmetingen 142 h x 210 b x 15 d WelcomeEye AddCompact extra scherm ref 531005 2 draden Scherm 4 3 Resolutie 480 x 272 Stroomverbruik 400mA Verbruikt ver...

Page 48: ...ccu s etc en schade veroorzaakt door onjuist gebruik onjuiste installatie externe interventie beschadiging door fysieke of elektrische schokken vallen of weersinvloeden Open het apparaat niet bij opening vervalt de garantie Bescherm het scherm in geval van een eventuele retourzending naar de technische dienst om krassen te voorkomen Alleen reinigen met een zachte doek geen oplosmiddelen gebruiken ...

Page 49: ...igheidsvoorschriften Dit product werd strikt vervaardigd volgens de veiligheidsvoorschriften Om deze veiligheid te behouden en om het optimale gebruik van dit product te garanderen dient de gebruiker de veiligheidsinstructies en de waarschuwingen in deze handleiding in acht te nemen Dit symbool duidt op een risico op elektrische schokken of kortsluiting Dit product dient uitsluitend gebruikt te wo...

Page 50: ...r stroomonderbreker of gelijksoortige inrichting dient in de bekabelingsinstallatie van het pand opgenomen te worden voor permanent op het stroomnet aangesloten apparatuur Behoud een minimale afstand rond het apparaat om verzekerd te zijn van voldoende ventilatie De ventilatie mag niet belemmerd worden door de afdekking met voorwerpen als kranten doeken gordijnen enz van de ventilatieopening Er mo...

Page 51: ...NE str 3 4 TERMINOLOGIA str 3 5 MONTAŻ URZĄDZENIA str 5 1 Okablowanie 2 Ustawienia panela 3 Montaż ekranu głównego lub dodatkowego 4 Montaż zewnętrznej płyty głównej lub dodatkowej 5 Montaż kamery opcjonalnie 6 Więcej informacji 6 DANE TECHNICZNE str 8 7 DODATKI str 10 8 POMOC TECHNICZNA GWARANCJA str 10 9 ŚRODKI BEZPIECZEŃSTWA str 11 ...

Page 52: ...y wyłącznie przez wykwalifikowanego technika Środki bezpieczeństwa Dla bezpiecznej eksploatacji systemu instalatorzy użytkownicy oraz technicy powinni przestrzegać wszystkich procedur bezpieczeństwa zawartych w niniejszej instrukcji obsługi W stosownych przypadkach poszczególne elementy zostały oznaczone ostrzeżeniami oraz znakami ostrzegawczymi 2 ZAWARTOŚĆ ZESTAWU 1 Monitor 7 WelcomeEye Comfort 2...

Page 53: ...będna jest jedynie instalacja 2 przewodowa Wykonany w technologii WelcomeEye panel zewnętrzny przeznaczony jest do systemu 2 rodzinnego Każda rodzina może używać do 3 ekranów System może posiadać maksymalnie jedną kamerę i 2 panele zewnętrzne Aby w pełni korzystać z funkcjonalności domofonu należy dokładnie przeczytać niniejszą instrukcję Pełna instrukcja obsługi do pobrania na www philips com 4 T...

Page 54: ...2 7 8 1 2 1 2 Made in P R C CFI Extel ZI de Fétan 01600 Trévoux FRANCE IP44 1 2 3 4 5 6 1 2 7 8 1 2 1 2 Made in P R C CFI Extel ZI de Fétan 01600 Trévoux FRANCE IP44 1 2 3 4 5 6 1 2 7 8 1 2 1 2 Made in P R C CFI Extel ZI de Fétan 01600 Trévoux FRANCE IP44 Uwaga Naciśnięcie przycisku wywołania umożliwia uruchomienie dźwięku na monitorze wewnętrznym oraz wyświetlenie obrazu wideo W celu zmiany wizyt...

Page 55: ...an panel zewnętrzny i kamera zob rys 1 rys 2 lub rys 3 Należy zastosować następujące przewody 2 przewody 0 75 mm2 do 80 m lub 2 przewody 1 5 mm2 do 120 m Podłączyć przewody zgodnie ze schematami instalacji okablowania w zależności od żądanej konfiguracji Należy uwzględnić informacje na etykietach umieszczonych z tyłu ekranu i panela zewnętrznego W zależności od wybranej konfiguracji należy odpowie...

Page 56: ...a Regulacja siły dźwięku panela Ustawić siłę dźwięku panela za pomocą śrubokręta krzyżakowego 3 Montaż ekranu głównego lub dodatkowego 1m60 DES 9900 VDP 5 8 1 0 2 3 24V 550mA 1 3 2 4 WiĮ 2 4GHz DES 9900 VDP 5 8 1 0 2 3 Made in P R C CFI Extel ZI de Fétan 01600 Trévoux FRANCE 1 2 4 7 5 6 3 1 Umieścić uchwyt ścienny w taki sposób aby ekran znajdował się na wysokości ok 1 60 m od podłoża 2 Wyznaczyć ...

Page 57: ...ienia interfejsu może okazać się niezbędna Więcej informacji na ten temat znajduje się w pełnej instrukcji obsługi do pobrania na www philips com Uwaga na tym etapie prac nie podłączać zasilania 230 V AC 4 Montaż zewnętrznej płyty głównej lub dodatkowej Uwaga Przed zakończeniem instalacji okablowania nie należy podłączać urządzenia do zasilania DES 9900 VDP 5 1 0 0 6 3 1 2 3 4 5 6 1 2 7 8 1 2 1 2 ...

Page 58: ... połączenia wideo W przypadku drugiego panela zewnętrznego należy skonfigurować ekran y On 11 Uszczelnić za pomocą silikonowej uszczelki szczelinę między daszkiem i ścianą w celu zabezpieczenia przed przeciekaniem wody Nie stosować silikonu na bazie kwasu octowego zapach octu 5 Montaż kamery opcjonalnie Podłączyć przewody zgodnie ze schematem instalacji okablowania Wybrać odpowiednie dla montażu k...

Page 59: ...Sterowanie bramą zdolność wyłączania 12 V 2 A RFID 125 kHz IP44 temperatura pracy 20 C 50 C Wymiary 168 wys x 82 szer x 38 gł WelcomeEye AddComfort monitor dodatkowy nr ref 531003 2 przewody Ekran 7 Rozdzielczość 800 x 480 Pobór prądu 460 mA Pobór mocy 11 1 W 6 sygnałów dzwonków 85dB Wymiary 142 wys x 210 szer x 15 gł WelcomeEye AddCompact monitor dodatkowy nr ref 531005 2 przewody Ekran 4 3 Rozdz...

Page 60: ...rów itd oraz uszkodzeń powstałych na skutek nieodpowiedniego użytkowania niepoprawnego montażu dokonania zewnętrznych ingerencji przez osoby trzecie awarii wynikających z uszkodzeń fizycznych lub mechanicznych upadku lub oddziaływania zjawisk atmosferycznych Otwarcie urządzenia powoduje utratę gwarancji Podczas przekazywania urządzenia do serwisu pogwarancyjnego należy zabezpieczyć ekran przed zad...

Page 61: ...nikające z nieprawidłowego użytkowania lub z braku zgodności z wytycznymi w zakresie bezpieczeństwa Niniejszy produkt został wyprodukowany zgodnie z zaleceniami w zakresie bezpieczeństwa W celu utrzymania tego stanu rzeczy i zapewnienia najlepszego wykorzystania produktu użytkownik jest zobowiązany do przestrzegania zawartych w niniejszej instrukcji zaleceń i ostrzeżeń w zakresie bezpieczeństwa Te...

Page 62: ...niazdo elektryczne powinno znajdować się w pobliżu urządzenia i być łatwo dostępne Urządzenie odcinające dopływ prądu przełącznik do rozłączania rozłącznik lub podobne w działaniu urządzenie o łatwym dostępie powinno znajdować się w instalacji okablowania budynku dla urządzeń trwale podłączonych do sieci elektrycznej Zachować minimalną odległość wokół urządzenia w celu zapewnienia odpowiedniej wen...

Page 63: ...DEL PRODOTTO p 5 1 Cablaggio 2 Impostazione della pulsantiera 3 Installazione del monitor principale o supplementare 4 Installazione della pulsantiera esterna principale o supplementare 5 Installazione di una telecamera opzionale 6 Maggiori informazioni 6 CARATTERISTICHE TECNICHE p 8 7 ACCESSORI p 10 8 ASSISTENZA TECNICA GARANZIA p 10 9 MISURE DI SICUREZZA p 11 ...

Page 64: ...olo da un tecnico autorizzato Misure di sicurezza Per un uso in tutta sicurezza dell impianto è fondamentale che installatori utenti e tecnici si attengano a tutte le istruzioni relative alla sicurezza descritte nel presente manuale Ove necessario sullevarie parti dell apparecchiatura sono riportati simboli di avvertimento o avvisi specifici 2 CONTENUTO DEL KIT 1 Monitor 7 WelcomeEye Comfort 2 Sup...

Page 65: ...atismo La tecnologia WelcomeEye permette a 2 famiglie di condividere la pulsantiera esterna Ogni famiglia può avere fino a 3 monitor Il sistema può comportare fino a un massimo di una telecamera e 2 pulsantiere esterne Per un uso ottimale dell impianto leggere attentamente il presente manuale d istruzioni Il manuale d uso completo è disponibile su www philips com 4 NOMENCLATURA Monitor Schermo Mor...

Page 66: ... 1 2 7 8 1 2 1 2 Made in P R C CFI Extel ZI de Fétan 01600 Trévoux FRANCE IP44 1 2 3 4 5 6 1 2 7 8 1 2 1 2 Made in P R C CFI Extel ZI de Fétan 01600 Trévoux FRANCE IP44 1 2 3 4 5 6 1 2 7 8 1 2 1 2 Made in P R C CFI Extel ZI de Fétan 01600 Trévoux FRANCE IP44 N B Premendo il pulsante di chiamata all interno dell abitazione si avverte una suoneria e vengono visualizzate le immagini dell esterno Per ...

Page 67: ...videocitofono monitor pulsantiera esterna e telecamera v fig 1 fig 2 o fig 3 Fili da utilizzare 2 fili da 0 75 mm2 fino a 80 m o 2 fili da 1 5 mm2 fino a 120 m Collegare i fili rispettando lo schema di cablaggio corrispondente alla configurazione desiderata Fare riferimento all etichetta presente sul retro del monitor e sul retro della pulsantiera esterna Posizionare gli switch sul retro della pul...

Page 68: ...miliare c Regolazione del volume della pulsantiera esterna Per regolare il volume della pulsantiera esterna girare l apposita vite usando un cacciavite a croce 3 Installazione del monitor principale o supplementare 1m60 DES 9900 VDP 5 8 1 0 2 3 24V 550mA 1 3 2 4 WiĮ 2 4GHz DES 9900 VDP 5 8 1 0 2 3 Made in P R C CFI Extel ZI de Fétan 01600 Trévoux FRANCE 1 2 4 7 5 6 3 1 Disporre il supporto a paret...

Page 69: ... necessario impostare l interfaccia Per maggiori informazioni fare riferimento alla versione completa del manuale d istruzioni disponibile su www philips com Attenzione in questa fase NON collegare l apparecchiatura alla rete di alimentazione 230V AC 4 Installazione della pulsantiera esterna principale o supplementare Attenzione Non collegare il prodotto alla fonte di alimentazione prima di aver p...

Page 70: ...per la Francia NFC 15 100 Controllare che l impianto funzioni correttamente videochiamata ecc Nel caso in cui siano presenti due pulsantiere esterne non dimenticare di configurare il i monitor On 11 Applicare del silicone tra la visiera e il muro per evitare che nell interstizio scorra acqua Non utilizzare silicone a base di acido acetico odore di aceto 5 Installazione di una telecamera opzionale ...

Page 71: ...A Comando cancello potere di interruzione 12V 2A RFID 125kHz IP44 temperatura operativa 20 C 50 C Misure 168 h x 82 l x 38 p WelcomeEye AddComfort monitor supplementare rif 531003 2 fili Schermo 7 Risoluzione 800 x 480 Corrente consumata 460mA Potenza consumata 11 1W 6 suonerie 85dB Misure 142 h x 210 l x 15 p WelcomeEye AddCompact monitor supplementare rif 531005 2 fili Schermo 4 3 Risoluzione 48...

Page 72: ...itivi non riutilizzabili pile batterie ecc e danni causati da uso improprio installazione non corretta interventi esterni danneggiamento causato da urti scosse elettriche eventuali cadute del dispositivo o fenomeni atmosferici Per non far decadere la garanzia evitare di aprire il dispositivo Qualora fosse necessario inviare il dispositivo in assistenza coprire lo schermo in modo da proteggerlo da ...

Page 73: ...o di danni a cose e o persone causati da un uso improprio del dispositivo o dal mancato rispetto delle misure di sicurezza Il presente prodotto è stato realizzato nel pieno rispetto di tutte le norme di sicurezza applicabili Per fare in modo che il prodotto rimanga sicuro e funzioni correttamente l utente deve attenersi alle istruzioni e alle avvertenze relative alla sicurezza contenute nel presen...

Page 74: ... presa di corrente deve trovarsi nelle immediate vicinanze del dispositivo e deve essere di facile accesso L impianto deve integrare un dispositivo di interruzione dell alimentazione delle apparecchiature collegate alla rete interruttore sezionatore salvavita dispositivo equivalente di facile e rapido accesso Mantenere una distanza minima tutto intorno all apparecchiatura in modo da garantire una ...

Page 75: ...STALACIÓN DEL PRODUCTO p 5 1 Cableado 2 Configuración de la placa 3 Instalación del monitor principal o adicional 4 Instalación de la placa externa principal o adicional 5 Instalación de una cámara opcional 6 Para ir más lejos 6 CARACTERÍSTICAS TÉCNICAS p 8 7 ACCESORIOS p 10 8 ASISTENCIA TÉCNICA GARANTÍA p 10 9 MEDIDAS DE SEGURIDAD p 11 ...

Page 76: ...ntos Medidas de seguridad Para un uso de este sistema con total seguridad resulta fundamental que los instaladores usuarios y técnicos sigan todos y cada uno de los procedimientos de seguridad descritos en el presente manual En caso necesario figuran advertencias específicas y símbolos de atención en los elementos 2 CONTENIDO DEL KIT 1 Monitor 7 WelcomeEye Comfort 2 Soporte de pared 3 Alimentación...

Page 77: ...oles del cerradero y del automatismo La tecnología WelcomeEye le permite compartir la placa externa entre 2 familias Cada familia puede disponer de hasta 3 monitores El sistema puede tener un máximo de una cámara y 2 placas externas Para un uso eficaz lea detenidamente este manual de instrucciones El manual completo se puede descargar en www philips com 4 NOMENCLATURA Monitor Pantalla Bornera de a...

Page 78: ... 1 2 3 4 5 6 1 2 7 8 1 2 1 2 Made in P R C CFI Extel ZI de Fétan 01600 Trévoux FRANCE IP44 1 2 3 4 5 6 1 2 7 8 1 2 1 2 Made in P R C CFI Extel ZI de Fétan 01600 Trévoux FRANCE IP44 1 2 3 4 5 6 1 2 7 8 1 2 1 2 Made in P R C CFI Extel ZI de Fétan 01600 Trévoux FRANCE IP44 Notas Al pulsar el botón de llamada el monitor suena en el interior y aparece el vídeo Para cambiar la etiqueta del portanombre d...

Page 79: ...fig 2 o fig 3 Cables que se deben usar 2 cables de 0 75 mm2 hasta 80 m o 2 cables de 1 5 mm2 hasta 120 m Conectar los cables respetando uno de los esquemas de cableado en función de la configuración deseada Respetar bien la etiqueta pegada al dorso del monitor y al dorso de la placa externa En función de la configuración elegida configurar los conmutadores al dorso de la placa y configurar la inte...

Page 80: ...milias c Ajuste del volumen de la placa Girar el ajuste del volumen con un destornillador de cruz para ajustar el nivel sonoro de la placa 3 Instalación del monitor principal o adicional 1m60 DES 9900 VDP 5 8 1 0 2 3 24V 550mA 1 3 2 4 WiĮ 2 4GHz DES 9900 VDP 5 8 1 0 2 3 Made in P R C CFI Extel ZI de Fétan 01600 Trévoux FRANCE 1 2 4 7 5 6 3 1 Colocar el soporte de pared procurando que la pantalla d...

Page 81: ...erminar todo el cableado puede ser necesaria la configuración de la interfaz Para más información consulte el manual completo que puede descargar en www philips com Atención en esta etapa no conectar la alimentación al 230 V CA 4 Instalación de la placa externa principal o adicional Atención El producto no debe estar conectado a la alimentación antes de haber terminado el cableado DES 9900 VDP 5 1...

Page 82: ...ra Francia Comprobar el funcionamiento correcto llamada de vídeo En el caso de una segunda placa externa recordar configurar el los monitor es On 11 Aplicar una junta de silicona entre la visera y la pared para evitar que circule el agua No use silicona con ácido acético olor a vinagre 5 Instalación de una cámara opcional Conectar los cables respetando el esquema de cableado Elegir un emplazamient...

Page 83: ...12 V 2 A RFID 125 kHz IP44 temperatura de uso 20 C 50 C Dimensiones 168 alto x 82 ancho x 38 profundo WelcomeEye AddComfort monitor adicional ref 531003 2 cables Pantalla 7 Resolución 800 x 480 Corriente consumida 460mA Potencia consumida 11 1 W 6 timbres 85 dB Dimensiones 142 alto x 210 ancho x 15 profundo WelcomeEye AddCompact monitor adicional ref 531005 2 cables Pantalla 4 3 Resolución 480 x 2...

Page 84: ...s baterías etc y los daños ocasionados por un uso o instalación incorrectos la intervención de una tercera persona el deterioro por golpes físicos o cortocircuitos caídas o fenómenos atmosféricos No abrir el aparato para no perder la cobertura de la garantía En caso de una eventual devolución a SPV proteger la pantalla para evitar que se raye Limpiar únicamente con un trapo suave no usar disolvent...

Page 85: ...ido fabricado respetando completamente las normas de seguridad Para mantener este estado y garantizar el uso correcto del producto el usuario deberá respetar las instrucciones y avisos de seguridad incluidos en el manual Este símbolo indica un riesgo de electrocución o de cortocircuito Solo deberá utilizar este producto con un nivel de corriente situado entre 100 240 voltios y 50 60 hercios No int...

Page 86: ...ueda acceder rápidamente en la instalación de cableado del edificio para el material conectado en el domicilio a la red eléctrica Conservar una distancia mínima alrededor del aparato para garantizar una ventilación suficiente La ventilación no debe impedirse cubriendo la apertura de ventilación con ningún objeto tipo papel de periódico mantel cortina etc No se debe colocar sobre el aparato ninguna...

Page 87: ...INSTALAÇÃO DO PRODUTO p 5 1 Cablagem 2 Parametrização da placa de rua 3 Instalação do monitor principal ou suplementar 4 Instalação da placa de rua principal ou suplementar 5 Instalação de uma câmara opcional 6 Para saber mais 6 CARACTERÍSTICAS TÉCNICAS p 8 7 ACESSÓRIOS p 9 8 ASSISTÊNCIA TÉCNICA GARANTIA p 10 9 MEDIDAS DE SEGURANÇA p 11 ...

Page 88: ...smontados por um técnico autorizado Medidas de segurança Para uma exploração em total segurança deste sistema é essencial que os instaladores utilizadores e técnicos respeitem todos os procedimentos de segurança descritos neste manual Se necessário consulte as advertências específicas e símbolos de atenção indicados nos elementos 2 CONTEÚDO DO KIT 1 Monitor 7 WelcomeEye Comfort 2 Suporte de parede...

Page 89: ...andos do trinco e do automatismo A tecnologia WelcomeEye permite compartilhar a placa de rua entre 2 domicílios Cada domicílio pode ter até 3 monitores O sistema pode incluir no máximo uma câmara e duas placas de rua Para uma utilização eficaz ler atentamente este manual de instruções O manual completo do seu produto está disponível na página www philips com 4 NOMENCLATURA Monitor Ecrã Terminal de...

Page 90: ...ltifalante 1 2 3 4 5 6 1 2 7 8 1 2 1 2 Made in P R C CFI Extel ZI de Fétan 01600 Trévoux FRANCE IP44 1 2 3 4 5 6 1 2 7 8 1 2 1 2 Made in P R C CFI Extel ZI de Fétan 01600 Trévoux FRANCE IP44 1 2 3 4 5 6 1 2 7 8 1 2 1 2 Made in P R C CFI Extel ZI de Fétan 01600 Trévoux FRANCE IP44 Notas Ao premir o botão de chamada aciona a campainha do monitor no interior e o dispositivo vídeo Para mudar a etiquet...

Page 91: ... a utilizar 2 fios de 0 75 mm2 até 80 m ou 2 fios de 1 5 mm2 até 120 m Ligar corretamente os fios respeitando os esquemas de cablagem em função da configuração desejada Para a cablagem consultar a etiqueta colada na parte traseira do monitor e da placa de rua Em função da configuração escolhida parametrizar os switchs na parte traseira da placa de rua e configurar a interface do monitor consulte a...

Page 92: ...talação do monitor principal ou suplementar 1m60 DES 9900 VDP 5 8 1 0 2 3 24V 550mA 1 3 2 4 WiĮ 2 4GHz DES 9900 VDP 5 8 1 0 2 3 Made in P R C CFI Extel ZI de Fétan 01600 Trévoux FRANCE 1 2 4 7 5 6 3 1 Posicionar o suporte de parede de modo que o ecrã do monitor fique à uma altura de cerca de 1m60 do solo 2 Marcar as posições a perfurar com um suporte de montagem 3 Furar 4 Colocar buchas adaptadas ...

Page 93: ...tação de 230V AC 4 Instalação da placa de rua principal ou suplementar Atenção Não ligar o produto à alimentação antes de terminar a cablagem DES 9900 VDP 5 1 0 0 6 3 1 2 3 4 5 6 1 2 7 8 1 2 1 2 DES 9900 VDP 5 1 0 0 6 3 Made in P R C CFI Extel ZI de Fétan 01600 Trévoux FRANCE IP44 20V 110mA RFID 125kHz 1m60 1 1 2 2 1 2 4 7 5 3 6 8 9 1 Retirar o parafuso antirroubo na parte inferior da placa de rua...

Page 94: ...de a fim de evitar a infiltração de água Não colocar silicone à base de ácido acético odor de vinagre 5 Instalação de uma câmara opcional Ligar os fios respeitando o esquema de cablagem Escolher um espaço adequado para a instalação da câmara A instalação não deve ser perturbada por nenhum elemento Aparafusar a parte mural com os parafusos fornecidos para materiais sólidos Orientar a câmara na dire...

Page 95: ...Dimensões 142 A x 210 L x 15 P WelcomeEye AddCompact monitor suplementar ref 531005 2 fios Ecrã de 4 3 Resolução 480 x 272 Energia consumida 400mA Potência consumida 9 6W 6 melodias 85dB Dimensões 116 A x 146 L x 16 P WelcomeEye Cam câmara suplementar ref 531007 sensor C MOS a cores 900TVL ângulo de vista H95 V75 temperatura de utilização 20 C 50 C Índice de proteção IP66 7 ACESSÓRIOS WelcomeEye A...

Page 96: ...tes A garantia é anulada se desmontar os componentes Antes da limpeza desligue ou coloque o aparelho fora de tensão Atenção Não utilizar qualquer produto ou essência de lavagem com ácido carboxílico álcool ou semelhantes Para além de poderem danificar o seu aparelho os vapores são perigosos para a sua saúde e são explosivos Não utilize nenhum instrumento que possa ser condutor de tensão escova met...

Page 97: ...alações eléctricas Nas escolas nos equipamentos de formação os ateliês é necessária a presença de pessoal qualificado para controlar o funcionamento dos aparelhos eletrónicos Observe as instruções de utilização dos outros aparelhos ligados ao sistema Queira contactar uma pessoa experiente em caso de dúvida sobre o funcionamento ou a segurança dos aparelhos Nunca ligue ou desligue os aparelhos elét...

Page 98: ......

Page 99: ......

Page 100: ...vice must only be installed and used indoors D Dieses Symbol zeigt an dass das Gerät nur innen installiert und verwendet wird NL Dit symbool betekent dat het apparaat alleen binnen mag worden geïnstalleerd en gebruikt PL Ten symbol wskazuje iż urządzenie przeznaczone jest wyłącznie do montażu i użytku wewnętrznego IT Questo simbolo indica che l apparecchio si installa e si utilizza unicamente all ...

Reviews: