background image

Configuring the Wireless Router

14

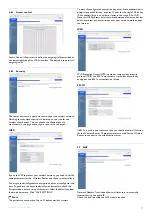
RIP Defect (Default : Disabled) - If an RIP request packet is not 
acknowledged to by the router, it will stay in the input queue and not 
be released. Accumulated packets could cause the input queue to fill, 
causing severe problems for all protocols. enabling this feature prevents 
the packets from accumulating.

Discard Ping to WAN (Default : Disabled) - Prevent a ping on the 
Wireless Router’s WAN port from being routed to the network.

Scroll down to view more information.

Stateful Packet Inspection

This is called a "Stateful" packet inspection because it examines the 
contents of the packet to determine the state of the communications ; 
i.e., it ensures that the stated destination computer has previously 
requested the current communication. This is a way of ensuring that all 
communications are initiated by the recipient computer and are taking 
place only with sources that are known and trusted from previous 
interactions. In addition to being more rigorous in their inspection of 
packets, stateful inspection firewalls also close off ports until connection 
to the specific port is requested.

When particular types of traffic are checked, only the particular type of 
traffic initiated from the internal LAN will be allowed. For example, if 
the user only checks "FPT Service" in the Stateful Packet Inspection 
section, all incoming traffic will be blocked except for FTP connections 
initiated from the local LAN.

Stateful Packet Inspection allows you to select different application 
types that are using dynamic port numbers. If you wish to use the 
Stateful Packet Inspection (SPI) to block packets, click on the Yes radio 
button in the "Enable SPI and Anti-DoS firewall protection" field and 
then check the inspection type that you need, such as Packet 
Fragmentation, TCP Connection, UDP Session, FTP Service, H.323 
Service, or TFTP Service.

When hackers attempt to enter your network, the router can alert 
you by e-mail

If the mail server needs to authenticate your indentification before 
sending out any e-mail, please fill related information in POP3 server, 
username and password fields. Otherwise leave the three fields blank.

Connection Policy

Enter the appropriate values for TCP/UDP sessions as described in the 
following table.

Note

The firewall does not significantly affect system performance, so we 
advise enabling the prevention features to protect your network.

4.8.6

DMZ

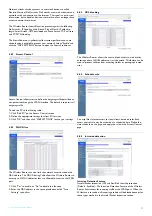
If you have a client PC that cannot run an Internet application properly 
from behind the firewall, you can open the client up to unrestricted 

two-way Internet access. Enter the IP address of a DMZ (Demilitarized 
Zone) host on this screen. Adding a client to the DMZ may expose your 
local network to a variety of security risks, so only use this option as a 
last resort.

4.9

UPnP

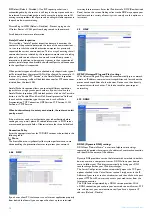
UPNP (Universal Plug and Play) settings

With Universal Plug and Play, a device can automatically join a network, 
obtain an IP address, communicate its capabilities, and learn about the 
presence and capabilities of other devices. Devices can then directly 
communicate with each other. This further enables peer-to-peer 
networking.

4.10 DDNS

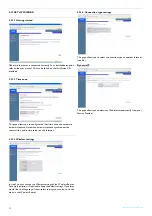
DDNS (Dynamic DNS) settings

DDNS text "Domain Name" is a series of alphanumeric strings 
separated by periods that maps to the address of a network connection 
and identifies the owner of the address.

Dynamic DNS provides users on the Internet with a method to tie their 
domain name to a computer or server. DDNS allows your domain 
name to follow your IP address automatically by having your DNS 
records changed when your IP address changes.
The Server Configuration section automatically opens the TCP port 
options checked in the Virtual Server section. Simply enter in the IP 
Address of your server, such as a web server, and then click on the port 
option HTTP Port 80 so users can access your web server from the 
Internet connection.
This DNS feature is powered by a DDNS service provider. With 
a DDNS connection you can host your own web site, email server, FTP 
site, and more at your own location even if you have a dynamic IP 
address. (Default : Disable)

Summary of Contents for Wireless Router SNB5600

Page 1: ...Register your product and get support at www philips com welcome EN Wireless Router SNB5600 ...

Page 2: ......

Page 3: ...es menu structure 8 4 3 SYSTEM 8 4 3 1 Time zone 8 4 3 2 Password Settings 9 4 3 3 Remote management 9 4 4 WAN 9 4 4 1 Dynamic IP Address 9 4 4 2 PPPoE 9 4 4 3 Static IP Address 10 4 4 4 Clone MAC Address 10 4 4 5 DNS 10 4 5 LAN 10 4 6 WIRELESS 10 4 6 1 Channel and SSID 10 4 6 2 Access control 11 4 6 3 Security 11 4 7 NAT 11 4 7 1 Address Mapping 12 4 7 2 Virtual server 12 4 7 3 Special Applicatio...

Page 4: ...ectronic Equipment Directive 2002 96 EC has been put in place to ensure that products are recycled using best available treatment recovery and recycling techniques to ensure human health and high environmental protection Your product is designed and manufactured with high quality materials and components which can be recycled and reused Do not dispose of your old product in your general household ...

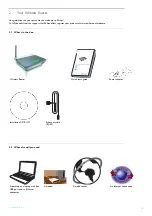
Page 5: ...ter your product at www philips com welcome 2 1 What s in the box Wireless Router Quick start guide Power adapter Installation CD ROM Ethernet cable RJ 45 2 2 What else will you need A desktop or a laptop with free A modem A web browser An Internet connection USB port and an Ethernet connector Quick start guide 1 2 3 Connect Install Enjoy SNB5600 W E B BROW SER ...

Page 6: ...lished 2 4 Overview of the rear side of the wireless router A WAN port Connect your modem to this port B LAN ports 10 100 Ethernet ports RJ 45 Connect devices to your local area network on these ports i e a PC hub or switch C Power Inlet Connect the included power adapter to this inlet D Reset button Use this button to reset the power and restore the default factory settings To reset without losin...

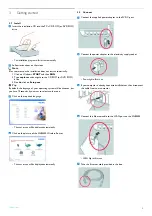
Page 7: ...em will be choosen but you have 10 seconds if you want to select another one Click on the required language The next screen will be displayed automatically Click on the picture of the SNB5600 Wireless Router The next screen will be displayed automatically 3 2 Connect Connect the supplied power adapter to the 9V DC port Connect the power adapter to the electricity supply socket Power light will tur...

Page 8: ...ubject to change The screen displayed may differ from the one shown Click on Menu if you want to go back to the menu screen Tip Your WiFi network is running but not secured Click on Menu if you want to go back to the menu screen Click on Set Encryption Your WiFi network will be secured by generating automatically an encryption key and a network name SSID Note At any time you can retrieve your wire...

Page 9: ...her install your Wireless USB adapter on the same PC than the Wireless Router or on another PC 3 4 2 Install another WiFi device Refer to the manual of the other WiFi device Note If you have previously secured your network see 3 2 step 12 through the easy installation the name of your network SSID will be PHILIPS_xxxxxx If not secured previously through the easy installation the SSID will be phili...

Page 10: ...ist This information is used for log entries and client filtering If you want to automatically synchronize the Wireless Router with a public time server check the box to Enable Automatic Time Server Maintenance Select the desired servers from the drop down menu SET UP WIZARD Getting started Time zone Wireless settings Connection Type Settings Dynamic IP Note It is highly recommended to use the Eas...

Page 11: ...imum idle time it will perform system logout and you have to log in again to access the management interface Default 10 minutes 4 3 3 Remote management By default management access is only available to users on your local network However you can also manage the Wireless Router from a remote host by entering the IP address of a remote computer on this screen Check the Enabled check box and enter th...

Page 12: ...ever if there is a DNS server that you would rather use you need to specify the IP address here 4 5 LAN You can enable DHCP to dynamically allocate IP addresses to your client PCs or configure filtering functions based on specific clients or protocols The router must have an IP address for the local network 4 6 WIRELESS The router can be quickly configured as a wireless access point for roaming cl...

Page 13: ...elect the default key from the drop down menu Click SAVE SETTINGS Note The passphrase can consist of up to 32 alphanumeric characters To manually configure the encryption key enter five hexadecimal pairs of digits for each 64 bit key or enter 13 pairs for the single 128 bit key A hexadecimal digit is a number or letter in the range 0 9 or A F Note that WEP protects data transmitted between wireles...

Page 14: ...92 168 2 2 80 then all HTTP requests from outside users will be transferred to 192 168 2 2 on port 80 Therefore by just entering the IP address provided by the ISP Internet users can access the service they need at the local address to which you redirect them A list of ports is maintained at the following link http www iana org assignments ports numbers 4 7 3 Special Applications Some applications...

Page 15: ...s 3 Click OK and then click SAVE SETTINGS to save your settings 4 8 2 MAC Filter The Wireless Router can also limit the network access based on the MAC address The MAC Filtering Table allows the Wireless Router to enter up to 32 MAC addresses that are allowed to access to the WAN port 1 Click Yes to enable or No to disable this function 2 Enter the MAC address in the space provided and click Save ...

Page 16: ...y e mail If the mail server needs to authenticate your indentification before sending out any e mail please fill related information in POP3 server username and password fields Otherwise leave the three fields blank Connection Policy Enter the appropriate values for TCP UDP sessions as described in the following table Note The firewall does not significantly affect system performance so we advise ...

Page 17: ...ile from www philips com support Model SNB5600 and save it to your hard drive Then click Browse to look for the downloaded file Click BEGIN UPGRADE Check the Status page Information section to confirm that the upgrade process was successful 4 11 3 Reset Click REBOOT ROUTER to reset the Wireless Router If you perform a reset from this page the configuration will not be changed back to the factory d...

Page 18: ...ance synchronizes the router with a public time server on the Internet 4 13 3 Wireless settings In step 2 you can change the Wireless settings of the Wireless Router For easy installation it is advised to keep the default settings If you later would like to change any of the wireless settings you can do so via the menu in the Wireless Router 4 13 4 Connection type settings This page allows you to ...

Page 19: ...l 11b 18 5 1 dBm 11g 14 5 1 dBm 54Mbps RF Output Power Modulation Rate Output Power dBm 802 11b 1Mbps 16dBm 802 11b 2Mbps 16dBm 802 11b 5 5Mbps 16dBm 802 11b 11Mbps 16dBm Modulation Rate Output Power dBm 802 11g 6Mbps 15dBm 802 11g 9Mbps 15dBm 802 11g 12Mbps 15dBm 802 11g 18Mbps 15dBm 802 11g 24Mbps 15dBm 802 11g 36Mbps 15dBm 802 11g 48Mbps 15dBm 802 11g 54Mbps 15dBm Sensitivity Modulation Rate Re...

Page 20: ...pply for your Wireless Router However if your Wireless Router power if OFF after running for a while check for power loss or overcharge If your wall outlet has a switch is it in position ON If you still cannot isolate the problem then the external power supply may be defective In this case contact Technical Support for assistance The signal is OFF Make sure that your Modem Ethernet cable RJ45 is p...

Page 21: ......

Page 22: ... Philips Electronics N V All rights reserved Trademarks are the property of Koninklijke Philips Electronics N V or their respective owners Specifications are subject to change without notice Document order number 3111 285 43951 ...

Reviews: