background image

Troubleshooting

102786_en_03

PHOENIX CONTACT

15

English

3

Troubleshooting

3.1

Error messages on the Display

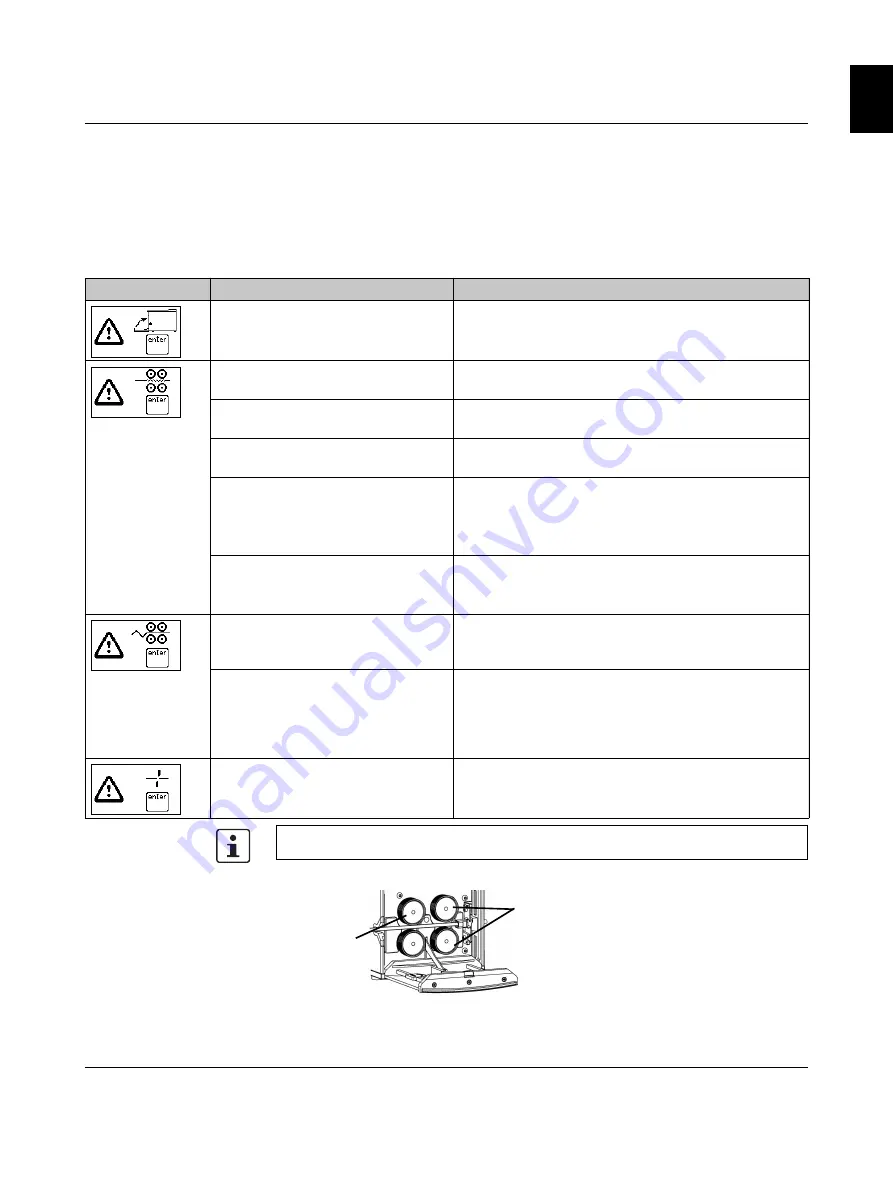
Metering and drive rollers

Table 3-1

Error messages and remedies

Display

Cause

Remedy

Front door is open.

Close front door.

The error is trig-

gered when the 

motor receives cur-

rent but the meter-

ing rollers are not 

turning.

The metering roller does not detect a 

cable.

Insert a new cable.

While conveying the cable, it jammed or 

made a knot. The drive rollers slip.

Check if there is a jam or knot.

The force required to unwind the cable 

is too large. The drive rollers slip.

Check if the force required to unwind the cable is too 

large.

The rollers do not convey the cable 

properly. The drive rollers slip.

Adjust the clamping pressure of the drive rollers (see 

page 18).

Replace the drive rollers (see page 18).

Use drive rollers that suited to the cable (see page 20). 

The metering roller slips past the cable.

Check if the metering roller is worn.

Use a metering roller that suits the cable (see 

page 20). 

The error is trig-

gered when the 

motor current in-

creases too fast.

While conveying the cable, it jammed or 

made a knot. The drive rollers are 

locked or are about to lock.

Check if there is a jam or knot.

The force required to unwind the cable 

is too large. The drive rollers are locked 

or are about to lock.

Check if the force required to unwind the cable is too 

large.

Maximum cutting force exceeded

Check if the cable cross section is too large or if the ca-

ble is for some other reason not suitable.

Switch the cutter (see page 19).

Press the "enter" key to delete the error message.

Metering 

roller

Drive rollers

Summary of Contents for CUTFOX 10

Page 1: ...Original operating instructions Operation of the Cutting Machine CUTFOX 10...

Page 2: ......

Page 3: ...en_03 Operation of the Cutting Machine CUTFOX 10 UM EN CUTFOX 10 03 Designation From this Serial No onwards Order No CUTFOX 10 231000 1206829 Original operating instructions Designation Revision Order...

Page 4: ...e 8 32825 Blomberg GERMANY Should you have any suggestions or recommendations for improvement of the contents and layout of our manuals please send your comments to tecdoc phoenixcontact com This is t...

Page 5: ...ducts in your specific application in particular with regard to observing the applicable standards and regulations All information made available in the technical data is supplied without any accompan...

Page 6: ...0 2 4 Automatic cable cutting 11 2 5 Planning cutting jobs with a PC 12 2 6 Manual cable cutting 14 2 7 Exiting from cutting 14 3 Troubleshooting 15 3 1 Error messages on the Display 15 3 2 The length...

Page 7: ...ented on the PC with the supplied software and loaded to the CUTFOX 10 1 2 For your safety WARNING The CUTFOX 10 may only be used as intended and when in perfect working order regarding safe functioni...

Page 8: ...e operating components 1 RS 232 interface 11 Metering roller 2 Mains connection 12 Insertion slot 3 Mains fuses 13 Door opener 4 Mains switch 14 Display 5 Adjusting screw 15 Key pad 6 Drive rolls 16 A...

Page 9: ...gh levels of heat direct sunlight or low temperatures operat ing range 15 C 35 C NOTE Set up the CUTFOX 10 so that it cannot slip from its work surface Use a non slip mat or fix the CUTFOX 10 in place...

Page 10: ...ld up the front door 6 The rollers clamp the cable firmly 5 If you cut very soft or hard material it is advisable to change the clamping pressure see page 18 Adjusting the measuring unit between milli...

Page 11: ...imal places can be used Switch to the next line with the enter key Cutting the cable Press the start button The green LED lights up The cable is then cut automatically Pausing or stopping the cable Cu...

Page 12: ...UTFOX 10 Switch the CUTFOX 10 and the PC back on Create the cutting jobs at the PC with the help of the CUTSOFT software supplied Switch into the appropriate mode Press the mode button and then the 2...

Page 13: ...d number of cuts with the keys 0 to 9 For entries in inches decimal places can be used Cutting the cable Insert the cable as described see page 10 Press the start button The green LED lights up The CU...

Page 14: ...the 3 key Cutting cable Press and hold the 6 key until the cable has been moved the desired length Press the 2 key to cut the cable Deleting the length Press the C key to delete the set length Changi...

Page 15: ...slip Adjust the clamping pressure of the drive rollers see page 18 Replace the drive rollers see page 18 Use drive rollers that suited to the cable see page 20 The metering roller slips past the cabl...

Page 16: ...ey lowers this value and with it the length conveyed The 8 key raises this value and with it the length conveyed Press the enter key to save the value and return to mode selection With the mode button...

Page 17: ...he shock proof plug is connected to the mains socket Make sure that the power supply at the mains socket is OK Mains fuse blown Remove the fuse holder 3 Check the mains fuses 4 Replace the blown mains...

Page 18: ...ront door Set the clamping pressure with the adjusting screw Rotate left more pressure Rotate right less pressure Replacing drive or metering rollers Press the door opener and fold down the front door...

Page 19: ...cutters Place the lower blade 4 with the threaded insert onto the holder from the right Place the upper blade 2 onto the holder from the left Tighten the screws with the Allen key Remount the drive ro...

Page 20: ...lls for CUTFOX 10 with hard ened finely knurled steel tread for very hard insu lation and materials CF 10 WHEEL STEEL 1200099 1 Cutter CF 10 CUTTER KNIFE SET 1207284 1 set Mains fuse T 2A 250V 20 x 5...

Page 21: ...with essential requirements of the follow ing directives and their amending directives The following applicable standards were consulted for evaluating the conformity CUTFOX 10 1206829 CUTFOX 10 BASI...

Page 22: ...CUTFOX 10 22 PHOENIX CONTACT 102786_en_03...

Reviews: