PAGE # 11
Call 1-877-744-3649 for assistance or visit us at www.phoenixinno.com
7
Fig. 7
Fig. 8
Fig. 9
Fig. 10
Fig. 11
Fig. 6.1
Fig. 6
For Models:
PH603SB
PH603SBN
INFRARED ROTISSERIE BURNER
Your grill comes equipped with an infrared burner and a rotisserie kit for rotisserie cooking. The infrared rotisserie burner is great for cooking
roasts and fowl (Max 15 lbs / 6.8 kg). With the heat source located behind the food, there is no chance of a flare up caused by fat dripping
on to hot burners below to burn or spoil your meal. A dish or drip pan placed below the spit will collect the juices for basting or for preparing a sauce.
NOTE: READ ALL INSTRUCTIONS
1.
DO NOT operate rotisserie with a damaged cord or plug, or if the rotisserie malfunctions or has been damaged in any way.
2.
DO NOT let children operate grill or rotisserie, and DO NOT let children play nearby.
3.
Unplug rotisserie motor from electrical outlet when not in use and before cleaning. Allow to cool before adding or removing parts.
4.
To protect against electrical shock, DO NOT immerse electrical cord, plug or motor in water or expose to rain or snow. Protect electrical elements.
5.
Most grill surfaces and accessories become hot during and after cooking, so use reasonable care and caution around grill.
Wear flame retardant BBQ mitts when handling the rotisserie.
6.
This rotisserie is for outdoor use only.
To operate your rear burner see lighting instructions on page 9.
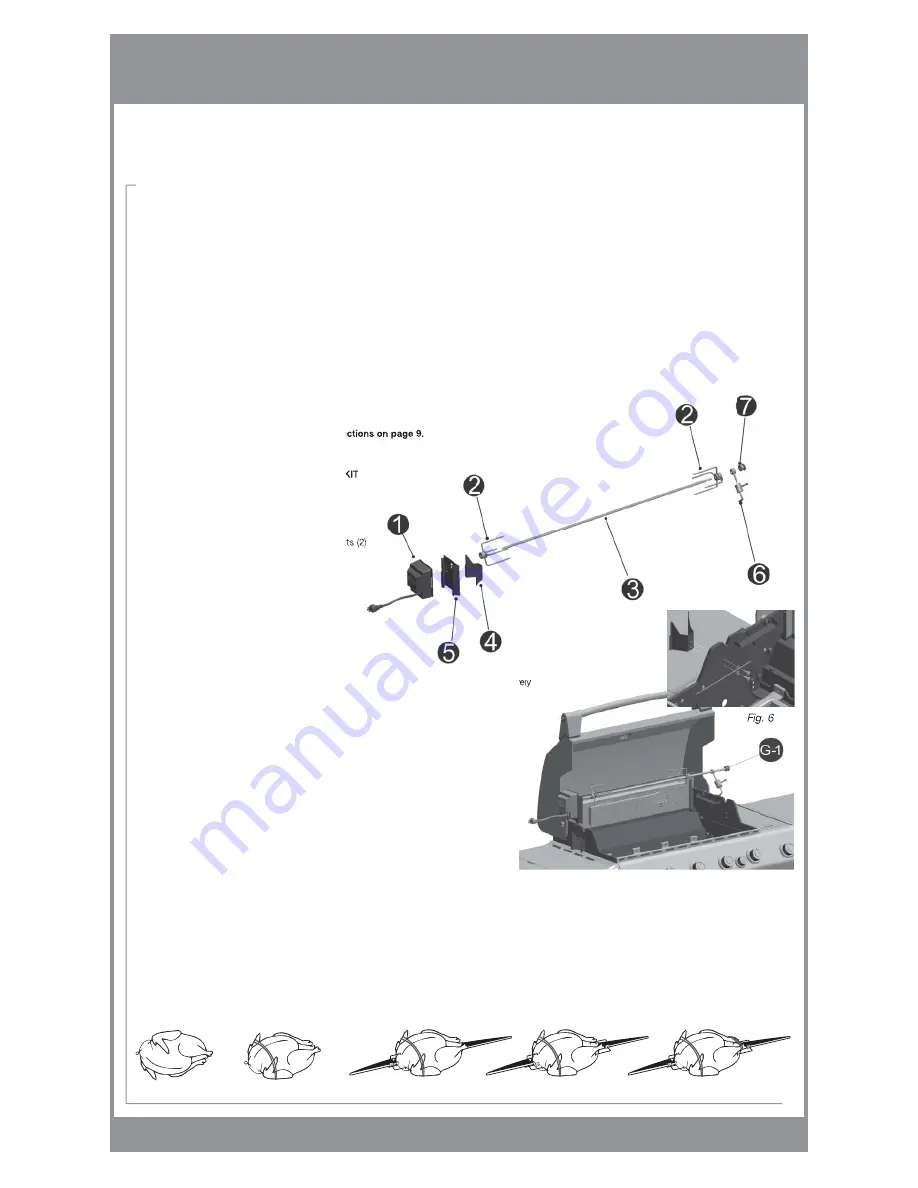
HOW TO USE / INSTALL YOUR ROTISSERIE KIT
Your rotisserie kit includes the following:
1.
Motor
2.
4 prong meat forks with locking wing bolts (2)
3.
Spit rod
4.
Motor support bracket
5.
Motor support extension
6.
Counter balance with locking wing bolt
7.
Spit collar
INSTALL MOTOR BRACKET
1. Line up holes in motor support bracket (part #4) with holes in grill head and attach securely
using the 2 medium bolts included with your rotisserie kit. (See Fig 6)
2. Slide the motor support extension (part #5) over the motor support bracket (part #4).
3. Slide motor (part #1) onto motor support extension (part #5).
POULTRY
1. With breast down, bring neck skin up over cavity.
Fold under edges of skin, skewer to keep in place.
(See Fig 7)
2. Turn breast side up, tie wings to body with twine.
(See Fig 8)
3. Slide a meat fork on spit rod and tighten. Insert the spit rod in neck skin parallel
to the backbone, bring it out just above the tail.
(See Fig 9)
4. Insert second meat fork on opposite side of spit rod and secure. Make sure the bird is
centered on the spit rod. Tighten wing bolts securely on meat forks.
(See Fig 10)
5. Cross the legs to tail and tie to the spit rod with twine.
(See Fig 11)
6. Rest spit rod onto grooves in left and right side of grill head. Allow the spit rod to rotate freely so that the heaviest part of the poultry/meat is facing down.
7. Add the counterbalance so that it’s weight is directly opposite of the heaviest part of the poultry/meat (i.e. it will be facing straight up at this point).
Tighten the counter balance in position by turning the axel. Fine adjustments can be made by sliding the weight up and down the axel and securing it
with the thumb screw. (See Fig 6.1)
Note: Position the counter balance so it does not interfere with the side bucket.
8. Insert the pointed end of the spit rod into motor.
9. Attach spit collar to the other end of the spit rod and position into the groove on right side of grill head.
FOR COOKING TIMES AND TEMPERATURES SEE COOKING GUIDES ON PAGE #18
✓
✓


