PAGE # 15
Call 1-877-744-3649 for assistance or visit us at www.phoenixinno.com
For Models:
PH603SB
PH603SBN
✓
MAINTENANCE
CLEANING AND CARE:
1.
All cleaning and maintenance should be done while the grill is cool
and with the fuel supply disconnected.
2.
During maintenance,
a) care must be taken not to obstruct the flow of combustion and ventilation air in your grill.
b) ensure after maintenance that the ventilation openings of the cylinder enclosure are free and clear of debris.
3.
DO NOT clean any grill part in a self cleaning oven. The extreme heat will damage the finish.
4.
Abrasive cleaners will damage this product.
5.
Never use oven cleaner to clean any part of your grill.
CLEANING MAIN BURNERS
1.
Turn off gas at the LP gas cylinder/main NG valve.
2.
Remove cooking grids and heat plates
3.
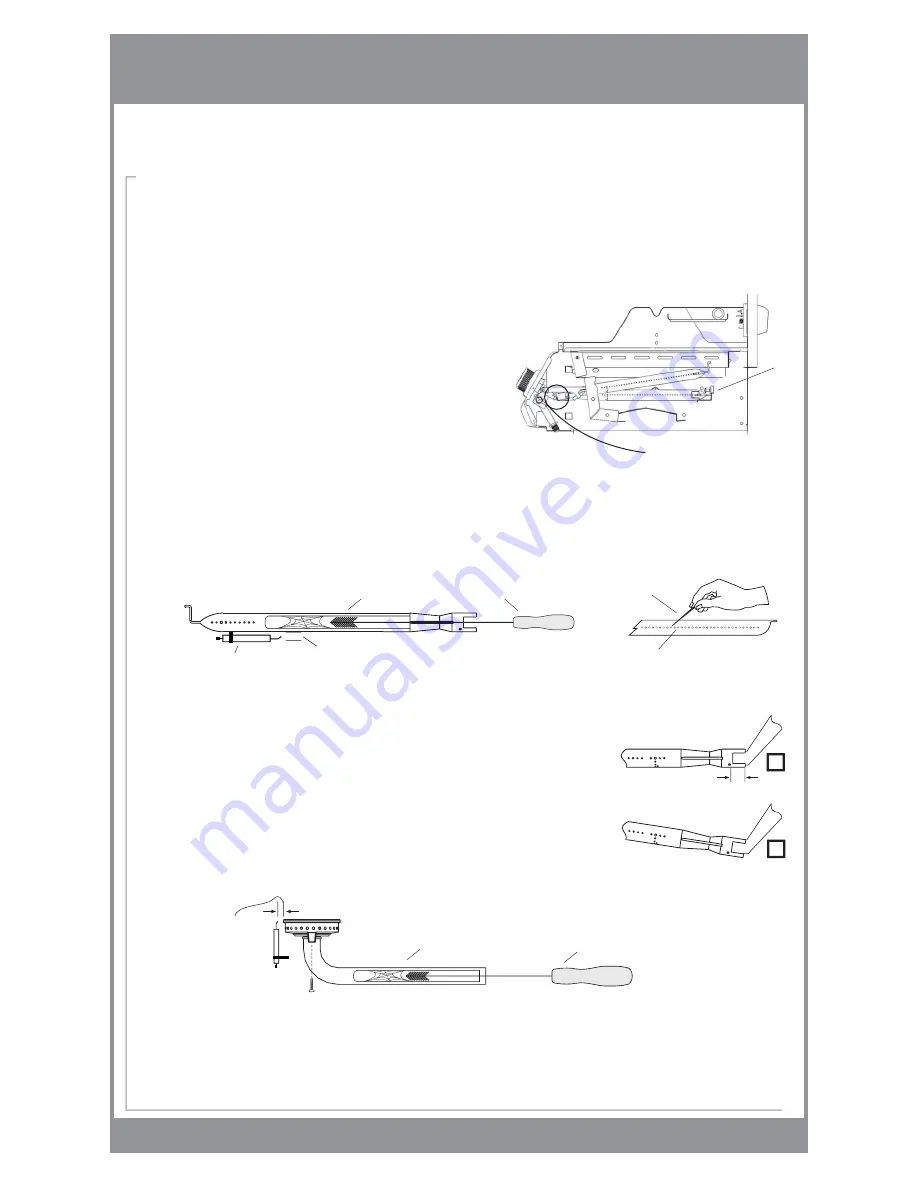
Remove burner(s) by removing the screws securing the
burner(s) to the grill bottom.
(See Fig. 18)
4.
Lift the burner up and away from the gas valve orifice.
(See Fig. 18)
5.
Clean inlet (venturi) of burner with venturi/bottle brush or compressed air. “checking for insects and insect nests.
A clogged tube can lead to a fire underneath the grill.”
(See Fig. 19)
6.
Remove all food residue and dirt on burner surface.
7.
Clean any clogged ports with a stiff wire (such as an opened paper clip).
(See Fig. 20)
8.
Inspect burner for any damage (cracks or holes). If damage is found, replace with new burner.
9.
Reinstall burner, check to ensure that the gas valve orifice is correctly positioned
inside
burner
inlet
(venturi).
(See Fig. 21)
CLEANING SIDE BURNER
1.
Turn off gas at the LP gas cylinder/main NG valve.
2. Remove
side
burner
grate.
3.
Remove burner by removing the sideburner securing bolts from the bottom of the burner
(See Fig. 22)
4.
Lift the burner up and away from the gas valve orifice.
5.
Clean inlet (venturi) of burner with venturi/bottle brush or compressed air.
(See Fig. 22)
6.
Remove all food residue and dirt on burner surface.
7.
Clean any clogged ports with a stiff wire (such as an opened paper clip).
(See Fig. 20)
8.
Inspect burner for any damage (cracks or holes). If damage is found, replace with new burner.
9.
Reinstall burner, check to ensure that the gas valve orifice is correctly positioned
inside
burner
inlet
(venturi).
(See Fig. 21)
Also check position of spark electrode
(electrode should be 1/8” / 0.3 cm from burner).
(See Fig. 22)
Note: Inspect all venturi tubes/burners at least once per year or sooner if:
a. You smell gas.
b. You experience delayed burner ignition.
c. The appliance does not reach proper temperature.
Paper Clip / Stiff Wire
Burner Ports
Tube Burner
Venturi / Bottle Brush
Fig. 22
Venturi / Bottle Brush
Side Burner
Fig. 18
Fig. 19
Fig. 20
Electrode
1/8”
(0.3 cm)
1/8”
(0.3 cm)
Screw
gas valve orifice
Tube Burner
Valve orifice
1/4”
Fig. 21
Tube Burner
Valve orifice
✓
✘
d. The burner makes a “popping” noise.
e. The appliance heats unevenly.
f. The appliance has been stored for a period of more than 1 month.


