background image

14

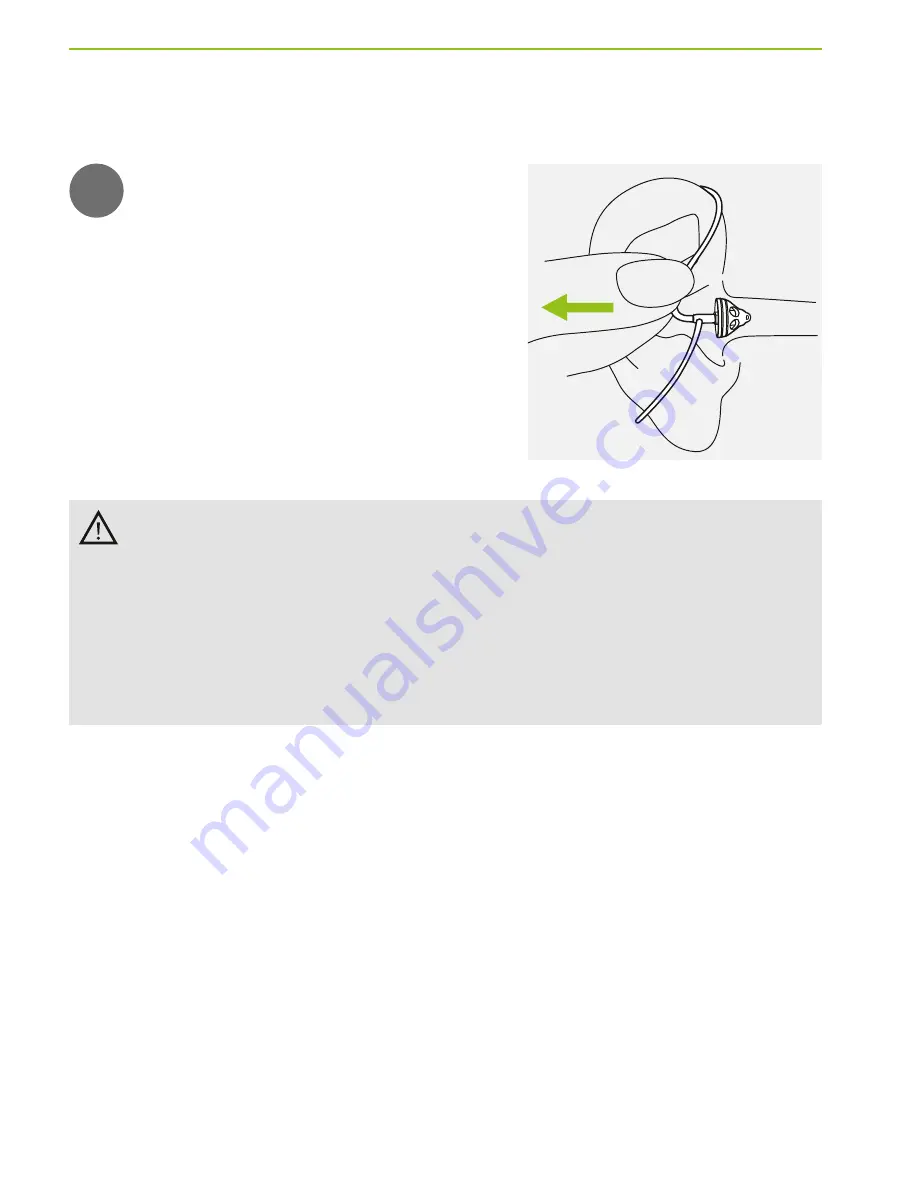
7. Removing the hearing aid

1

Pull on the bend of the tube 
and remove the hearing aid 
from behind the ear.


In very rare cases, the dome can remain in your ear 
canal when removing the tube from the ear. In the 
unlikely case that the dome does get stuck in your 
ear canal, it is strongly recommended to see a 
physician for safe removal.

Summary of Contents for audeo B50-direct

Page 1: ...User Guide Phonak Aud oTM B Direct B90 B70 B50...

Page 2: ...Wireless models Phonak Aud o B90 Direct Phonak Aud o B70 Direct Phonak Aud o B50 Direct CE mark applied 2017 2017 2017 This user guide is valid for...

Page 3: ...Earpiece c Dome c SlimTip c cShell Battery size 13 Your hearing care professional Your hearing aids operate in the frequency range of 2 4 GHz 2 48 GHz When flying please check if flight operator requ...

Page 4: ...and are designed to keep you connected to the beauty of sound We thank you for making such a great choice and wish you many years of listening pleasure Please read the user guide carefully to make sur...

Page 5: ...d 7 Removing the hearing aid 8 Push button 9 Phone calls 10 Flight mode Further Information 11 Care and maintenance 12 Exchanging the earwax protection 13 Connectivity overview 14 Service and warranty...

Page 6: ...ngs Changing batteries 1 2 3 Blue marking for left hearing aid Red marking for right hearing aid Remove the sticker from the new battery and wait two minutes Open the battery door Place battery in the...

Page 7: ...ing This is indicated in your individual instructions 2 If the hearing aid is paired with a phone a short push less then 2 seconds will accept an incoming call and a long push more than 2 seconds will...

Page 8: ...r Anchor optional Speaker without earpiece attached Push button Aud o B Direct Tube 2 Parts of the hearing aid The pictures below show the model described in this user guide Possible earpieces cShell...

Page 9: ...ring aid markings There is a red or blue marking inside the battery door and on the speaker This will tell you if it is a left or a right hearing aid Blue marking for left hearing aid Red marking for...

Page 10: ...10 4 On Off The battery door is also the on off switch 1 2 Closed battery door hearing aid is on Open battery door hearing aid is off When you switch on the hearing aid you may hear a start up melody...

Page 11: ...y in the battery door with the symbol facing upwards If it is difficult to close the battery door Check that the battery is inserted correctly and the symbol is facing the label inside the battery com...

Page 12: ...Please ensure you use the correct type of battery in your hearing aids zinc air Please also read chapter 18 2 for further information on product safety Low power You will hear two beeps when the batt...

Page 13: ...on the hearing aid 1 2 3 Place the hearing aid behind your ear Insert the earpiece into your ear canal If there is an anchor attached to the earpiece tuck it into the bowl of your ear to secure your...

Page 14: ...emove the hearing aid from behind the ear In very rare cases the dome can remain in your ear canal when removing the tube from the ear In the unlikely case that the dome does get stuck in your ear can...

Page 15: ...e depending on the hearing aid programming This is indicated in your individual instructions 2 If the hearing aid is paired with a phone a short push less then 2 seconds will accept an incoming call a...

Page 16: ...th enabled phones When paired and connected to a phone you will hear the caller s voice directly in your hearing aid Your hearing aid picks up your voice through its own microphones Caller s voice You...

Page 17: ...fter the initial pairing your hearing aid will connect automatically to the phone This can take up to 2 minutes On your phone ensure that Bluetooth wireless technology is enabled and search for Blueto...

Page 18: ...etooth wireless technology specific to some of the most popular phone manufacturers go to www phonak com audeob direct Your phone shows a list of found Bluetooth enabled devices Select the hearing aid...

Page 19: ...ed as long as the phone remains ON and within range Your hearing aid can connect to two phones at the same time but only one call at a time is possible After your hearing aids have been paired to your...

Page 20: ...an 2 seconds or on your phone as you normally do 9 3 Making a call Enter the phone number using the phone keypad and press the dialing button You will hear the dialing tone through your hearing aid If...

Page 21: ...21 9 5 Ending a call A call can be ended by holding down the push button on the hearing aid for more than 2 seconds or on your phone as you normally do long push 2 sec...

Page 22: ...22 9 6 Rejecting a call An incoming call can be rejected by holding down the push button on the hearing aid for more than 2 seconds or on your phone as you normally do long push 2 sec...

Page 23: ...ring flight mode will not disable normal hearing aid functionality only the Bluetooth connectivity functions 10 1 Enter flight mode To disable the wireless function and enter flight mode Open battery...

Page 24: ...24 10 2 Exit flight mode To enable the wireless function and exit flight mode again Open battery door Close the battery door on the hearing aid again 1 2...

Page 25: ...arding product safety see chapter 18 2 General information Before using hair spray or applying cosmetics you should remove your hearing aid from your ear because these products may damage it When you...

Page 26: ...or when it is closed After exposure to water sweat or dust the hearing aid is cleaned and dried The hearing aid is used and maintained as described in this user guide Use of your hearing aid around wa...

Page 27: ...for cleaning your hearing aid It is not recommended to rinse with water If you need to clean your hearing aid intensively ask your hearing care professional for advice and information on filters or dr...

Page 28: ...check the earwax protector regularly and exchange it if it looks dirty or if the hearing aid volume or sound quality is reduced The earwax protection should be replaced every four to eight weeks 1 Rem...

Page 29: ...29 2 Gently pull on the earpiece to remove 3 Clean the speaker with a lint free cloth...

Page 30: ...sed earwax protector The shaft of the holder should touch the rim of the earwax protector 12 2 Exchanging the earwax protection 2 Carefully pull and remove the earwax protector straight out of the spe...

Page 31: ...tly push the insertion side of the exchange tool straight into the hole of the speaker until the outer ring is perfectly aligned 4 Pull the tool straight out The new earwax protector will remain in pl...

Page 32: ...the speaker in one hand and the earpiece in the other 12 3 Attaching the earpiece to the speaker 2 Slide the earpiece over the speaker sound outlet 3 The speaker and the earpiece should fit perfectly...

Page 33: ...ivity options available for your hearing aid The TV Connector can be connected to any audio source such as a TV PC or hi fi system Note Your hearing aid does not offer connectivity with Roger or other...

Page 34: ...warranty valid starting from the date of purchase This limited warranty covers manufacturing and material defects in the hearing aid itself but not accessories such as batteries tubes earpieces extern...

Page 35: ...ess Damage caused by third parties or non authorized service centers renders the warranty null and void This warranty does not include any services performed by a hearing care professional in their of...

Page 36: ...or the local Phonak representative whose address can be taken from the list on www phonak com Phonak worldwide locations 15 Compliance information Australia New Zealand Indicates a device s complianc...

Page 37: ...with RSS 210 RSS 247 of Industry Canada Operation is subject to the following two conditions 1 this device may not cause harmful interference and 2 this device must accept any interference received in...

Page 38: ...enerates uses and can radiate radio frequency energy and if not installed and used in accordance with the instructions may cause harmful interference to radio communications However there is no guaran...

Page 39: ...s connected Consult the dealer or an experienced radio TV technician for help Notice 4 Japanese Radio Law and Japanese Telecommunications Business Law Compliance This device is granted pursuant to the...

Page 40: ...ency Modulation Radiated power Bluetooth Range Bluetooth Profiles supported Resonant loop antenna 2 402 2 480 GHz GFSK Pi 4 DPSK 1mW EIRP 1m class 3 Version 4 2 HFP Hands free profile Radio informatio...

Page 41: ...U The numbers after the CE symbol correspond to the code of certified institutions that were consulted under the above mentioned directives This symbol indicates that the products described in these u...

Page 42: ...ention to the relevant warning notices in these user guides Important information for handling and product safety During transportation keep dry The Bluetooth word mark and logos are registered tradem...

Page 43: ...daily life situations Therefore you do not have to worry about getting the hearing aids exposed to a rain shower or sweat However the hearing aid is not intended to be used in water activities that in...

Page 44: ...ying the hearing aid after use Atmospheric pressure 200 hPA to 1500 hPa The symbol with the crossed out garbage bin is to make you aware that this hearing aid may not be thrown away as normal househol...

Page 45: ...45...

Page 46: ...too loud Low battery Speaker earpiece blocked Volume too low Hearing has changed Indication for low battery Moisture on battery or hearing aid Hearing aid is in flight mode Hearing aid not paired to t...

Page 47: ...act your ENT GP or hearing care professional Decrease volume if volume control available chapter 1 8 Change battery chapter 1 5 Clean speaker opening earpiece Turn volume up if volume control availabl...

Page 48: ...ot prevent or improve a hearing impairment resulting from organic conditions Infrequent use of a hearing aid does not permit a user to attain full benefit from it The use of a hearing aid is only part...

Page 49: ...the hearing aid that were not explicitly approved by Sonova AG are not permitted Such changes may damage your ear or the hearing aid Do not use the hearing aids in explosive areas mines or industrial...

Page 50: ...e dome can remain in your ear canal when removing the tube from the ear In the unlikely case that the dome does get stuck in your ear canal it is strongly recommended to see a physician for safe remov...

Page 51: ...rs etc Keep the wireless hearing aid at least 15 cm 6 inches away from the active implant If you experience any interference do not use the wireless hearing aids and contact the manufacturer of the ac...

Page 52: ...th perforated eardrums inflamed ear canals or otherwise exposed middle ear cavities In these cases we recommend the use of a custom earpiece In the unlikely case that any part of this product should r...

Page 53: ...basis that is worn in activities such as swimming or bathing Always remove your hearing aid before these activities as the hearing aid contains sensitive electronic parts 18 2 Information on product...

Page 54: ...earing aid after use Store the hearing aid in a safe dry and clean place Do not drop your hearing aid Dropping onto a hard surface can damage your hearing aid Always use new batteries for your hearing...

Page 55: ...ffect the correct functioning of your hearing aids Remove and keep them outside the examination room area before undergoing Medical or dental examination with X ray also CT scan Medical examinations w...

Page 56: ...Manufacturer Sonova AG Laubisr tistrasse 28 CH 8712 St fa Switzerland www phonak com 029 0530 02 V3 00 2017 08 FO 2017 Sonova AG All rights reserved Your hearing care professional...

Reviews: