background image

15

4. Charging the hearing aids

   Low power: You will hear two beeps when the 

battery is low. You will have approximately  
60 minutes before you have to charge the hearing 
aids (this can vary, depending on the hearing aid 
settings).

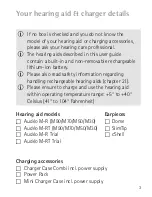
  The hearing aid contains a built-in and non-

removable rechargeable lithium-ion battery.

  Before using your hearing aid for the first time, it  

is recommended to charge it for 3 hours.

  The hearing aid must be dry before charging,  

see chapter 15.

  Please ensure to charge and use the hearing aid 

within operating temperature range: +5° to +40° 
Celsius (41° to 104° Fahrenheit).

Summary of Contents for Audeo M-R Trial

Page 1: ...Phonak Aud oTM M User Guide Phonak Aud o M R RT Phonak Aud o M R RT Trial...

Page 2: ...o M50 R Phonak Aud o M50 RT Phonak Aud o M30 R Phonak Aud o M30 RT Phonak Aud o M R Trial Phonak Aud o M RT Trial Non wireless charging accessories Phonak Charger Case Combi Phonak Power Pack Phonak...

Page 3: ...l power supply If no box is checked and you do not know the model of your hearing aid or charging accessories please ask your hearing care professional The hearing aids described in this user guide co...

Page 4: ...4...

Page 5: ...rtise and are designed to keep you connected to the beauty of sound We thank you for making such a great choice and wish you many years of listening pleasure Please read the user guide carefully to ma...

Page 6: ...Preparing the charger 4 Charging the hearing aids Using the hearing aid 5 Left right hearing aid markings 6 Putting on the hearing aid 7 Removing the hearing aid 8 Multi function button 9 On Off 10 C...

Page 7: ...onditions 15 Care and maintenance 16 Exchanging the earwax protection 17 Service and warranty 18 Compliance information 19 Information and description of symbols 20 Troubleshooting 21 Important safety...

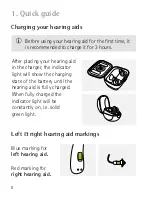
Page 8: ...aring aid After placing your hearing aid in the charger the indicator light will show the charging state of the battery until the hearing aid is fully charged When fully charged the indicator light wi...

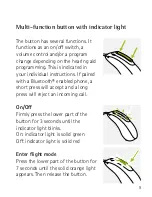
Page 9: ...vidual instructions If paired with a Bluetooth enabled phone a short press will accept and a long press will reject an incoming call On Off Firmly press the lower part of the button for 3 seconds unti...

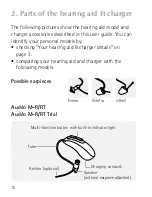
Page 10: ...n identify your personal models by checking Your hearing aid charger details on page 3 comparing your hearing aid and charger with the following models Charging contacts Anchor optional Speaker withou...

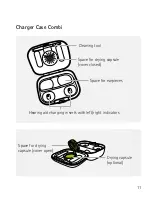
Page 11: ...ace for earpieces Cleaning tool Space for drying capsule cover open Drying capsule optional Hearing aid charging inserts with left right indicators Space for drying capsule cover closed Charger Case C...

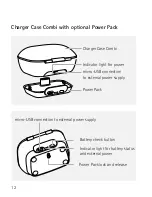
Page 12: ...arger Case Combi Indicator light for power micro USB connection to external power supply micro USB connection to external power supply Power Pack Indicator light for battery status and external power...

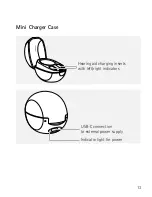
Page 13: ...13 Mini Charger Case USB C connection to external power supply Indicator light for power Hearing aid charging inserts with left right indicators...

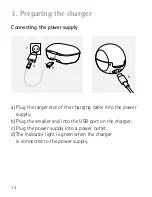
Page 14: ...harging cable into the power supply b Plug the smaller end into the USB port on the charger c Plug the power supply into a power outlet d The indicator light is green when the charger is connected to...

Page 15: ...ding on the hearing aid settings The hearing aid contains a built in and non removable rechargeable lithium ion battery Before using your hearing aid for the first time it is recommended to charge it...

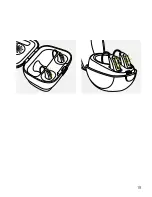
Page 16: ...er 3 for how to set up the charger Insert the hearing aid into the charging inserts Make sure the left and right hearing aid markings match the left blue right red indicators next to the charging inse...

Page 17: ...17...

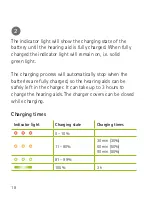
Page 18: ...lid green light The charging process will automatically stop when the batteries are fully charged so the hearing aids can be safely left in the charger It can take up to 3 hours to charge the hearing...

Page 19: ...19...

Page 20: ...the hearing aids from the charging inserts by 1 pulling the hearing aids gently toward yourself and 2 lifting them out of the charger The hearing aid switches on automatically when removed from the ch...

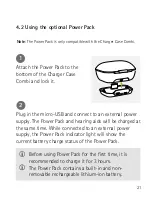
Page 21: ...onnect to an external power supply The Power Pack and hearing aids will be charged at the same time While connected to an external power supply the Power Pack indicator light will show the current bat...

Page 22: ...r hearing aids when storing them in the charger to prevent unwanted discharge of the Power Pack Power Pack lock and release Indicator light battery status 0 29 30 59 60 100 micro USB connection to ext...

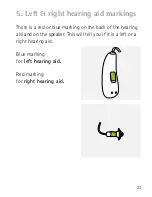
Page 23: ...g aid markings There is a red or blue marking on the back of the hearing aid and on the speaker This will tell you if it is a left or a right hearing aid Blue marking for left hearing aid Red marking...

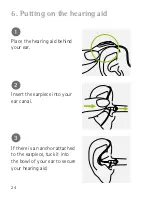
Page 24: ...on the hearing aid 1 2 3 Place the hearing aid behind your ear Insert the earpiece into your ear canal If there is an anchor attached to the earpiece tuck it into the bowl of your ear to secure your...

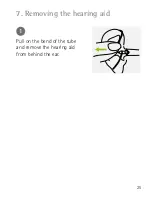
Page 25: ...25 7 Removing the hearing aid 1 Pull on the bend of the tube and remove the hearing aid from behind the ear...

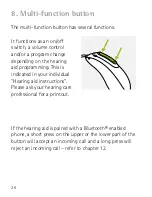
Page 26: ...n your individual Hearing aid instructions Please ask your hearing care professional for a printout The multi function button has several functions If the hearing aid is paired with a Bluetooth enable...

Page 27: ...y press and hold the lower part of the button for 3 seconds until the indicator light blinks Wait until the solid green light indicates the hearing aid is ready When you switch on the hearing aid you...

Page 28: ...e connectivity options available for your hearing aid The TV Connector can be connected to any audio source such as a TV PC or hi fi system Roger wireless microphones can be connected to your hearing...

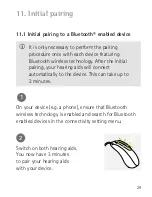
Page 29: ...e initial pairing your hearing aids will connect automatically to the device This can take up to 2 minutes On your device e g a phone ensure that Bluetooth wireless technology is enabled and search fo...

Page 30: ...s technology specific to some of the most popular phone manufacturers go to www phonak com audeomarvel Your device shows a list of Bluetooth enabled devices Select the hearing aid from the list to sim...

Page 31: ...ction will be maintained as long as the device remains ON and within range Your hearing aids can be paired to one device at a time After your hearing aids have been paired to your device they will aut...

Page 32: ...led phones When paired and connected to your phone you will hear the caller s voice directly in your hearing aids Your hearing aids pick up your voice through its own microphones Caller s voice Your v...

Page 33: ...or lower part of the multi function button on the hearing aid less than 2 seconds or directly on your phone 12 1 Making a call Enter the phone number and press the dial button You will hear the dialin...

Page 34: ...34 12 3 Ending a call A call can be ended by a long press on the upper or lower part of the multi function button on the hearing aid more than 2 seconds or directly on your phone long press 2 sec...

Page 35: ...4 Rejecting a call An incoming call can be rejected by a long press on the upper or lower part of the multi function button on the hearing aid more than 2 seconds or directly on your phone long press...

Page 36: ...ly the Bluetooth connectivity functions 13 1 Enter flight mode To disable the wireless function and enter flight mode in each hearing aid In flight mode your hearing aid cannot connect directly to you...

Page 37: ...37 13 2 Exit flight mode To enable the wireless function and exit flight mode in each hearing aid Switch the hearing aid off and then on again refer to chapter 9...

Page 38: ...essure range 800 hPA to 1500 hPA Aud o M R RT are classified IP68 depth of 1 meter for 60 minutes and designed to be used in all daily life situations Therefore you do not have to worry about getting...

Page 39: ...outstanding performance and a long service life To ensure a long service life Sonova AG provides a minimum of a five year service period after phase out of the respective hearing aid Please use the fo...

Page 40: ...ucts may damage it Your hearing aids are resistant to water sweat and dust under the following conditions After exposure to water sweat or dust the hearing aid is cleaned and dried The hearing aid is...

Page 41: ...aring care professional for advice and information on filters or drying capsules Chargers Make sure that charger inserts are clean Never use cleaning agents such as household detergents soap etc for c...

Page 42: ...check the earwax protector regularly and exchange it if it looks dirty or if the hearing aid volume or sound quality is reduced The earwax protection should be replaced every four to eight weeks 1 Rem...

Page 43: ...43 2 Gently pull off the earpiece to remove 3 Clean the speaker with a lint free cloth...

Page 44: ...ng appears under the bin icon 16 2 Exchanging the earwax protection with CeruShield Disk 2 To remove a used earwax protector carefully insert the speaker into the free opening under bin icon until it...

Page 45: ...tor carefully insert the speaker into the opening where the new earwax protector is visible opposite the bin icon until it clicks After the click you will see the opening below is empty and the new ea...

Page 46: ...the speaker in one hand and the earpiece in the other 16 3 Attaching the earpiece to the speaker 2 Slide the earpiece over the speaker sound outlet 3 The speaker and the earpiece should fit perfectly...

Page 47: ...47...

Page 48: ...tional warranty valid from the date of purchase This limited warranty covers manufacturing and material defects in the hearing aid and chargers respectively but not accessories such as tubes earpieces...

Page 49: ...rties or non authorized service centers renders the warranty null and void This warranty does not include any services performed by a hearing care professional in their office Serial numbers Hearing a...

Page 50: ...nufacturer or the local Phonak representative whose address can be taken from the list on www phonak com Phonak worldwide locations Australia New Zealand Indicates a device s compliance with applicabl...

Page 51: ...51 The wireless models listed on page 2 are certified under Phonak Aud o M R M RT M90 M70 M50 M30 Phonak Aud o M R Trial M RT Trial USA FCC ID KWC LDR Canada IC 2262A LDR...

Page 52: ...ressly approved by Sonova AG may void the FCC authorization to operate this device Notice 3 This device has been tested and found to comply with the limits for a Class B digital device pursuant to Par...

Page 53: ...the equipment off and on the user is encouraged to try to correct the interference by one or more of the following measures Reorient or relocate the receiving antenna Increase the separation between...

Page 54: ...ns Business Law Compliance This device is granted pursuant to the Japanese Radio Law and the Japanese Telecommunications Business Law This device should not be modi fied otherwise the granted designat...

Page 55: ...ncy Modulation Radiated power Bluetooth Range Bluetooth Profiles supported Resonant loop antenna 2 4 GHz 2 48 GHz GFSK Pi 4 DPSK GMSK 2 5mW 1m 4 2 Dual Mode HFP Hands free profile A2DP Radio informati...

Page 56: ...iance with emission and immunity standards Emission standards EN 60601 1 2 2015 IEC 60601 1 2 2014 EN 55011 2009 A1 CISPR11 2009 AMD1 2010 CISPR22 1997 CISPR32 2012 ISO 7637 2 2011 CISPR25 2016 EN 550...

Page 57: ...4 2 2008 EN 61000 4 3 2006 A1 A2 IEC 61000 4 3 2006 A1 A2 EN 61000 4 4 2012 IEC 61000 4 4 2012 EN 61000 4 5 2014 IEC 61000 4 5 2014 EN 61000 4 6 2014 IEC 61000 4 6 2013 EN 61000 4 8 2010 IEC 61000 4...

Page 58: ...nd to the code of certified institutions that were consulted under the above mentioned directives This symbol indicates that the products described in these user instructions adhere to the requirement...

Page 59: ...ices in these user guides Important information for handling and product safety This symbol confers that the electromagnetic interference from the device is under limits approved by the US Federal Com...

Page 60: ...can be identified Indicates the manufacturer s catalogue number so that the medical device can be identified This symbol indicates that it is important for the user to read and take into account the...

Page 61: ...p dry The symbol with the crossed out garbage bin is to make you aware that this hearing aid as well as chargers and Power Pack may not be thrown away as normal household waste Please dispose of old o...

Page 62: ...cked Volume too low Hearing has changed Indication for low battery Battery fully discharged Faulty battery Problem Hearing aid not functioning Hearing aid whistles Hearing aid not loud enough or disto...

Page 63: ...tact your ENT GP or hearing care professional Decrease volume if volume control available chapter 8 Charge hearing aid chapter 4 Clean speaker opening earpiece Turn volume up if volume control availab...

Page 64: ...its operating temperature range Charger Case Combi or Mini Charger Case not connected to power supply Hearing aid not inserted correctly into charger Power Pack discharged Problem Indicator light on...

Page 65: ...hapter 4 Contact your hearing care professional a battery replacement may be required What to do Warm hearing aid up Operating temperature range is 5 to 40 Celsius 41 to 104 Fahrenheit Connect charger...

Page 66: ...a hearing aid does not permit a user to attain full benefit from it The use of a hearing aid is only part of hearing habilitation and may need to be supplemented by auditory training and instruction...

Page 67: ...operator requires devices to be switched into flight mode see chapter 13 The intended use of hearing aids is to amplify and transmit sound to the ears and hereby compensate for impaired hearing The he...

Page 68: ...check with your hearing care professional or physician In very rare cases the dome can remain in your ear canal when removing the hearing tube from the ear In the unlikely case that the dome does get...

Page 69: ...ician or hospital immediately as the hearing aid or its parts can cause choking Keep the Charger Case Combi out of reach of children individuals with cognitive impairment and pets If the drying capsul...

Page 70: ...can also be caused by power lines electrostatic discharge airport metal detectors etc Keep magnets i e EasyPhone magnet etc at least 15 cm 6 inches away from the active implant If using a Phonak wire...

Page 71: ...ied equipment with an output rating of 5 VDC Min 500 mA Use of accessories transducers and cables other than those specified or provided by the manufacturer of this equipment could result in increased...

Page 72: ...ear canal it is strongly recommended to see a physician for safe removal Avoid strong physical impacts to the ear when wearing a hearing aid with customized earpiece The stability of customized earpi...

Page 73: ...swimming or bathing Always remove your hearing aid before these activities as the hearing aid contains sensitive electronic parts 21 2 Information on product safety Never wash the microphone inputs Do...

Page 74: ...ut during insertion into or removal from the ear Do not drop your hearing aid or charging accessories Dropping onto a hard surface can damage your hearing aid or charging accessories Store your hearin...

Page 75: ...aids have to be dry before charging Otherwise the charging reliability cannot be guaranteed Only use approved chargers and Power Pack described in this user guide for charging your hearing aids otherw...

Page 76: ...Notes...

Page 77: ......

Page 78: ......

Page 79: ......

Page 80: ...029 0669 02 V3 00 2018 09 na 2018 Sonova AG All rights reserved Manufacturer Sonova AG Laubisr tistrasse 28 CH 8712 St fa Switzerland www phonak com Your hearing care professional...

Reviews: