background image

52

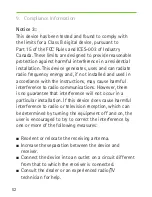
Notice 3: 
This device has been tested and found to comply with  
the limits for a Class B digital device, pursuant to  
Part 15 of the FCC Rules and ICES-003 of Industry 
Canada. These limits are designed to provide reasonable 
protection against harmful interference in a residential 
installation. This device generates, uses and can radiate 
radio frequency energy and, if not installed and used in 
accordance with the instructions, may cause harmful 
interference to radio communications. However, there  
is no guarantee that interference will not occur in a 
particular installation. If this device does cause harmful 
interference to radio or television reception, which can  
be determined by turning the equipment off and on, the 
user is encouraged to try to correct the interference by 
one or more of the following measures:


S

Reorient or relocate the receiving antenna.


S

Increase the separation between the device and 
receiver.


S

Connect the device into an outlet on a circuit different 
from that to which the receiver is connected.


S

Consult the dealer or an experienced radio/TV 
technician for help.

9.  Compliance information

Summary of Contents for Bolero Q30-M13

Page 1: ...User Guide Phonak Bolero Q Q90 Q70 Q50 Q30...

Page 2: ...description 13 4 Step by step instructions for using the hearing aid 18 Step 1 Getting to know your hearing aid 18 Step 2 Battery preparation 21 Step 3 Inserting the battery 22 Step 4 Turning on the h...

Page 3: ...th a secured battery compartment 36 5 Care and maintenance 38 6 Troubleshooting 42 7 Wireless accessories description 44 8 Service and warranty 47 9 Compliance information 50 10 Information and descri...
Page 4: ...nak Bolero Q90 P Phonak Bolero Q90 SP Phonak Bolero Q70 M312 Phonak Bolero Q70 M13 Phonak Bolero Q70 P Phonak Bolero Q70 SP Phonak Bolero Q50 M312 Phonak Bolero Q50 M13 Phonak Bolero Q50 P Phonak Bole...

Page 5: ...al hearing technology currently available on the market Please read these user instructions thoroughly in order to benefit from all the possibilities your new hearing aid has to offer With proper use...

Page 6: ...d to be supplemented by auditory training and instruction in lipreading 2 1 Hazard warnings The intended use of hearing aids is to amplify and transmit sound to the ears and hereby compensate for impa...

Page 7: ...kin irritation or accelerated accumulations of ear wax occur please check with your hearing care professional or physician In very rare cases the dome can remain in your ear canal when removing the he...

Page 8: ...accessories approved by Phonak AG to avoid any electrical shock The following is only applicable for persons with active implantable medical devices i e pacemakers defibrillators etc 2 Important safet...

Page 9: ...e battery handling tool EasyPhone magnet etc at least 15 cm 6 inches away from the active implant You are not permitted to use wireless accessories for your hearing aids Ask your hearing care professi...

Page 10: ...n on a continual basis that is worn in activities such as swimming or bathing Always remove your hearing aid before these activities as the hearing aid contains sensitive electronic parts I I Never wa...

Page 11: ...a safe dry and clean place I I Do not drop your hearing aid Dropping onto a hard surface can damage your hearing aid I I Always use new batteries for your hearing aid In case a battery is leaking repl...

Page 12: ...ing 2 Important safety information S S Medical or dental examination with X ray also CT scan S S Medical examinations with MRI NMRI scans generating magnetic fields Hearing aids don t need to be remov...

Page 13: ...s On the following pages use the labeled drawings to identify the hearing aid and the earmold that you use The following table shows what battery you need for your hearing aid model Model Zinc air bat...

Page 14: ...a Right or left indicator right red left blue placed in the battery compartment b Battery compartment with ON OFF switch c Volume control d Program button e Microphone inputs f Hook sound output g Hea...

Page 15: ...a b c a d e 15 P and SP models Option B with dome Option C with SlimTip a Hearing tube b Earmold Dome detachable c Retention d Earmold SlimTip detachable e Removal handle...

Page 16: ...a Right or left indicator right red left blue placed in the battery compartment b Battery compartment with ON OFF switch c Program button or volume control d Microphone inputs e Hook sound output f He...

Page 17: ...a b c a d e 17 M312 and M13 model Option B with dome Option C with SlimTip a Hearing tube b Earmold Dome detachable c Retention d Earmold SlimTip detachable e Removal handle...

Page 18: ...the parts that are particularly important for each step are shown in green Step 1 Getting to know your hearing aid Take the hearing aid in your hand and try out the hearing aid controls This will make...

Page 19: ...rogram button Fig 1b 19 P and SP models To increase the volume press the volume control upwards To decrease the volume press the volume control downwards Fig 1a In order to change a hearing program pr...

Page 20: ...g care professional can configure the push button as either a volume control or a program selector To increase the volume press the button on your right hearing aid To decrease the volume press the bu...

Page 21: ...2 21 In order to change a hearing program press the button Fig 1d Step 2 Battery preparation Remove the protective foil from the new battery Fig 2 Wait for two minutes before inserting to activate th...

Page 22: ...g 3a Fig 3b 22 Step 3 Inserting the battery Take the hearing aid in your hand and open the battery door Fig 3a Insert the battery so that you see the symbol on the battery Fig 3b 4 Using the hearing a...

Page 23: ...nd close the battery compartment gently and carefully I I Check if you feel resistance when closing the battery compartment Check to make sure the battery is correctly inserted and in the correct dire...

Page 24: ...This step shows you how to correctly insert the hearing aid The instructions apply for all hearing aid models The type of earmold determines how the hearing aid is inserted I I Each hearing aid is ind...

Page 25: ...Fig 5a M312 P and SP M13 25 Step 5 1 Identifying the hearing aid for the right and left ear Side indicator right red left blue...

Page 26: ...r earmold for the right ear red mark on the hearing aid see step 5 1 between your thumb and forefinger Fig 5b Take the earmold up to your ear Fig 5b Place the ear canal part of the earmold into your e...

Page 27: ...until it fits correctly Check the fit by running your finger over the bowl of the ear You know it fits correctly if when doing so you feel the contour of the bowl of the ear and not the hearing aid Fi...

Page 28: ...place the right hearing aid red mark on the hearing aid see step 5 1 behind your right ear Fig 5f Take the hearing tube between your thumb and forefinger Insert the dome deep enough into the ear cana...

Page 29: ...r canal a little more and you can rotate the dome until it fits correctly You have now successfully inserted the right hearing aid Now insert your left hearing aid in the same way marked in blue see s...

Page 30: ...nd the ear To increase the volume on a P or SP model for the M312 or M13 model refer to page 29 press the volume control upwards To decrease it press the volume control downwards using your forefinger...

Page 31: ...aring aid push button as either a volume control or a program selector To increase the volume on a M312 or M13 model press the button on your right hearing aid To decrease the volume press the button...

Page 32: ...SP hearing aid press the program button displayed Fig 7a For a M312 or M13 hearing aid press the program button displayed Fig 7b If you press it again you change to the next program A signal indicate...

Page 33: ...aid with classic earmold Take the hearing aid behind your ear do not touch the tube and lift it above the upper part of your ear and then gently let go Fig 8a Use your thumb and forefinger to grasp t...

Page 34: ...cases the dome can remain in your ear canal when removing the hearing tube from the ear In the unlikely case that the dome does get stuck in your ear canal it is strongly recommended to see a physicia...

Page 35: ...tment Fig 9 Step 10 Changing the battery Your hearing aid will indicate with a double beep that the battery soon needs to be changed You typically have up to 30 minutes to change the battery however t...

Page 36: ...the battery compartment Use the battery door tool and put it into the notch shown Fig 11a Pull the battery compartment downwards until its open Fig 11b Push the battery out of the battery compartment...

Page 37: ...Fig 11d Fig 11c Fig 11f Fig 11e 37 Close the battery compartment properly and check that it can t be opened by hand Fig 11f...

Page 38: ...Before using hair spray or applying cosmetics you should remove your hearing aid from your ear because these products may damage it When you are not using your hearing aid leave the battery compartme...

Page 39: ...ery door when it is closed S S After exposure to water sweat or dust the hearing aid is cleaned and dried S S The hearing aid is used and maintained as described in this user guide I I Hearing aids wi...

Page 40: ...se of your hearing aid in and around water can restrict air flow to the batteries causing it to stop working Should your hearing aid stop working after coming into contact with water refer to the trou...

Page 41: ...ng care professional for advice and information on filters or drying capsules Weekly Clean the earmold dome or SlimTip with a soft damp cloth or with a special cleaning cloth for hearing aids For more...

Page 42: ...ofessional Battery discharges too quickly Insert a new battery and make note of exactly how long it lasts Contact your hearing care professional with this information they will be able to help and adv...

Page 43: ...s working after contact with water Dry the hearing aid with a soft cloth or tissue Open the battery compartment allow the hearing aid to dry and replace the battery Should any water be present in the...

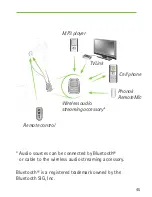
Page 44: ...situations such as watching TV talking on the phone and communicating in noise over distance 7 1 Connecting to audio sources and remote control Connecting to an audio source such as an MP3 player tel...

Page 45: ...ireless audio streaming accessory Cell phone Phonak RemoteMic MP3 player Audio sources can be connected by Bluetooth or cable to the wireless audio streaming accessory Bluetooth is a registered tradem...

Page 46: ...hone and receiver Some Roger FM microphones also support input from audio sources via Bluetooth or cable Microphone worn or placed close to the speaker or connected to the audio source directly transm...

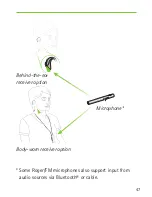
Page 47: ...Behind the ear receiver option Body worn receiver option Microphone Some Roger FM microphones also support input from audio sources via Bluetooth or cable 47...

Page 48: ...ing from the date of purchase This limited warranty covers manufacturing and material defects in the hearing aid itself but not accessories such as batteries tubes earmolds external receivers The warr...

Page 49: ...tress Damage caused by third parties or non authorized service centers renders the warranty null and void This warranty does not include any services performed by a hearing care professional in their...

Page 50: ...l as the Radio and Telecommunications Terminal Equipment Directive 1999 5 EC The full text of the Declaration of Conformity can be obtained from the manufacturer or the local Phonak representative who...

Page 51: ...1 This device complies with Part 15 of the FCC Rules and with RSS 210 of Industry Canada Operation is subject to the following two conditions 1 this device may not cause harmful interference and 2 thi...

Page 52: ...adio communications However there is no guarantee that interference will not occur in a particular installation If this device does cause harmful interference to radio or television reception which ca...

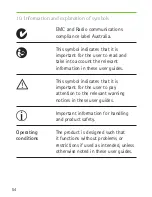
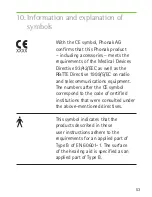
Page 53: ...cations equipment The numbers after the CE symbol correspond to the code of certified institutions that were consulted under the above mentioned directives This symbol indicates that the products desc...

Page 54: ...r to pay attention to the relevant warning notices in these user guides Important information for handling and product safety The product is designed such that it functions without problems or restric...

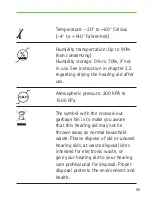
Page 55: ...er use Atmospheric pressure 200 hPA to 1500 hPa The symbol with the crossed out garbage bin is to make you aware that this hearing aid may not be thrown away as normal household waste Please dispose o...

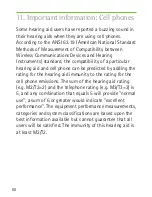
Page 56: ...ing the rating for the hearing aid immunity to the rating for the cell phone emissions The sum of the hearing aid rating e g M2 T2 2 and the telephone rating e g M3 T3 3 is 5 and any combination that...

Page 57: ...lease try the hearing aid with your cell phone or if you are purchasing a new phone be sure to try it with your hearing aid prior to purchase For additional guidance please ask your hearing care profe...

Page 58: ...her available information concerning the prospective user that the prospective user has any of the following conditions i Visible congenital or traumatic deformity of the ear ii History of active drai...
Page 59: ...remaining hearing of the hearing aid user This provision is required only for those hearing aids with a maximum sound pressure capability greater than 132 decibels dB Important Notice for Prospective...

Page 60: ...d evaluation The audiologist or hearing aid dispenser will conduct a hearing aid evaluation to assess your ability to hear with and without a hearing aid The hearing aid evaluation will enable the aud...

Page 61: ...se of such a waiver is not in your best health interest and its use is strongly discouraged Children with Hearing Loss In addition to seeing a physician for a medical evaluation a child with a hearing...

Page 62: ...Notes 62...

Page 63: ...63...

Page 64: ...029 0235 03 V2 00 2013 10 Printed in USA Phonak AG All rights reserved www phonak us com Manufacturer Phonak LLC 4520 Weaver Parkway Warrenville IL 60538...

Reviews: