background image

8

on

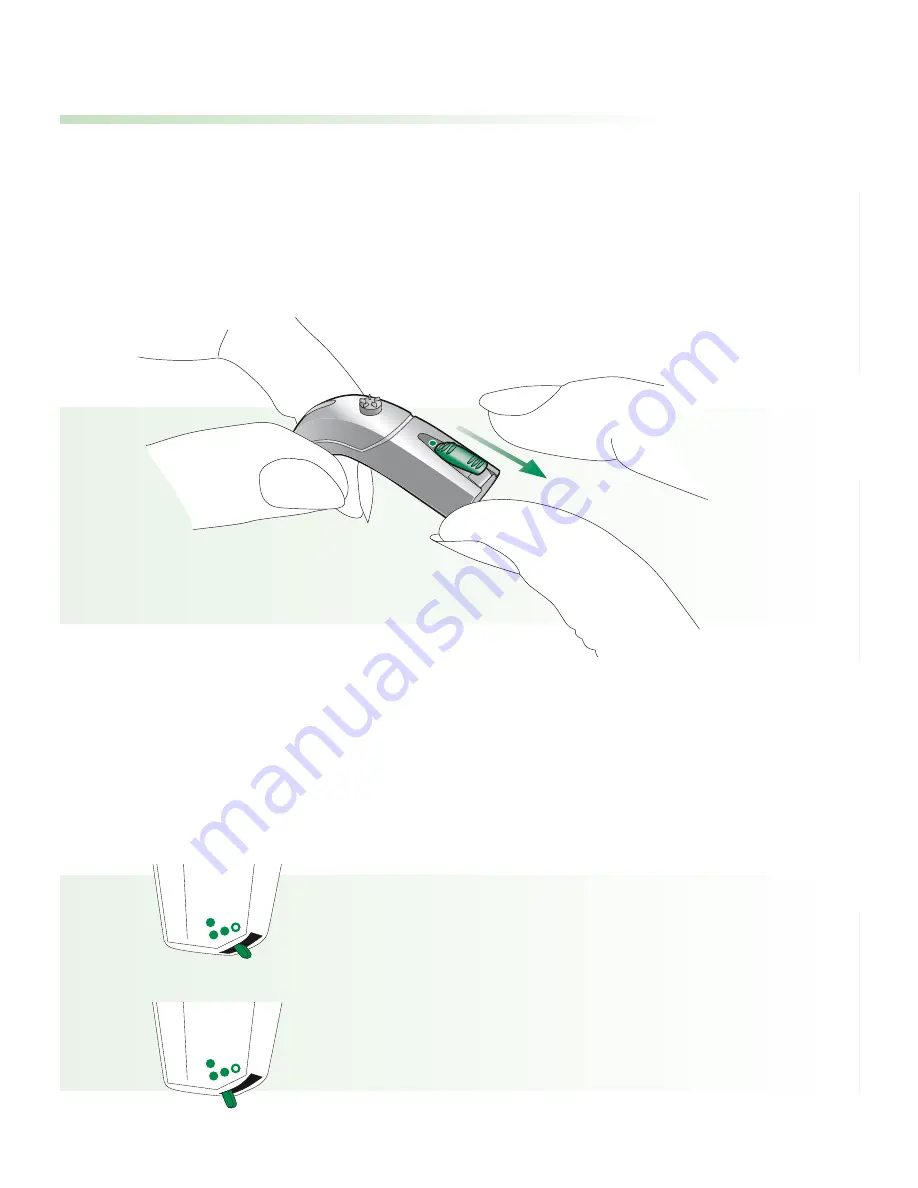
Switch on and go

1)

Switch the CROSLink transmitter on and wear 
it on the unaidable ear

2)

Switch on the hearing instrument and set the
CROSLink receiver to the setting recommended by
the hearingcare professional:

one dot position 

two dot position

Summary of Contents for CROSLink

Page 1: ...CROSLink User Guide...

Page 2: ...rom all direction It is easy to handle very discreet and fits to a vast range of behind the ear hearing instruments on the market For maximum benefit it is recommended that CROSLink is used in combina...

Page 3: ...Insert Change batteries 6 Switch on and go 8 For experienced users BiCROS 10 Readjust the CROSLink 10 To adjust the volume of the CROSLink 14 Important points 15 Warning 15 Declaration of conformity 1...

Page 4: ...OFF switch Volume control Plug for connection to the hearing instrument audio shoe Switch Off position The signal from the CROSLink transmitter on the unaidable ear cannot be received Please consult y...

Page 5: ...er receives the speech signal coming from the CROSLink transmitter Insert retention The Fit n Go retention holds the CROSLink transmitter securely in the ear while keeping the ear canal open for maxim...

Page 6: ...Change batteries The CROSLink transmitter requires size 13 batteries Operating time of a new battery between 100 and 150 hours 1 Switch off the CROSLink instrument 2 Open the battery door 3 Remove the...

Page 7: ...t Make sure that the sign flat side of the battery is on the same side as the battery door 5 Gently shut the battery cover until you feel it click into place and switch on the instrument The CROSLink...

Page 8: ...witch the CROSLink transmitter on and wear it on the unaidable ear 2 Switch on the hearing instrument and set the CROSLink receiver to the setting recommended by the hearingcare professional one dot p...

Page 9: ...9 3 Attach receiver to audioshoe 4 Attach audioshoe to hearing instrument 5 Attach the CROSLink receiver to the hearing instrument and wear it on the better ear Ready...

Page 10: ...s BiCROS Readjust the CROSLink To achieve a balanced sound quality from all directions proceed as follows Step 1 Adjust the volume on the hearing instrument Wear the CROSLink system and switch on only...

Page 11: ...se a radio as a sound source 3 Sit on a chair at approximately 1 meter 3 feet in front of the radio speaker 4 Turn yourself slightly so that the sound is directed toward your better hearing ear 5 Dete...

Page 12: ...CROSLink Step 2 Adjust the level of the CROSLink transmitter on the unaidable poorer ear Switch on the CROSLink transmitter and receiver and set the receiver to the setting recommended by the hearingc...

Page 13: ...of the CROSLink transmitter to a comfortable level trying to match the volume you experienced in Step 1 3 Recheck the transmitter volume by turning yourself again 180 to the same position as in Step...

Page 14: ...r CROS use Adjust the loudness of the signal on your poorer side by increasing or decreasing the volume on your CROSLink transmitter For BiCROS use Adjust balance the loudness of the signal on your po...

Page 15: ...cleaning Use only original Phonak accessories The CROSLink may only be repaired by an authorized service center Warning Changes or modifications made to this equipment not expressly approved by Phonak...

Page 16: ...and found to comply with the limits for a Class B digital device pursuant to Part 15 of the FCC Rules These limits are designed to provide reasonable protection against harmful inter ference in a res...

Page 17: ...sures Reorient or relocate the receiving antenna Increase the separation between the equipment and receiver Consult the dealer or an experienced radio TV technician for help Operation is subject to th...

Page 18: ...from improper handling or care and repairs made by an unauthorized party are not covered by the warranty Please ask at the point of sale for full details of this warranty The salesperson will note the...

Page 19: ...pan Phonak Japan Co Ltd Tokyo 101 0044 Jordan Phonak Middle East 11181 Amman Netherlands Phonak B V 3439 ME Nieuwegein New Zealand Phonak New Zealand Ltd Takapuna Auckland 9 Norway Phonak AS 0105 Oslo...

Page 20: ...This unit sold by www phonak com 029 0430 02 V01 1205 A W Printed in Switzerland Phonak AG All rights reserved...

Reviews: