background image

III

d

l

e

i

F

o

r

c

i

M

l

e

n

n

a

h

C

y

c

n

e

u

q

e

r

F

)

z

H

M

(

k

a

n

o

h

P

n

e

t

s

i

L

c

i

n

o

h

P

r

a

E

k

e

t

m

o

C

x

e

l

e

T

R

V

A

s

m

a

i

l

l

i

W

t

h

g

i

L

d

e

e

p

S

e

k

a

r

D

r

e

n

t

n

e

G

5

4

0

5

2

2

.

6

1

2

E

2

5

4

C

5

4

2

5

7

3

2

.

6

1

2

E

3

5

2

5

2

6

2

.

6

1

2

F

1

6

4

0

5

7

2

.

6

1

2

F

2

6

4

D

6

2

1

5

7

8

2

.

6

1

2

2

1

N

F

3

2

1

C

2

1

N

3

1

5

2

1

3

.

6

1

2

3

1

N

G

1

7

4

0

5

2

3

.

6

1

2

G

2

7

4

E

7

6

2

5

7

3

3

.

6

1

2

G

3

7

2

5

2

6

3

.

6

1

2

H

1

8

4

0

5

7

3

.

6

1

2

H

2

8

4

F

8

6

1

5

7

8

3

.

6

1

2

6

1

N

H

3

6

1

C

7

1

5

2

1

4

.

6

1

2

7

1

N

J

1

9

4

0

5

2

4

.

6

1

2

J

2

9

4

G

9

8

1

5

7

3

4

.

6

1

2

8

1

N

J

3

8

1

C

8

1

N

1

6

5

2

1

5

.

6

1

2

1

6

N

K

1

1

2

C

9

2

0

5

2

5

.

6

1

2

K

2

1

5

H

0

1

2

6

5

7

3

5

.

6

1

2

2

6

N

K

3

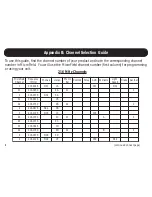
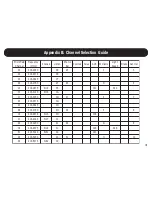
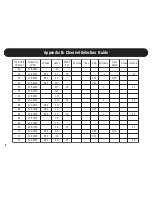
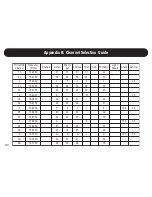
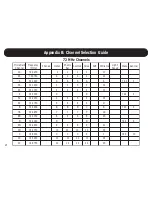
Appendix B: Channel Selection Guide

Summary of Contents for MSF0001 MicroField

Page 1: ...MicroField User Manual...

Page 2: ......

Page 3: ...s For First Time Users 7 General Functions 8 Turning the Unit On and Off 9 Operational Overview Connections and Controls 10 MicroField s Display 11 Adjusting Volume 12 Enabling the Automatic Shut Off...

Page 4: ...ith an External 72MHz Transmitter and Receiver 24 Setting up the Receive Channel 26 Important Notes 27 Finding a Receive Channel Using Automatic Search 28 Finding a Receive Channel Using Manual Search...

Page 5: ...3 MicroField as a Transmitter 38 Using the Auxiliary Input With a Microphone 39 Using the Auxiliary Input With Your TV or Other Device 40 Troubleshooting 41 Compliance Notice 47 Appendix 50...

Page 6: ...This page intentionally blank...

Page 7: ...1 Introduction...

Page 8: ...facilities providing wireless assistive listening on any of three frequency bands Once MicroField finds the transmission it sends the audio signal to you in one of several ways Directly to your heari...

Page 9: ...s an FM IR signal in a facility Seven presets for regularly used transmission channels Ideal for classroom use places of worship or your favorite theater Automatically remembers the last volume settin...

Page 10: ...an exter nal transmitter that transmits to an FM receiver This manual frequently refers to receive and transmit channels Please note that re ceive channels are frequencies received by MicroField from...

Page 11: ...the batteries are charged overnight before using MicroField See page 15 After extensive use of your MicroField you might want to restore the factory default set tings to give you a fresh start on pro...

Page 12: ...listening devices Your MicroField is designed to search out these audio channels and then send them directly to your FM receiver Your MicroField can pick up signals in three frequency bands 72 76 MHz...

Page 13: ...ble batteries pre installed 2 Nylon case 3 Infrared receiving cable 4 Power supply for re charging and or powering the unit 5 Headset not shown If any components are missing contact Phonak immediately...

Page 14: ...8 General Functions...

Page 15: ...hold the ON button until you see the Phonak logo on the display and then release To turn the unit off press and hold the OFF button until the display turns off If the I O symbol is illuminated your M...

Page 16: ...nel battery status program mode and preset lock Use to select and store presets or to program the unit Connect the provided power supply here to charge the batteries or operate the unit Use to automat...

Page 17: ...ttery life remaining when flashing shutdown is imminent When illuminated indicates unit is in transmit channel programming mode When illuminated indicates unit is in auto shut off mode When illuminate...

Page 18: ...tween 0 and 25 indicating the relative volume level The unit will also remember volume settings for each preset Once you adjust volume to the desired level the volume level will automatically return t...

Page 19: ...will be displayed To turn off the automatic shut off function quickly press and hold the On Off button and then press the DOWN button The I O symbol will be extinguished Note Any time you plug a devic...

Page 20: ...y default settings the following occurs All of the presets are programmed to channel 00 they are all cleared The transmitting channel is set to channel 00 The auto shut off function is turned off The...

Page 21: ...batteries When the batteries are fully charged the unit will stop charging When not in use it is best to leave your MicroField connected to the power supply to keep the batteries fully charged the uni...

Page 22: ...rated with batteries or connected to the power supply To use your unit with the power supply simply connect the supply to the front of the MicroField unit and connect to AC power Use ONLY the power su...

Page 23: ...ries with the same type NiMH and a capacity of 1600mA or greater Use good quality batteries To replace the batteries Turn the unit off Turn the unit upside down Use a Phillips screwdriver to remove th...

Page 24: ...fore first use You can expect a new set of NiMH batteries to last between 1 and 3 years before requiring replacement depending on the usage WARNING do not use alkaline batteries in your MicroField Cha...

Page 25: ...19 Using MicroField for Rebroadcasting Setting Up The Transmit Channel...

Page 26: ...audio signals to the headset jack To use it with your MicroLink MicroEar or with any other FM receiver you will need to go through the setup process outlined in this section Please refer to the follo...

Page 27: ...rol at about 15 to ensure the best audio levels To change volume use the controls on your hearing aid or receiver If you use your MicroField near a computer the computer may cause interference which w...

Page 28: ...r MicroEar Receiver Determine the channel of your MicroLink or MicroEar for example 9 Press PRESET and SEARCH at the same time on your MicroField PGM will appear on the display indicating the unit is...

Page 29: ...oduct For example Phonic Ear 51 MicroField Channel 29 Press the PRESET and SEARCH buttons at the same time on your MicroField PGM will appear on the display indicating it is ready to program a channel...

Page 30: ...l from MicroField to the FM receiver you will need to connect it to your MicroField using an auxiliary cable from Phonak You also must program MicroField so that it will work with your transmitter Set...

Page 31: ...annel is selected 00 will ap pear in the channel indicator if your MicroField was previously programmed the transmitting chan nel number will be displayed Press the DOWN button to select the channel n...

Page 32: ...26 Using MicroField For Rebroadcasting Setting up the Receive Channel...

Page 33: ...near a computer Com puters cause interference which may prevent your unit from finding a signal When searching MicroField will step through all available channels in the sequence shown in the MicroFi...

Page 34: ...l start over when you press SEARCH If no receive signals are present the unit will continue to search press UP or DOWN to stop CH is displayed when your MicroField is in the search mode If you are not...

Page 35: ...he exact channel number of the desired audio signal by using the UP and DOWN buttons See Appendix B for MicroField channel num bers After you have selected your channel do not press any buttons for 7...

Page 36: ...Press and hold the Preset button The display will flash between P1 and the stored channel the factory default channel is 00 Momentarily press the Preset button to select the preset number you want to...

Page 37: ...eset button will result in the following selections P1 P2 P3 52 P1 P2 P3 52 If no presets are available you may program them See Stor ing Presets on the previous page Caution if you hold the preset bu...

Page 38: ...d you cannot store any new presets However you can still find out what is in a preset location by pressing and holding the Preset button until the display flashes This will cause MicroField to cycle b...

Page 39: ...up the signal If you are not certain where the IR emitter is located try different positions until you get the strongest signal Plug the cable into the jack marked IR Attach the IR cable to your cloth...

Page 40: ...34 MicroField as a Receiver...

Page 41: ...om the transmitting antenna to a maximum of approximately 1000 feet 305 meters depending on the type of trans mitter used When using your MicroField make sure the unit is not near a computer Computers...

Page 42: ...evice into the headset jack Stereo or mono mini 3 5 mm plugs can be used Adjust the volume to a com fortable listening level using the UP DOWN buttons Headset Earphone or Neckloop Use Connect your hea...

Page 43: ...you to use your MicroField for personal soundfield applications Plug the speaker cable into MicroField s headset jack Position the speaker in the case so the speaker grid is facing outside After locat...

Page 44: ...38 Operating Your MicroField MicroField as a Transmitter...

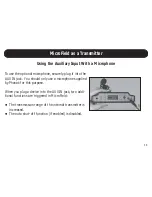
Page 45: ...ack You should only use a microphone supplied by Phonak for this purpose When you plug a device into the AUX IN jack two addi tional functions are triggered in MicroField The transmission range of the...

Page 46: ...your FM receiver via MicroField Connect the optional cable to the AUX IN jack on your MicroField Connect the other end to your TV or other device When you plug a device into the AUX IN two additional...

Page 47: ...41 Troubleshooting...

Page 48: ...o channel or preset has been programmed You can find a channel using the Search functions see pages 28 29 or you can program presets see page 30 When I repeatedly press the Preset button not all 7 pre...

Page 49: ...p pendix A for details For example if your MicroField is programmed to transmit on channel 52 it will not be able to receive on channel 52 or nearby channels These channels are purposefully locked out...

Page 50: ...channel 91 Most theaters use channel 91 or 92 for infrared transmissions The audio signal is distorted When searching for a channel your MicroField may not stop at the clearest channel Press the Searc...

Page 51: ...d keeps turning off by itself The auto shut off function may be enabled the I O symbol will be illuminated see page 13 Or the batteries may be dead try charging the batteries The unit is not turning o...

Page 52: ...put Ring is a line input The microphone that is connected to the AUX IN does not work or is distorted You may be using the wrong type of microphone Contact Phonak for assistance I can t get the audio...

Page 53: ...47 Compliance Notice...

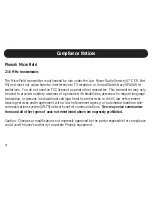
Page 54: ...disabilities persons who require language translation or persons in educational settings health care services to the ill law enforcement tracking services under agreement with a law enforcement agency...

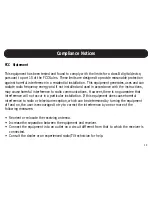
Page 55: ...terference to radio communications However there is no guarantee that interference will not occur in a particular installation If this equipment does cause harmful interference to radio or television...

Page 56: ...50 Appendix...

Page 57: ...225 200 175 150 113 50 75 0 0 12 100 75 137 200 175 275 287 250 700 675 575 550 525 500 375 350 325 250 225 200 175 138 75 100 0 0 12 75 50 112 175 150 250 262 225 713 688 587 562 538 512 387 362 338...

Page 58: ...a n o h P n e t s i L c i n o h P r a E k e t m o C x e l e T R V A s m a i l l i W t h g i L d e e p S e k a r D r e n t n e G 1 5 2 1 0 6 1 2 1 0 N A 1 1 0 C 1 0 N 1 4 0 5 2 0 6 1 2 A 2 1 4 1 2 5 7...

Page 59: ...1 6 4 0 5 7 2 6 1 2 F 2 6 4 D 6 2 1 5 7 8 2 6 1 2 2 1 N F 3 2 1 C 2 1 N 3 1 5 2 1 3 6 1 2 3 1 N G 1 7 4 0 5 2 3 6 1 2 G 2 7 4 E 7 6 2 5 7 3 3 6 1 2 G 3 7 2 5 2 6 3 6 1 2 H 1 8 4 0 5 7 3 6 1 2 H 2 8 4...

Page 60: ...7 8 5 6 1 2 4 6 N L 3 4 2 C 4 6 N 5 6 5 2 1 6 6 1 2 5 6 N M 1 5 2 C 3 5 0 5 2 6 6 1 2 M 2 3 5 J 2 1 1 8 5 7 3 6 6 1 2 M 3 2 8 5 2 6 6 6 1 2 N 1 4 5 0 5 7 6 6 1 2 N 2 4 5 K 3 1 8 6 5 7 8 6 6 1 2 8 6 N...

Page 61: ...i L d e e p S e k a r D r e n t n e G 6 7 5 7 3 8 6 1 2 6 7 N S 3 5 8 5 2 6 8 6 1 2 T 1 8 5 0 5 7 8 6 1 2 T 2 8 5 7 1 6 8 5 7 8 8 6 1 2 T 3 7 7 5 2 1 9 6 1 2 7 7 N U 1 7 3 C 7 7 N 9 5 0 5 2 9 6 1 2 U...

Page 62: ...2 A 3 0 5 2 1 2 7 3 3 3 3 4 1 A 4 0 5 7 1 2 7 4 4 4 4 5 1 K 0 0 0 2 2 7 K B 2 2 7 4 K 5 0 5 2 2 2 7 5 5 5 5 6 1 K 6 0 5 7 2 2 7 6 6 6 6 7 1 B 0 0 0 3 2 7 B B B C B 3 2 7 6 B 7 0 5 2 3 2 7 7 7 7 7 9 1...

Page 63: ...7 D D D G D 7 2 7 4 1 D 5 0 5 2 7 2 7 5 1 5 1 5 1 5 1 9 2 D 6 0 5 7 7 2 7 6 1 6 1 6 1 0 3 P 0 0 0 8 2 7 P H 8 2 7 6 1 P 7 0 5 2 8 2 7 7 1 7 1 7 1 7 1 1 3 P 8 0 5 7 8 2 7 8 1 8 1 8 1 8 1 2 3 E 0 0 0 9...

Page 64: ...J 4 2 J 9 0 5 2 3 5 7 9 3 9 3 9 3 9 3 4 4 J 0 0 5 7 3 5 7 0 4 0 4 0 4 0 4 5 4 R 0 0 0 4 5 7 R Q 6 2 R 1 0 5 2 4 5 7 1 2 1 2 1 2 6 4 R 2 0 5 7 4 5 7 2 2 2 2 2 2 7 4 F 0 0 0 5 5 7 F F F J F 5 5 7 8 2 F...

Page 65: ...C x e l e T R V A s m a i l l i W t h g i L d e e p S e k a r D r e n t n e G T 0 0 0 8 5 7 T M 8 5 7 4 3 T 9 0 5 2 8 5 7 9 2 9 2 9 2 6 5 T 0 0 5 7 8 5 7 0 3 0 3 0 3 7 5 H 0 0 0 9 5 7 H H N H 9 5 7 6...

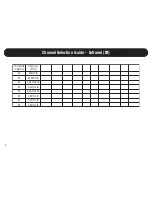
Page 66: ...de Infrared IR d l e i F o r c i M l e n n a h C y c n e u q e r F z H M 1 9 R I z H k 5 9 2 9 R I z H k 0 5 2 3 9 R I z H M 6 0 2 4 9 R I z H M 3 2 5 9 R I z H M 6 5 2 6 9 R I z H M 8 2 7 9 R I z H M...

Page 67: ...XI...
Page 68: ...vision Contact Information Telephone 1 888 777 7316 Website www Phonak US com Address 4520 Weaver Parkway Warrenville IL 60555 3927 Version 031020 Copyright 2003 Phonak Hearing Systems All Rights Rese...

Reviews: