background image

10

must be cleaned and dried, as the hearing aid 
contains sensitive electronic parts.


I

Never wash the microphone inputs. Doing so could 
cause it to lose its special acoustic features.


I

Protect your hearing aid from heat (never leave it 
near a window or in the car). Never use a microwave 
or other heating devices to dry your hearing aid. Ask 
your hearing care professional about suitable drying 
methods.


I

When you are not using your hearing aid, leave the 
battery compartment open so that any  
moisture can evaporate. Make sure that you always 
completely dry your hearing aid after use. Store the 
hearing aid in a safe, dry and clean place.


I

Do not drop your hearing aid! Dropping onto a hard 
surface can damage your hearing aid. 


I

Always use new batteries for your hearing aid. In case 
a battery is leaking, replace it immediately with a 
new one to avoid any skin irritation.You can return 
used batteries to your hearing care professional.

2.  Important safety information

Summary of Contents for Nathos S+

Page 1: ...User Guide Power hearing aids...

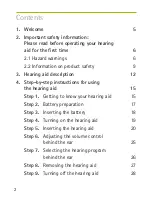
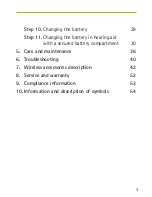
Page 2: ...p instructions for using the hearing aid 15 Step 1 Getting to know your hearing aid 15 Step 2 Battery preparation 17 Step 3 Inserting the battery 18 Step 4 Turning on the hearing aid 19 Step 5 Inserti...

Page 3: ...the battery in hearing aid with a secured battery compartment 30 5 Care and maintenance 36 6 Troubleshooting 40 7 Wireless accessories description 42 8 Service and warranty 52 9 Compliance informatio...

Page 4: ...This user guide is valid for Wireless models CE mark applied Phonak Nathos S SP W 2014 Phonak Nathos S UP W 2014 4...

Page 5: ...l hearing technology currently available on the market Please read these user instructions thoroughly in order to benefit from all the possibilities your new hearing aid has to offer With proper use a...

Page 6: ...d to be supplemented by auditory training and instruction in lipreading 2 1Hazard warnings The intended use of hearing aids is to amplify and transmit sound to the ears and hereby compensate for impai...

Page 7: ...grated Roger FM receiver if used must be attached for children younger than 36 months to prevent accidental swallowing of the battery or small parts of the device In case one of these secured mechanis...

Page 8: ...g from behind e g cars are partially or entirely suppressed This hearing aid is not designed to be used for children below 36 months The Hearing aid contains small parts that can cause choking if swal...

Page 9: ...g aid at least 15 cm 6 inches away from the active implant If you experience any interference do not use the wireless hearing aids and contact the manufacturer of the active implant Please note that i...

Page 10: ...le drying methods I I When you are not using your hearing aid leave the battery compartment open so that any moisture can evaporate Make sure that you always completely dry your hearing aid after use...

Page 11: ...Medical or dental examinations with X ray also CT scan S S Medical examinations with MRI NMRI scans generating magnetic fields Hearing aids don t need to be removed when passing security gates airport...

Page 12: ...wings to identify the hearing aid and the earmold that you use The following table shows what battery you need for your hearing aid model Model Zinc air battery size IEC ANSI marking on package code c...

Page 13: ...with classic earmold a Power SlimTube b Classic earmold detachable c Volume control d Program button e Microphone input with Wind and Weather Protector f Hook sound output g Hearing tube h Classic ear...

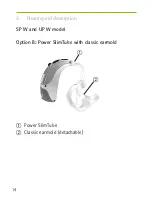
Page 14: ...14 3 Hearing aid description SP W and UP W model Option B Power SlimTube with classic earmold a Power SlimTube b Classic earmold detachable a b...

Page 15: ...the parts that are particularly important for each step are shown in green Step 1 Getting to know your hearing aid Take the hearing aid in your hand and try out the hearing aid controls This will make...

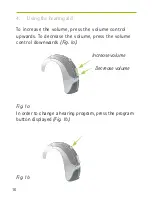
Page 16: ...volume control upwards To decrease the volume press the volume control downwards Fig 1a In order to change a hearing program press the program button displayed Fig 1b Fig 1a Fig 1b Decrease volume Inc...

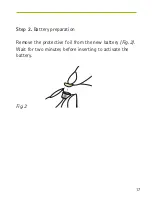
Page 17: ...17 Step 2 Battery preparation Remove the protective foil from the new battery Fig 2 Wait for two minutes before inserting to activate the battery Fig 2...

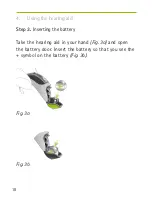
Page 18: ...Fig 3b Fig 3a Step 3 Inserting the battery Take the hearing aid in your hand Fig 3a and open the battery door Insert the battery so that you see the symbol on the battery Fig 3b 4 Using the hearing a...

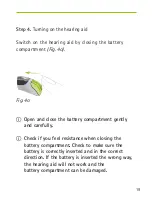
Page 19: ...se the battery compartment gently and carefully I I Check if you feel resistance when closing the battery compartment Check to make sure the battery is correctly inserted and in the correct direction...

Page 20: ...ear an acoustic signal Step 5 Inserting the hearing aid This step shows you how to correctly insert the hearing aid I I Each hearing aid is individually programmed for your right or left ear For the f...

Page 21: ...21 Step 5 1 Identifying the hearing aid for the right and left ear Color indicator right red left blue Fig 5a...

Page 22: ...ght ear red mark on the hearing aid see step 5 1 between your thumb and forefinger Fig 5c Take the earmold up to your ear Fig 5c Place the ear canal part of the earmold into your ear canal see the par...

Page 23: ...t fits correctly Check the fit by running your finger over the bowl of the ear You know it fits correctly if when doing so you feel the contour of the bowl of the ear and not the hearing aid Fig 5f In...

Page 24: ...24 Step 5 3 Inserting a SP W or UP W model with Power SlimTube with classic earmold Follow the instructions in Step 5 2 as this procedure is identical 4 Using the hearing aid...

Page 25: ...behind the ear To increase the volume press the volume control upwards To decrease it press the volume control downwards using your forefinger Use your thumb to lightly support the hearing aid Fig 6...

Page 26: ...earing program press the program button displayed Fig 7 If you press it again you change to the next program A signal indicates the change A signal tone can only be heard if you have turned on the hea...

Page 27: ...assic earmold Take the hearing aid behind your ear and lift it above the upper part of your ear and then gently let go Fig 8a Use your thumb and forefinger to grasp the earmold and gently remove it fr...

Page 28: ...a SP W or UP W model with Power SlimTube with classic earmold Follow the instructions in Step 8 1 as this procedure is identical Step 9 Turning off the hearing aid You can turn off your hearing aid by...

Page 29: ...u always keep a spare battery on hand I I Contrary to customary practice particularly for pediatric consumers the use of battery testers is not recommended The battery tester may indicate that the bat...

Page 30: ...t Your hearing aid can be fitted with a secured battery compartment if needed for safety reasons Open the battery compartment by inserting a pen tip into the notch shown Fig 11a Gently lift the latch...

Page 31: ...31 I Do not lift the latch above 90 Fig 11a Fig 11b...

Page 32: ...32 Fig 11c Use your thumb and forefinger and pull the battery compartment to open it up Fig 11c 4 Using the hearing aid...

Page 33: ...fingernail Fig 11d and push it in an upward direction Fig 11e The battery can only be removed or inserted when the tab is in upwards position Fig 11e Fig 11d Fig 11e The old battery can now be replac...

Page 34: ...pushing the white tab towards the hearing aid with your finger Fig 11h Before you close the battery compartment check that the white tab is locked in position and the battery is secured Fig 11g Fig 1...

Page 35: ...35 Secure the battery compartment by pushing the latch over the battery compartment Fig 11j until it snaps into place Fig 11k Check that the battery compartment is now secured Fig 11j Fig 11k...

Page 36: ...amage it Never wash or clean the Wind and Weather Protector see chapter 3 Doing so could cause it to lose its special acoustic features When you are not using your hearing aid leave the battery compar...

Page 37: ...bed in this user guide I I Hearing aids with the design integrated Roger FM receiver or secured battery compartment are also water resistant I I Hearing aids with an audio shoe and Roger FM universal...

Page 38: ...immerse your hearing aid in water or other liquids I I Always remove your hearing aid before showering bathing or swimming It is not designed for any kind of swimming or diving activities 5 Care and...

Page 39: ...our hearing aid intensively ask your hearing care professional for advice and information on filters or drying capsules Weekly Clean the earmold with a soft damp cloth or with a special cleaning cloth...

Page 40: ...correctly inserted and properly fitted adjust the fit if necessary If there is no improvement change the battery If the problem persists contact your hearing care professional Hearing aid stops workin...

Page 41: ...x residue Check the hearing tube for damage color changes hardening or cracks and contact your hearing care professional if necessary for replacement Whistling Check whether the earmold is correctly a...

Page 42: ...ted situations such as watching TV talking on the phone and communicating in noise over distance 7 1 Connecting to audio sources and remote control Connecting to an audio source such as an MP3 player...

Page 43: ...l Wireless audio streaming accessory Cell phone Phonak RemoteMic MP3 player Audio sources can be connected by Bluetooth or cable to the wireless audio streaming accessory Bluetooth is a registered tra...

Page 44: ...rophone and receiver Some Roger FM microphones also support input from audio sources via Bluetooth or cable Microphone worn or placed close to the speaker or connected to the audio source directly tra...

Page 45: ...45 Behind the ear receiver option Body worn receiver option Microphone Some Roger FM microphones also support input from audio sources via Bluetooth or cable...

Page 46: ...iver models Design integrated receiver Audio shoe with universal receiver On the following pages use the pictures to identify the receiver option you have 7 2 2 Design integrated receiver SP W UP W mo...

Page 47: ...ee chapter 4 Your hearing care professional has prepared your hearing aid for use with the design integrated receiver The design integrated receiver can not be removed The hearing aid with the design...

Page 48: ...Hearing aid b Battery compartment c Audio shoe removable part d Universal receiver With the audio shoe and universal receiver attached the hearing aid offers the same functionalities and usability as...

Page 49: ...d for use with the audio shoe and universal receiver Step 1 Attaching the audio shoe to the hearing aid Hold the hearing aid between the thumb and forefinger of one hand and the audio shoe in your oth...

Page 50: ...ep 2 Attaching the universal receiver to the audio shoe Push the three pins of the universal receiver into the three sockets of the audio shoe Make sure to align the universal receiver so that the big...

Page 51: ...ystem on the audio shoe back Fig 7 4 At the same time pull the hearing aid upwards with your other hand Fig 7 5 The audio shoe is now removed from the hearing aid To have Roger FM automatically turned...

Page 52: ...52 8 Service and warranty Serial number left side Serial number right side Fitting date...

Page 53: ...Directive 93 42 EEC as well as the Radio and Telecommunications Terminal Equipment Directive 1999 5 EC The full text of the Declaration of Conformity can be obtained from the manufacturer or the local...

Page 54: ...cations equipment The numbers after the CE symbol correspond to the code of certified institutions that were consulted under the above mentioned directives This symbol indicates that the products desc...

Page 55: ...or the user to pay attention to the relevant warning notices in these user guides Important information for handling and product safety The product is designed such that it functions without problems...

Page 56: ...g the hearing aid after use Atmospheric pressure 200 hPA to 1500 hPa The symbol with the crossed out garbage bin is to make you aware that this hearing aid may not be thrown away as normal household w...

Page 57: ...Notes...

Page 58: ...Notes...

Page 59: ......

Page 60: ...029 0303 02 V1 00 2014 06 FO Printed in Switzerland Phonak AG All rights reserved www phonak com Phonak AG Laubisr tistrasse 28 CH 8712 St fa Switzerland...

Reviews: