Copyright © 2011, PHONO SOLAR
Page 29 of 29
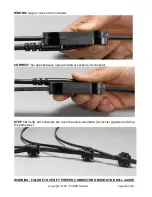
7) While supporting the PV module, loosen and remove the four screws holding the
corners of the AC Module to the enclosure on the PV.
8) Grasp the AC Module by the sides of the finned heat sink and pull the AC Module from
the enclosure base, noting the location of the internal AC interface connector.
9) Place the old AC Module to one side. Note the location of the internal AC interface
connector.
10) Insert the new AC Module into the enclosure, making sure to align the AC interface
connector on the AC Module printed circuit board with the AC interface connector in
the enclosure. Press firmly. The lid should seat completely on the base of the
enclosure. Make sure the o-ring gasket remains in place.
11) Replace the four screws located at the corners of the AC Module enclosure. Torque
to 10 inch-pounds. DO NOT OVERTIGHTEN.
12) Reinstall the PV module onto the rack.
13) Verify that all hardware is tight per the installation instructions.
14) Restore AC power to the AC Module system. Follow the steps outlined in
“Commissioning Your System”.
This completes the replacement of an existing AC Module.
SAFETY COMPLIANCE STATEMENT
– MICRO INVERTER
Micro inverter of PHONO SOLAR AC Modules comply with the following safety and related
standards:
Title 47 CFR, Part 15, Subparts A and B of the United States Federal Communications
Commission Rules and Regulations.
ANSI C62.41 IEEE Standards for Surge Protection.
UL1741
Standards for Inverters, Converters, Controllers and Interconnection System
Equipment for Use With Distributed Energy Resources.
UL1703
Standards for Photovoltaic Modules.
IEEE 519
International Standards for Harmonic Limits.
IEEE 929
International Standards for safety of linemen, customers, and utility equipment.
Also sets power quality ranges and anti-islanding requirements.


