background image

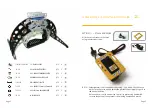
COMPONENT CHECKLIST

1.

Page  1

100-1165   


AV1-AV130 PAN SERVO BRACKET

100-1157   


AV1-AV130 PAN SHAFT

100-1163   


AV1-AV130 PAN SKIDS

100-1162   


AV2-AV200 SKID BASE COMMON

HH-DS16 FCD 


HH-HYPERION DS16FCD SERVO 

SC-44T 48P SERVO GE        

SC-44T SERVO GEAR (Futuba)

CS- 10-1.OMG 304N CR3      

FS- M10 LOCK NUT

HH-TREX 450 MAINGEAR    

HH-T-Rex 450 MAIN GEAR

100-1164   


AV1-AV130 PAN SPACER

F6701 ZZ   


ABS- 12x18x4mm B FLANGE

100-1128   


AV2-AV200 BOTTOM BEARING BRACKET

100-1021   


OR- ROLL BEARING SPACER - 50.8mm

100-1020  


OR- STANDARD SPACER - 60mm

CSB-BH M3X6 CS ZINC        

FS- M3x6 BUTTON HEAD CS ZINC

LN-M3   


FS- M3 LOCK NUT

QTY 1

QTY 1

QTY 4

QTY 2

QTY 1

QTY 1

QTY 1

QTY 1

QTY 1

QTY 2

QTY 1

QTY 6

QTY 4

QTY 48

QTY 32

Summary of Contents for AV130 360 PAN KIT MR

Page 1: ...AV130 360 PAN KIT MR 360 Pan kit assembly instructions for the Mini AV130 Camera Gimbal for Multirotors ...

Page 2: ...EAR Futuba CS 10 1 OMG 304N CR3 FS M10 LOCK NUT HH TREX 450 MAINGEAR HH T Rex 450 MAIN GEAR 100 1164 AV1 AV130 PAN SPACER F6701 ZZ ABS 12x18x4mm BEARING FLANGE 100 1128 AV2 AV200 BOTTOM BEARING BRACKET 100 1021 OR ROLL BEARING SPACER 50 8mm 100 1020 OR STANDARD SPACER 60mm CSB BH M3X6 CS ZINC FS M3x6 BUTTON HEAD CS ZINC LN M3 FS M3 LOCK NUT QTY 1 QTY 1 QTY 4 QTY 2 QTY 1 QTY 1 QTY 1 QTY 1 QTY 1 QTY...

Page 3: ...adjust the pot shaft if neccessary to get it to the neutral position Once you have it set to neutral you can fix it in place using heatshrink to cover the pot shaft and prevent it from being bumped and moved CS M3X6 COUNTRSINK FS CSK M3x6 ZINC 100 1178 AV1 AV130 BATTERY TRAY 100 1192 AV2 PAN AXES BEARING SPACER 100 1131 DROIDWORX ADAPTOR PLATE LG360GRE DW GEAR RAIL PLATES 200 1219 AV2 GROMET 3 2mm...

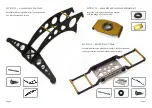
Page 4: ...crews Insert the bearing into the bearing bracket with the flange on the under side Assemble battery tray with 60mm spacers M3x6 buttonheads rubber grommets and the Droidworx adaptor plate Page 5 Page 4 STEP 2 LANDING SKIDS STEP 3 LOWER BEARING BRACKET STEP 4 BATTERY TRAY ...

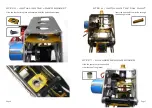
Page 5: ...uttonhead screws Insert the pan shaft from inside through the bearing bracket Slide the spacer onto the pan shaft from the top of the gimbal Page 7 Page 6 STEP 5 INSTALLING THE LOWER BRACKET STEP 6 INSTALLING THE PAN SHAFT STEP 7 PAN AXES BEARING SPACER ...

Page 6: ...rvo in place with M3x10 screws Page 9 Page 8 STEP 8 BEARING PLACEMENT Slide the servo into the gimbal on an angle as shown If this method proves problematic you can separate the serve from its bracket and slide that in first Place the servo gear and fix in place using the servo screw STEP 9 INSTALL THE SERVO STEP 10 Servo gear ...

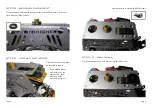
Page 7: ...p facing up STEP 11 MAIN GEAR ASSEMBLY Fit the main gear hub side down onto the pan shaft Slide the servo gear toward the main gear so that the teeth of the two gears are interconnected STEP 12 AFFIX THE TWO GEARS Position the pre assembled battery tray on the main gear and fix in place tightly using the wavy washer then the lock nut STEP 14 ATTACHING THE BATTERY TRAY ...

Page 8: ...3 Page 12 Attach the pre assembled skids to the gimbal using M3x6 buttonhead screws The screws should be positioned on the interior of the gimbal with the M3 lock nuts on the exterior STEP 15 ATTACHING SKIDS ...

Reviews: