background image

6 Hardware Interface

An example of improper wiring that causes a ground loop is shown in Fig. 6.17.

I

s o l a t o r

C A M _ G N D

I S O _ I N

I S O _ G N D

G r o u n d   p l a n e   v o l t a g e   d i f f e r e n c e

C o n n e c t i n g   C A M _ G N D   a n d  

I S O _ G N D   t h e   w r o n g   w a y

G r o u n d   l o o p

  G r o u n d   l o o p

Figure 6.17: Improper I/O wiring causing a ground loop

.

70

Summary of Contents for MV1-R1280-50-G2 Camera Series

Page 1: ...User Manual MV1 R1280 50 G2 Camera Series Ultra low light CMOS camera with GigE interface MAN066 04 2015 V1 0...

Page 2: ...responsibility is assumed by Photonfocus AG for its use Photonfocus AG reserves the right to make changes to this information without notice Reproduction of this manual in whole or in part by any mean...

Page 3: ...ature Overview 27 4 3 Available Camera Models 27 4 4 Technical Specification 28 5 Functionality 31 5 1 Reduction of Image Size 31 5 1 1 Region of Interest ROI 31 5 1 2 Maximal Frame Rate 32 5 2 Trigge...

Page 4: ...iring 67 6 6 PLC connections 71 7 Software 73 7 1 Software for Photonfocus GigE Cameras 73 7 2 PF_GEVPlayer 73 7 2 1 PF_GEVPlayer main window 74 7 2 2 GEV Control Windows 74 7 2 3 Display Area 76 7 2...

Page 5: ...1 Warranty Terms 87 9 2 Warranty Claim 87 10 References 89 A Pinouts 91 A 1 Power Supply Connector 91 B Camera Revisions 93 B 1 General Remarks 93 B 2 MV1 R1280 50 G2 16 93 C Document Revision Histor...

Page 6: ...CONTENTS 6...

Page 7: ...CH 8853 Lachen SZ Switzerland Sales Phone 41 55 451 00 00 Email sales photonfocus com Support Phone 41 55 451 00 00 Email support photonfocus com Table 1 1 Photonfocus Contact 1 3 Sales Offices Photo...

Page 8: ...ving been obtained from Photonfocus AG Photonfocus can not be held responsible for any technical or typographical er rors 1 5 Legend In this documentation the reader s attention is drawn to the follow...

Page 9: ...impressive low light performance of the MV1 R1280 camera by showing a comparison with the MV1 D2048x1088 camera with a CMOSIS CMV2000 sensor Both images were shot at the same illumination and with an...

Page 10: ...2 Introduction 10...

Page 11: ...bytes In this guide the Intel PRO 1000 GT desktop adapter is used The descriptions in the following chapters assume that such a network interface card NIC is installed The latest drivers for this NIC...

Page 12: ...t J a c k R J 4 5 P o w e r S u p p l y a n d I O C o n n e c t o r S t a t u s L E D Figure 3 1 Rear view of the Photonfocus MV1 R1280 GigE camera series with power supply and I O con nector Etherne...

Page 13: ...e computer before proceeding 4 After the computer has been restarted open the eBUS Driver Installation tool Start All Programs eBUS SDK Tools Driver Installation Tool see Fig 3 2 If there is more than...

Page 14: ...3 How to get started GigE G2 Figure 3 3 PFInstaller components choice 14...

Page 15: ...ttings are described in the tool chapter 1 Open the Network Connections window Control Panel Network and Internet Connections Network Connections right click on the name of the network adapter where t...

Page 16: ...ress automatically For this quick start guide it is recommended to configure the network adapter to obtain an IP address automatically To do this select Internet Protocol TCP IP see Fig 3 4 click the...

Page 17: ...ck on the Advanced tab and click on Jumbo Frames in the Settings list see Fig 3 6 The highest number gives the best performance Some tools however don t support the value 16128 For this guide it is re...

Page 18: ...ows Firewall is used then it can be switched off like this Open the Windows Firewall configuration Start Control Panel Network and Internet Connections Windows Firewall and click on the Advanced tab U...

Page 19: ...rk adapter where the Photonfocus camera is connected and select Properties from the drop down menu that appears A Properties window will open Check the eBUS Universal Pro Driver see Fig 3 8 for maxima...

Page 20: ...o acquire images from the camera and how to modify camera settings 1 Open the PF_GEVPlayer software Start All Programs Photonfocus GigE_Tools PF_GEVPlayer which is a GUI to set camera parameters and t...

Page 21: ...amera is not listed then select the box Show unreachable GigE Vision Devices Figure 3 10 GEV Device Selection Procedure displaying the selected camera 3 Select camera model to configure and click on S...

Page 22: ...the configuration process and connect the camera to PF_GEVPlayer Figure 3 13 PF_GEVPlayer is readily configured 6 The camera is now connected to the PF_GEVPlayer Click on the Play button to grab imag...

Page 23: ...ight is green when an image is being acquired and it is red when serial communication is active 8 Camera parameters can be modified by clicking on GEV Device control see Fig 3 15 The visibility option...

Page 24: ...3 How to get started GigE G2 9 To modify the exposure time scroll down to the AcquisitionControl control category bold title and modify the value of the ExposureTime property 24...

Page 25: ...ICam compliant Frame rate 33 fps at full resolution Advanced I O capabilities 2 isolated trigger inputs 2 differential isolated RS 422 inputs and 2 isolated outputs Crosshairs overlay on the image Ima...

Page 26: ...4 Product Specification Figure 4 1 Photonfocus MV1 R1280 GigE camera series with C mount lens 26...

Page 27: ...rnal resolution of 18 bit Configurable region of interest ROI Constant frame rate independent of exposure time Crosshairs overlay on the image Test pattern LFSR and grey level ramp Temperature monitor...

Page 28: ...f peak responsivity Responsivity 2130 x 103 DN J m2 570 nm 8 bit Quantum Efficiency 75 Optical fill factor 75 Dynamic range 82 dB Characteristic curve Linear Shutter mode Rolling shutter Interface Gig...

Page 29: ...imensions 55 x 55 x 57 mm3 Mass 285 g Connector I O Power Hirose 12 pole mating plug HR10A 10P 12S Connector Interface RJ 45 Conformity CE RoHS WEEE IP Code IP20 Table 4 4 Physical characteristics and...

Page 30: ...4 Product Specification 30...

Page 31: ...rame and its width W and height H The ROI width must be a multiple of 2 When the vertical ROI parameters OffsetY Height are modified the camera stops sending image for a time that is at most equal to...

Page 32: ...th the current camera settings can be read out by the camera register AcquisitionFrameRateMax in PF_GEVPlayer or with the SDK To avoid a sensor artifact the exposure must start at a fixed position fro...

Page 33: ...some trigger pulses will be missed A missed trigger counter counts these events This counter can be read out by the user The exposure time in external trigger mode can be defined by the setting of the...

Page 34: ...e power supply connector through pin ISO_IN1 see also Section A 1 A setup of this mode is shown in Fig 5 3 and Fig 5 4 The electrical interface of the trigger input and the strobe output is described...

Page 35: ...g and ContinousReadout modes can be used if more than one camera is connected to the same network and need to shoot images si multaneously If all cameras are set to Continuous mode then all will send...

Page 36: ...cceptance is stopped after n triggers have been accepted SingleFrameRecording Off Camera saves one image on the on board memory of the IP engine SingleFrameRecording On Camera is ready to accept one t...

Page 37: ...me e x t e r n a l t r i g g e r p u l s e i n p u t t r i g g e r a f t e r i s o l a t o r t r i g g e r p u l s e i n t e r n a l c a m e r a c o n t r o l d e l a y e d t r i g g e r f o r s h u t...

Page 38: ...ditionally the optional external strobe output is controlled by the rising edge of the trigger pulse Timing diagram Fig 5 6 shows the detailed timing for the external trigger mode with pulse width con...

Page 39: ...le delay delay from the active input trigger edge to the rising edge of the strobe output signal Strobe_PulseWidth Width of the trigger pulse in s A setting of 0 turns off the strobe output Strobe_Inv...

Page 40: ...r o b e c o n t r o l i n t e r n a l s t r o b e c o n t r o l e x t e r n a l s t r o b e p u l s e o u t p u t t d i s o i n p u t t j i t t e r t t r i g g e r d e l a y t e x p o s u r e t s t r...

Page 41: ...n camera settings 0 33 s ttrigger offset non burst mode 200 ns duration of 1 row ttrigger offset burst mode 250 ns 250 ns texposure 58 s 0 33 s tstrobe delay 600 ns 0 33 s tstrobe offset non burst mod...

Page 42: ...ger ABTriggerDeBounce Suppresses the generation of triggers when the A B signal bounce ABTriggerDeBounce is ignored when ABTriggerDirection fwdbkwd ABTriggerDivider Specifies a division factor for the...

Page 43: ...de and double the value of ABTriggerDi vider A B G r a y C o u n t e r E n c o d e r C o u n t e r T r i g g e r F w d T r i g g e r B k w d 0 1 2 3 0 1 2 3 2 1 0 3 2 1 2 3 0 0 1 2 1 0 T r i g g e r F...

Page 44: ...conveyor belt stops and retraces by a small amount which may cause a misalignment in the system If ABTriggerDirection fwd is used and the Debounce mode is enabled and the conveyor belt starts again i...

Page 45: ...bled then the encoder position is always incremented Detailed diagrams are shown in Fig 5 14 and Fig 5 15 Note that the quad mode is not available when ABTriggerAOnly true A E n c o d e r C o u n t e...

Page 46: ...camera settings Missed Burst Trigger Counter When the camera is in burst trigger mode see Section 5 2 7 a missed burst trigger counter will be incremented when a subsequent external trigger TriggerMo...

Page 47: ...ra revisions see Appendix B for a list of available features 5 2 12 Trigger Acquisition The applied trigger can be enabled or disabled by one or two external signals in the TriggerAcquisition mode Thi...

Page 48: ...d by setting TriggerAcquisition_Mode to Edge and TriggerAcquisition_Enable True Two signals act as trigger enable see Fig 5 17 A rising edge on the start signal enables triggering A rising edge on the...

Page 49: ...I m a g e S e n s o r D i g i t a l O f f s e t D i g i t a l G a i n C r o s s h a i r s i n s e r t i o n S t a t u s l i n e i n s e r t i o n T e s t i m a g e s i n s e r t i o n A p p l y d a t...

Page 50: ...n Image noise is amplified when operating at high gain values In this case some pixels appear as very bright pixels There is a hotpixel correction that corrects this issue The hotpixel correction comp...

Page 51: ...Figure 5 19 Crosshairs Example with different grey values 5 6 Crosshairs 51...

Page 52: ...unning mode it counts all incoming external triggers counter width 8 bit no wrap around see also Section 5 2 10 Missed burst trigger counter When the camera is in burst trigger mode see Section 5 2 7...

Page 53: ...1 HeightInterface 1 48 2 Trigger Source 0 TriggerMode Off 1 TriggerMode On TriggerSource PLC_Q4 2 TriggerMode On TriggerSource Line1 3 TriggerMode On TriggerSource Software 4 TriggerMode On TriggerSou...

Page 54: ...herefore the histogram of the received image must be flat A test image is a useful tool to find data transmission errors or errors in the access of the image buffers by the acquisition software The an...

Page 55: ...ndow to 1024 x 1024 pixels x 0 and y 0 and check the histogram If your image acquisition application does not provide a real time histogram store the image and use a graphic software tool e g ImageJ t...

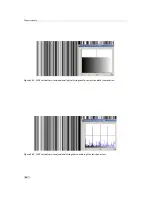
Page 56: ...5 Functionality Figure 5 23 LFSR test pattern received and typical histogram for error free data transmission Figure 5 24 LFSR test pattern received and histogram containing transmission errors 56...

Page 57: ...which indicates camera operation E t h e r n e t J a c k R J 4 5 P o w e r S u p p l y a n d I O C o n n e c t o r S t a t u s L E D Figure 6 1 Rear view of the GigE camera 6 2 Power Supply Connector...

Page 58: ...inks at a rate equal to the frame rate At slow frame rates the LED blinks At high frame rates the LED changes to an apparently continuous green light with intensity proportional to the ratio of readou...

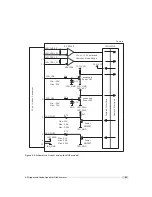
Page 59: ...E l e c t r o n i c I S O L A T O R I S O _ G N D I S O _ P W R 1 2 1 2 p o l H i r o s e C o n n e c t o r 6 8 3 9 7 1 0 1 1 4 5 I O a n d T r i g g e r I n t e r f a c e D C D C D C D C V C C _ 2 V...

Page 60: ...e power supply within a range between 10 and 30V In the same way encoder ground HTL_ENC_GND and ISO_GND signals should be connected to the same ground in order to guarantee the good reception of the d...

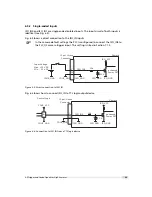
Page 61: ...T 0 P T C 4 k 7 M a x 3 0 V M a x 0 5 A M a x 0 5 W I S O _ G N D P o w e r M O S F E T I S O _ O U T 1 P T C M a x 3 0 V M a x 0 5 A M a x 0 5 W I s o l a t e d I n t e r f a c e C a m e r a E l e c...

Page 62: ...M O S F E T I S O _ O U T 0 P T C 4 k 7 M a x 3 0 V M a x 0 5 A M a x 0 5 W I S O _ G N D P o w e r M O S F E T I S O _ O U T 1 P T C M a x 3 0 V M a x 0 5 A M a x 0 5 W I s o l a t e d I n t e r f a...

Page 63: ...I S O _ I N 0 C a m e r a 7 1 2 p o l H i r o s e C o n n e c t o r I S O _ G N D 1 2 Y O U R _ G N D Y O U R _ G N D I n p u t V o l t a g e M a x 3 0 V D C M i n 3 0 V D C Figure 6 5 Direct connect...

Page 64: ...E T I S O _ O U T 0 P T C 4 k 7 C a m e r a 3 1 2 p o l H i r o s e C o n n e c t o r I S O _ G N D 1 2 Y O U R _ G N D I S O _ P W R Y O U R _ P W R Y O U R _ G N D C o n t r o l L o g i c Y O U R _...

Page 65: ...atings that must not be exceeded voltage 30 V current 0 5 A power 0 5 W see also Fig 6 10 The type of the Power MOSFET is International Rectifier IRLML0100TRPbF Y O U R _ P W R I S O _ G N D P o w e r...

Page 66: ...e r a Figure 6 11 Incorrect connection to ISO_INC inputs 6 5 5 Master Slave Camera Connection The trigger input of one Photonfocus G2 camera can easily connected to the strobe output of another Photon...

Page 67: ...mon power supply for camera and I O signals with star wiring Separate Grounds To separate the signal and ground connections of the camera CAM_GND CAM_PWR data connections from the I O connections ISO_...

Page 68: ...tic of the star wiring concept applied to a Photonfocus GigE camera The power supply and ground connections for the camera and for the I O are connected to the same power supply which acts as the Star...

Page 69: ...nd cables are connected to the same power supply P o w e r S u p p l y C a m e r a F l a s h M a c h i n e V i s i o n S y s t e m P C E t h e r n e t D a t a C a b l e S T R C A M _ P W R C A M _ G N...

Page 70: ...g 6 17 I s o l a t o r C A M _ G N D I S O _ I N I S O _ G N D G r o u n d p l a n e v o l t a g e d i f f e r e n c e C o n n e c t i n g C A M _ G N D a n d I S O _ G N D t h e w r o n g w a y G r o...

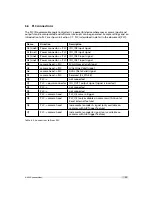
Page 71: ...ISO_INC1 input signal A4 camera head PLC FVAL Frame Valid signal A5 camera head PLC LVAL Line Valid signal A6 camera head PLC DVAL Data Valid signal A7 camera head PLC Reserved CL_SPARE Q0 PLC not co...

Page 72: ...6 Hardware Interface 72...

Page 73: ...a Graphical User Interface GUI tool for Gigabit Ethernet Vision cameras or they can be programmed with custom software using the SDK A GUI tool that can be downloaded from Photonfocus is the PF_GEVPla...

Page 74: ...et properties of the camera head IP properties and properties of the PLC Programmable Logic Controller see also Section 6 6 and document PLC Image stream control Set image stream properties and displa...

Page 75: ...control window to apply the property value to the camera A red cross at the upper right corner of the GEV Control Window indicates a parameter error i e a parameter is not correctly set In this case...

Page 76: ...ts all colours equally e g a special grey reference card while clicking on the White Balance button The white balance settings that were made as described in this section are ap plied by the PF_GEVPla...

Page 77: ...ilable in the Beginner mode The category name is given in parenthesis Width ImageFormatControl Width of the camera image ROI region of interest Height ImageFormatControl Width of the camera image ROI...

Page 78: ...ersistent IP address 1 Set GevPersistentIPAddress in category TransportLayerControl to the desired IP address 2 Set GevPersistentSubnetMask in category TransportLayerControl to the sub net mask 3 Set...

Page 79: ...b l e I 1 I 2 I 3 I 4 I 5 I 6 I 7 I 0 E n h a n c e d F u n c t i o n B l o c k Q 0 Q 1 Q 2 Q 3 Q 4 Q 5 Q 6 Q 7 Q 8 Q 9 Q 1 0 Q 1 1 Q 1 5 Q 1 6 Q 1 7 R e m o t e C o n t r o l B l o c k f r o m h o s...

Page 80: ...uts are ignored by setting the PLC_Q4_Variable to Zero and the PLC_Q4_Operator to Or for inputs 1 to 3 5 If a PLC output is used to connect to a camera trigger then the corresponding Trigger Source mu...

Page 81: ...ock PLC_I3 Line3 PLC SignalRoutingBlock PLC_Q6_Variable0 PLC_I2 PLC LookupTable Q6 PLC_Q6_Operator0 Or PLC LookupTable Q6 PLC_Q6_Variable1 Zero PLC LookupTable Q6 PLC_Q6_Operator1 Or PLC LookupTable Q...

Page 82: ...ingBlock PLC_I1 Line1 PLC SignalRoutingBlock PLC_Q6_Variable0 PLC_I0 PLC LookupTable Q6 PLC_Q6_Operator0 Or PLC LookupTable Q6 PLC_Q6_Variable1 Zero PLC LookupTable Q6 PLC_Q6_Operator1 Or PLC LookupTa...

Page 83: ...16 Mono10Packed 12 Mono12 16 Mono12Packed 12 Mono14 16 Mono16 16 Table 7 4 GigE pixel format overview The DR1 colour camera models have the BayerGB8 format This should be used to display the debayered...

Page 84: ...7 Software 84...

Page 85: ...1 1 Cameras with GigE Interface Fig 8 1 shows the mechanical drawing of the camera housing for the Photonfocus MV1 R1280 G2 camera series 54 30 4 5 5 57 2 61 2 8xM5 8 32 20 2xM2 36 9 41 8 13 2 24 2 4...

Page 86: ...perture of the lens and set the focus to infinite 4 Start the image acquisition and point the camera to a straight edge line in a distance x x infinite distance of your lens from the camera e g a door...

Page 87: ...the manufacturer and accompanying said product and the product shall be free from defects in materials and workmanship under normal use The distributor shall not make or pass on to any party any warra...

Page 88: ...9 Warranty 88...

Page 89: ...Quick Start Guide Pleora Technologies Included in eBUS installer MAN051 Manual Photonfocus GigE Quick Start Guide Photonfocus PLC iPORT Programmable Logic Controller Reference Guide Pleora Technologie...

Page 90: ...10 References 90...

Page 91: ...your camera Incorrect voltages will damage or destroy the camera The connection of the input and output signals is described in Section 6 5 A suitable power supply can be ordered from your Photonfocus...

Page 92: ...PWR Power supply 5V 24V for output signals Do NOT connect to camera Power 7 I ISO_IN0 IN0 input signal 8 O ISO_OUT1 MISC Q1 output from PLC no Pull up to ISO_PWR can be used as additional output by ad...

Page 93: ...trolled Trigger controlled Additional features Trigger Delay Burst Trigger and Strobe Counter Reset External Reset of image counter and real time counter by an external signal B 2 MV1 R1280 50 G2 16 V...

Page 94: ...B Camera Revisions 94...

Page 95: ...C Document Revision History Revision Date Changes 1 0 April 2015 First version 95...

Reviews: