background image


15 

TacFusion       

User Manual A1 

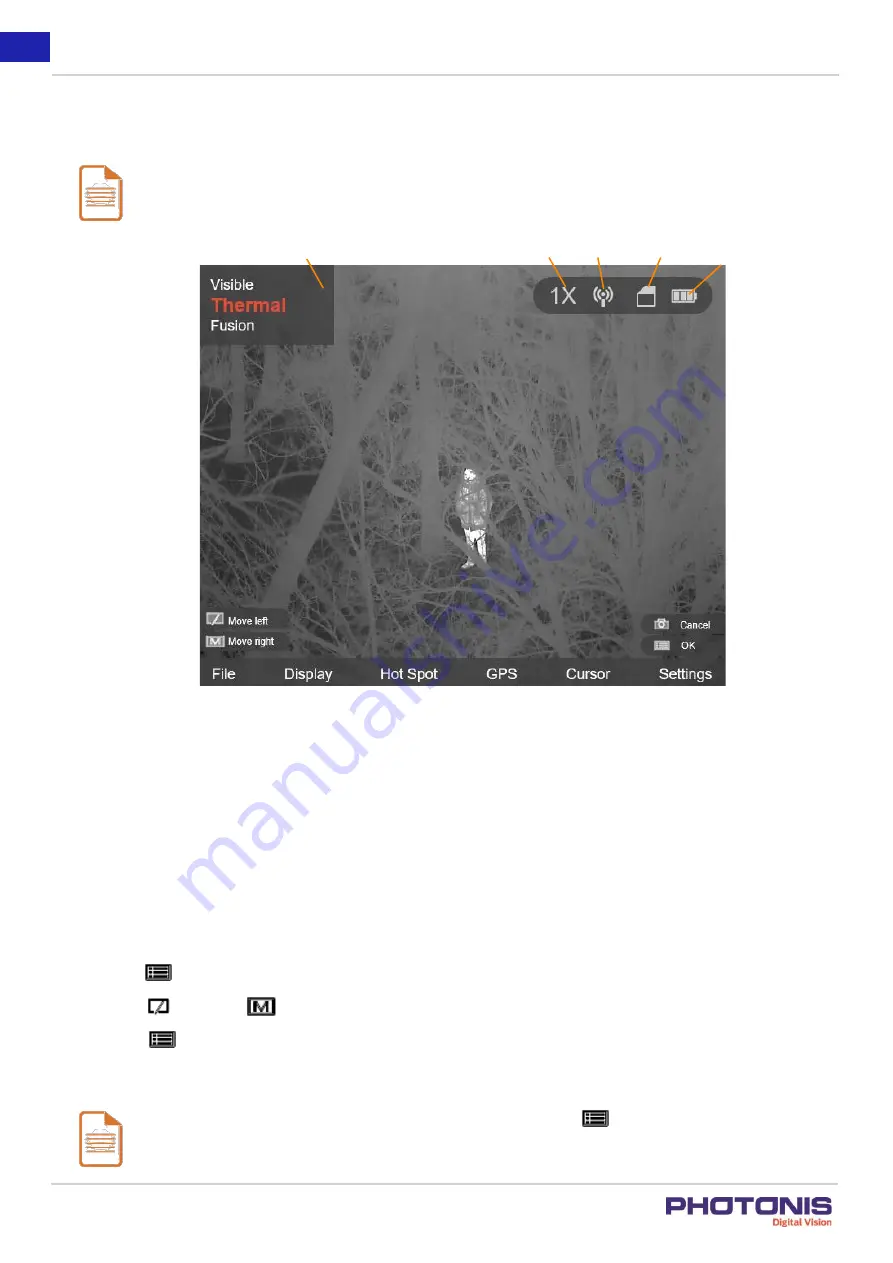
See Figure 12 for the menu interface. 

Notes:  

The Figure 12 is only for reference, the font size and icon are readjusted for better visualization. 


Figure 12. Menu interface.  

3.2.


Local Output 

Before you start: 

Connect the TacFusion to the display unit via CVBS interface of the aviation plug. Refer to Section 2.4

Purpose: 

View the TacFusion image on the display unit for details. 

Steps: 

1. Hold the 

 button to show the menu of TacFusion. 

2. Press the 

 button and 

button to move the cursor to Settings and open CVBS ON/OFF submenu. 

3. Press the 

button to confirm. 

Note: 

To disable the local output, go to CVBS ON/OFF submenu and press the 

button. 


Palettes 

Digital zoom 

Wi-Fi 

Storage 

Battery 

Summary of Contents for TacFusion

Page 1: ...TacFusion User Manual A1 ...

Page 2: ...se find the latest version in the company website Please use this user manual under the guidance of professionals Declaration of Conformity We Photonis Netherlands B V Dwazziewegen 2 9301 ZR Roden P O Box 60 9300 AB Roden The Netherlands Declare under our sole responsibility that our product Product name TacFusion Product Description Thermal Telescope Model Nocturn XS to which this declaration rel...

Page 3: ...l not occur in a particular installation If this equipment does cause harmful interference to radio or television reception which can be determined by turning the equipment off and on the user is encouraged to try to correct the interference by one or more of the following measures Reorient or relocate the receiving antenna Increase the separation between the equipment and receiver Connect the equ...

Page 4: ... info www recyclethis info Warnings and Cautions All the electronic operation should be strictly compliance with the electrical safety regulations fire prevention regulations and other related regulations in your local region Please use the power adapter which is provided by normal company The power consumption cannot be less than the required value Do not connect several devices to one power adap...

Page 5: ...g 11 2 2 Battery Installation 12 2 3 Turning the power ON OFF 12 2 3 1 Power On 12 2 3 2 Power Off 13 2 4 Cable Connection 13 2 5 Focus 13 3 TacFusion Setup 14 3 1 Menu Description 14 3 2 Local Output 15 3 3 File Export 16 3 4 Display Setting 16 3 4 1 Contouring Function 16 3 4 2 Display Brightness Contrast 17 3 4 3 Image Brightness Contrast 17 3 4 4 Cursor 18 3 4 5 Digital Zoom 19 3 4 6 OSD Setti...

Page 6: ...nd Video 22 4 1 Capture Settings 22 4 1 1 Capture Snapshots 22 4 1 2 View Snapshot 22 4 1 3 Delete Snapshots 22 4 2 Video Settings 22 4 2 1 Video Recording 22 4 2 2 Video Playback 23 4 2 3 Delete Video 23 5 Appendix 24 5 1 Dimensions 24 5 2 Common Material Emissivity Reference 24 ...

Page 7: ...ppear in the text as applicable Definitions for WARNINGS CAUTIONS and NOTES are as follows The CAUTION icon highlights a procedure practice condition or statement which if not strictly observed could result in damage or destruction of equipment or loss of product effectiveness The WARNING icon highlights a procedure practice condition or statement which if not strictly observed could result in inj...

Page 8: ...magers cap 1 2 Power adapter USB to micro USB cable is provided 1 3 Battery charger Be able to monitor batteries status 1 4 USB User Manual is included 1 5 Batteries Rechargeable Li ion batteries 4 6 Strap Already attached on the device 2 7 Aviation plug cable The connector is located at the bottom of the device 1 8 Day time pinhole To be used for daylight condition 1 TacFusion Daytime pinhole cov...

Page 9: ...or activities for day and night operations 1 4 Functions Thermal View Device detects the real time temperature and display it on the screen Fusion Device is able to display the combined of thermal and visible views Connectivity Device can capture images record videos and remote control over mobile phone application GPS Function The device can be located with GPS system 1 5 Appearance 1 5 1 Compone...

Page 10: ...the device by the batteries 6 Proximity Sensor Detecting human eyes that are approaching in order to save power The OLED screen turns on automatically when eyes are detected 1 5 2 Cables Description The aviation plug cable can be connected to connector which is located at the bottom part of TacFusion Figure 3 Cable description Table 3 Cable description No Feature Function 1 BNC Connect it to the d...

Page 11: ... the button to activate Contouring Function Hold the button to power on off the device Capture Button Press the button to capture the view Hold the button to start or stop recording Menu Button Press the button to switch between White Hot mode and Black Hot mode Hold the button to show the menu bar Note Contouring function will be further explain in Section 3 4 1 Different modes in TacFusion such ...

Page 12: ...h and hold it at the mean time slide it toward the inside to assemble the power adapter Figure 5 Step 1 and 2 3 Connect the power adapter to the battery charger Figure 6 Step 3 4 Insert the batteries in the charger with the correct positive negative terminals position Note When the charger is powered on the LCD display lights up indicating the status of the batteries The charger will detect the ba...

Page 13: ... the battery compartment cap by rotating the lock counter clockwise Figure 7 Step 1 2 Insert two batteries with positive negative marks see at the side of the device match with that of the battery compartment 3 Close the battery compartment cap by rotating the lock clockwise 2 3 Turning the power ON OFF 2 3 1 Power On Step When the TacFusion is sufficiently charged hold the button to turn ON the T...

Page 14: ...hich could damage the inside pins Purpose Connect the TacFusion with the aviation cable you can connect the device to your PC via USB interface or the display via the BNC interface Steps Connect the aviation cable with the aviation interface Make sure the anchor points match with each other and insert the cable To disconnect the cable lift the cable Figure 8 How to connect the aviation cable 2 5 F...

Page 15: ...focus the objective lens Figure 10 Step 2 3 TacFusion Setup 3 1 Menu Description Step Hold the button to show the menu bar In the menu the right button left button OK button and the cancel button are shown in the Figure 11 Figure 11 Right left OK and cancel buttons Rotate on thermal lens to focus Rotate to focus Rotate to focus Left Right OK Cancel ...

Page 16: ...sion to the display unit via CVBS interface of the aviation plug Refer to Section 2 4 Purpose View the TacFusion image on the display unit for details Steps 1 Hold the button to show the menu of TacFusion 2 Press the button and button to move the cursor to Settings and open CVBS ON OFF submenu 3 Press the button to confirm Note To disable the local output go to CVBS ON OFF submenu and press the bu...

Page 17: ...lick to open the disk View or copy the videos or snapshots 3 Disconnect the TacFusion with the PC 3 4 Display Setting 3 4 1 Contouring Function To emphasize the high temperature of the target TacFusion offers contouring function see Figure 13 The contouring function shows as the red line which follows the high temperature of objects Figure 13 Active contouring function in Fusion mode Steps Press t...

Page 18: ...ess submenu 5 Press the button to confirm 6 Press the button and button to set the brightness value The higher the brighter Screen Contrast Steps 1 Hold the button to show the menu of TacFusion 2 Press the button and button to move the cursor to Settings submenu 3 Press the button to confirm 4 Press the button and button to move the cursor to Display Contrast submenu 5 Press the button to confirm ...

Page 19: ... to Settings submenu 3 Press the button to confirm 4 Press the button and button to move the cursor to Image Contrast submenu 5 Press the button to confirm 6 Press the button and button to set the contrast value The higher the more contrast 3 4 4 Cursor Purpose Display the cursor on the live view to have better indication of the target Steps 1 Hold the button to show the menu bar of TacFusion 2 Pr...

Page 20: ...on to show the menu of TacFusion 2 Press the button and button to move the cursor to Settings submenu 3 Press the button to confirm 4 Press the button and button to move the cursor to OSD submenu 5 Press the button to switch ON OFF the OSD 3 5 Palettes Setting Figure 14 Thermal view Purpose The TacFusion equipped by dual lens thermal and visible light lens The user can set the thermal or visible v...

Page 21: ...ode The users can change these modes by pressing the button when using the Thermal Mode Please use the daytime pinhole cover on the visible imager during the day observation or bright condition to avoid over exposure of light 3 6 Mobile application The TacFusion can be controlled within 15 meter distance over mobile application based on iOS or Android system Steps 1 Download and install the softwa...

Page 22: ...w window of New Device will appear please fill User name admin Password abcd1234 Then click save button on the top right button 9 Now the TacFusion is connected to the mobile phone 3 7 GPS Steps 1 Hold the button to show the menu of TacFusion 2 Press the button and button to move the cursor to GPS submenu 3 Press the button to switch ON or OFF 3 8 Reset Default Settings Purpose Restore the device ...

Page 23: ...tton to view the selected snapshot 4 1 3 Delete Snapshots Attentions Once a snapshot is deleted it cannot be recovered Do this operation with attention Steps 1 Hold the button to show the menu of TacFusion 2 Press the button and button to move the cursor to File Image submenu 3 Press the button to confirm 4 Press the button and button to select snapshot 5 Press the button to view the selected snap...

Page 24: ... button to select video 5 Press the button to play the selected video 4 2 3 Delete Video Attentions Once a video is deleted it cannot be recovered Do this operation with attention Steps 1 Hold the button to show the menu of TacFusion 2 Press the button and button to move the cursor to File Video submenu 3 Press the button to confirm 4 Press the button and button to select video 5 Press the button ...

Page 25: ...f a material to emit the thermal radiation Table 7 shows the emissivity reference of different materials which useful in term of thermal imaging Table 7 Emissivity Reference Material Emissivity Human Skin 0 98 PCB 0 91 Cement Concrete 0 95 Ceramics 0 92 Rubber 0 95 Paint 0 93 Wood 0 85 Asphalt 0 96 Brick 0 95 Sand 0 90 Soil 0 92 Cotton 0 98 Cardboard 0 90 White Paper 0 90 Water 0 96 ...

Page 26: ... of this user manual Performance data represents typical characteristics as individual product performance may vary Customers should ensure that they have up to date Photonis product information before placing orders Photonis makes no representations or warranties as to the use of the product other than as set forth in the user manual or according to standard rules of use for such products Photoni...

Reviews: