background image

28

DE / EN / FR

EN

I

MPORTANT

 S

AFETY

 I

NFORMATION


Please keep this manual in a safe place for reference


It is important to read this entire manual before assembling and using the equipment.Safe

 and 

ef

fi

 cient use can only be achieved if the equipment is assembled, maintained and used


properly. It is your responsibility to ensure that all users of the equipment are informed of


all warnings and precautions.


Before starting any exercise program you should consult your doctor to determine if you


have any physical or health conditions that could create a risk to your health and safety, or


prevent you from using the equipment properly. Your doctor‘s advice is essential if you are


taking medication that affects your heart rate, blood pressure or cholesterol level.


Be aware of your body‘s signals. Incorrect or excessive exercise can damage your health.


Stop exercising if you experience any of the following symptoms: Pain, tightness in your


chest, irregular heartbeat, extreme shortness of breath, feeling light headed, dizzy or


nauseous. If you do experience any of these conditions you should consult your doctor


before continuing with your exercise program.


Keep children and pets away from the equipment. The equipment is designed for adult use only.


Use the equipment on a solid, 

fl

 at level surface with a protective cover for your 

fl

 oor or carpet. 


For safety, the equipment should have at least 0.5 meter of free space all around it.


Before using the equipment, check the nuts and bolts are securely tightened.


The safety level of the equipment can only be maintained if it is regularly examined for damage and/or  


wear and tear.


Always use the equipment as indicated. If you 

fi

 nd any defective components whilst assembling or 


checking the equipment, or if you hear any unusual noise coming from the equipment during use, stop.   


Do not use the equipment until the problem has been recti

fi

 ed.


Wear suitable clothing whilst using the equipment. Avoid wearing loose clothing which may get caught in  


the equipment or that may restrict or prevent movement.


The equipment has been tested and certi

fi

 ed to EN957 under class H.C. Suitable for domestic, home use  


only. Maximum weight of user: 100kg.


The equipment is not suitable for therapeutic use.


Care must be taken when lifting or moving the equipment so as not to injure your back. Always use 


proper lifting techniques and/or use assistance. Before starting any exercise or conditioning program 


you should consult with your personal physician to see if you require a complete physical exam.This is 


especially important if you are over the age of 35, have never exercised before, are pregnant, or suffer 


from any illness.

CAUTION

Read all warning af

fi

 xed to the product.

Read precautions and instructions in this manual before using this equipment.

Keep this manual for future reference.

!

!

!

!

!

!

!

!

!

!

!

!

!

Summary of Contents for FNST01

Page 1: ...ukt an Dritte weitergeben muss diese Aufbauanleitung mit ausgeh ndigt werden DEAR CUSTOMER thank you for purchasing this product Please read all the instructions in this manual ca refully before you a...

Page 2: ...enden Abdeckung f r Ihren Boden oder Teppich Aus Sicherheitsgr nden sollte das Ger t mindestens 0 5 Meter Freiraum rundherum haben Vor Inbetriebnahme des Ger tes berpr fen Sie unbedingt ob die Schraub...

Page 3: ...3 DE EXPLOSIONSZEICHNUNG...

Page 4: ...LSE FUSSKAPPE 1 4 6 SEITLICHE BODENSTANGE 2 22 FLASCHENZUG HALTERUNG 1 14 HALTESTANGE F R SCHAUMSTOFFTEIL 2 1 VORDERE BODENSTANGE 1 17 VERBINDUNGSSTANGE 1 9 BUTTERFLY STANGE RECHTS 1 25 32 GEWICHT VER...

Page 5: ...RFLYSTANGE 2 62 SECHSKANTSCHRAUBE M8 20 5 42 LAGERH LSE F R FLASCHENZUG 6 58 SECHSKANTSCHRAUBE M10 60 2 50 SEIL F R LATISSIMUSSTANGE 1 37 GRIFF BERZUG 6 53 R CKENLEHNE 1 45 KETTE 2 61 SECHSKANTSCHRAUB...

Page 6: ...zu sehen ist Fixieren Sie die Teile mit den Sech kantschrauben 56 und 62 den Unterlegscheiben 63 und 64 und den Muttern 66 3 Schieben Sie ber beide F hrungsrohre 4 die Gummiringe 39 4 Schieben Sie die...

Page 7: ...d sichern die Teile mit den Sechkantschrauben 60 und den Unterlegscheiben 64 3 Befestigen Sie die obere Haltestange 7 auf dem oberen Hauptrahmen 16 und fixieren diese mit den Sechkantschrauben 56 den...

Page 8: ...die linke und rechte Butterfly Stange 9 10 an dem Verbindungsst ck 8 Sichern Sie die Teile zusammen mit der meesingfarbenen H lse 52 den Unterlegscheiben 65 und den Muttern 67 3 Schieben Sie Schaumst...

Page 9: ...en Unterlegscheiben 65 und den Muttern 67 2 Fixieren Sie den linken und rechten U Form Rahmen 19 und 31 an der Verbindungsstange 17 Befestigen Sie die Teile mit den Sechkantschrauben 56 den Unterlegsc...

Page 10: ...cheiben 64 und dem Muttern 66 3 Befestigen Sie die Haltestangen f r die Schaumstoffteile 14 an dem Beintr ger 13 und an dem Sitztr ger 12 Damit die Schaumstoffteile besser angebracht werden k nnen kip...

Page 11: ...Flaschenzugklammern 18 an der r ckwertigen Klammer 23 und an den beweglichen Klammern 22 Sichern Sie alles mit hilfe der Sechskantschraube 59 56 60 den Lagerh lsen 42 den Unterlegscheiben 64 und den M...

Page 12: ...terfly Arm Montage von Seil 50 Beginnen Sie bei erst das Seil dann den Flaschen zug zu befestigen und folgen Sie anschlie end den Pfleilen zu Nr 2 3 und 4 Stecken sie zuletzt den Gewindebolzen an Seil...

Page 13: ...ete Muskelfunktion Das Aufw rmen reduziert das Risiko f r Kr mpfe und Muskelverletzungen Es wird empfohlen vor dem Training ein paar Dehn bungen wie unten gezeigt zu machen Jede Stellung sollte ca 30...

Page 14: ...Sie l nger und h rter trainieren da Sie mehr Ausdauer haben Es wird empfolen mindestens 3 mal die Woche zu trainieren und die Trainingseinheiten gleichm ig ber die Woche zu verteilen Muskelformen Um I...

Page 15: ...as ch ant veuillez consulter votre m decin imm diatement avant de recommencer l entra nement loigner les enfants de cet appareil Cet quipement est uniquement destin aux adultes Utilisez l appareil sur...

Page 16: ...pas vous endommager le dos Il est conseill par cons quent de toujours employer un m canisme de levage appropri et ou de cher cher de l aide pour d placer l appareil Une prudence particuli re est recom...

Page 17: ...CAPUCHON DES PIEDS 1 4 6 BARRE DE C T 2 22 SUPPORT SOUPLE 1 14 BARRE SUPPORTANT LES PI CES EN MOUSSE SYNTH TIQUE 2 1 BARRRE AVANT 1 17 BARRE DE CONNEXION 1 9 BARRE DE BUTTERFLY DROIT 1 25 32 POIDS OB...

Page 18: ...TTERFLY 2 62 BOULON T TE HEXAGONALE M8 20 5 42 DOUILLE POUR LES POULIES 6 58 BOULON T TE HEXAGONALE M10 60 2 50 CORDE POUR LES MUSCLES DORSAUX 1 37 POIGN E DE RECOUVREMENT 6 53 APPUI DORSAL 1 45 CHA N...

Page 19: ...u sur l image Fixez les pi ces avec les boulons t te hexagonale 56 et 62 les rondelles 63 et 64 et les crous 66 3 Enfilez sur les tiges du bas 4 les anneaux en caoutchouc 39 4 Enfilez les poids 25 sur...

Page 20: ...incipal inf rieur 15 et vissez les pi ces avec les boulons hexagonaux 60 et les rondelles 64 3 Fixez la barre sup rieure de support 7 sur le cadre principal sup rieur 16 et vissez les l aide du boulon...

Page 21: ...2 Fixez la barre gauche et la droite du butterfly 9 10 au raccord 8 Fixer les pi ces avec la grande douille 52 les rondelles 65 et l crou 67 3 Poussez la corde pour les muscles de bras 49 sur le bras...

Page 22: ...is 55 les rondelles 65 et les crous 67 2 Fixez les cadres en forme de U droit et gauche 19 et 31 sur la barre de connexion 17 Fixez les pi ces avec les boulons t te hexagonale 56 les rondelles 64 et l...

Page 23: ...e 57 les rondelles 64 et les crous 66 3 Fixez la barre supportant les pi ces en mousse synth tique 14 sur la potence des jambes 13 et sur la potence du si ge 12 Afin que les pi ces en mousse synth tiq...

Page 24: ...support de poulie soud 18 au support arri re 23 et au sup port souple 22 Serrez le tout l aide du boulon t te hexagonale 59 56 60 la douil le pour les poulies 42 les rondelles 64 et les crous 66 2 As...

Page 25: ...allant au n 12 et au No 14 et fixez le c ble la barre gau che du butterfly Installation du c ble 50 Fixez premi rement le c ble puis la poulie en suite suivez les fl ches allant aux n 2 3 et 4 Joigne...

Page 26: ...cles appropri s L chauffement r duit le risque de crampes et de blessures musculaires Il est conseill avant l entra nement d effectuer quelques exercices de stretching comme indiqu ci dessous Chaque p...

Page 27: ...leure endurance Il sera conseill de s entra ner au minimum 3 fois par semaine et de r partir les entra nements sur la semaine Galbe des muscles Pour galber vos muscles gr ce au banc de musculation vou...

Page 28: ...ctive cover for your floor or carpet For safety the equipment should have at least 0 5 meter of free space all around it Before using the equipment check the nuts and bolts are securely tightened The...

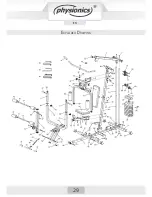
Page 29: ...29 DE EN FR EN EXPLODED DRAWING...

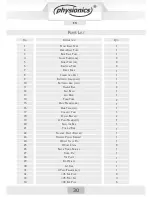
Page 30: ...1 26 33 BLACK FIXING BUSHING 45 FOOT CAP 1 4 6 BILATERAL TUBE 2 22 FLOATING PULLEY BRACKET 1 14 FOAM TUBE 2 1 FRONT BASE TUBE 1 17 CONNECT TUBE 1 9 BUTTERFLY ARM RIGHT 1 25 32 WEIGHT STACK 45 END PLU...

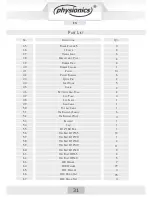
Page 31: ...Y PLUG 2 54 SEAT 1 46 BUTTERFLY ARM FOAM 2 62 HEX BOLT M8 20 5 42 PULLEY BUSHING 6 58 HEX BOLT M10 60 2 50 TOP LAT CABLE 1 37 HANDLE GRIP 6 53 BACKREST 1 45 CHAIN 2 61 HEX BOLT M8 65 2 41 PULLEY 14 57...

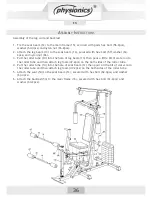
Page 32: ...secured with hex bolt 56 2pcs washer 64 4pcs nylon nut 66 2pcs washer 63 1pc and hex bolt 62 1pc 3 Slide both guide tubes 4 2pcs into the rubber rings 39 2pcs 4 Place the weight stacks 25 8pcs into t...

Page 33: ...t the main frame up 16 into the main frame down 15 secured with parts hex bolt 60 3pcs and washer 64 3pcs 3 Put the ridge tube 7 onto top of the main frame up 16 secured with parts hex bolt 56 2pcs wa...

Page 34: ...right 9 butterfly arm left 10 to the connecting part 8 secured with brass color bushing 52 4pcs washer 65 2pcs and nylon nut 67 2pcs 3 Slide butterfly arm foam pad 49 2pcs into both sides of the butt...

Page 35: ...olor bushing 51 6pcs bolt 55 1pcs washer 65 2pcs and nylon nut 67 2pcs 2 Fix the U push frame left 19 right 31 to the Connect Tube 17 secured with parts hex bolt 56 4pcs washer 64 8pcs and nylon nut 6...

Page 36: ...beam 13 then pour a little bit of water onto the roller tube and then attach leg foam 47 2pcs on the both sides of the roller tube 4 Put the roller tube 14 into the hole of seat beam 12 then pour a l...

Page 37: ...on welded pulley brackets 18 2pcs Reverse pulley bracket 23 and floating pulley bracket 22 secured with all hex bolt 59 11pcs hex bolt 56 3pcs hex bolt 60 2pcs pulley bush 42 6pcs washer 64 32pcs and...

Page 38: ...fix cable 49 on left butterfly arm Cable 50 assembly Start at No 1 to put cable first then assembly pulley and follow ARROW to go around No 2 3 and 4 And finally let the front threaded bolt of cable...

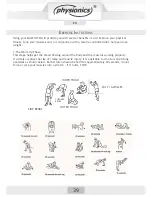
Page 39: ...ase This stage helps get the blood flowing around the body and the muscles working properly It will also reduce the risk of cramp and muscle injury It is advisable to do a few stretching exercises as...

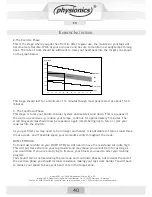
Page 40: ...able to train at least three times a week and if possible space your workouts evenly throughout the week MUSCLE TONING To tone muscle while on your MULTI GYM you will need to have the resistance set q...

Reviews: