ー7ー
ー2ー
PKI-0055
PKI-0055
Notice to customers:
Carefully read through the instructions before using this product.
● This product is for 12V and 24V vehicles. Check the bulb type before use. Do not mount or use
the product for different types.
● This product can be installed in lamps that use a HB3/HB4/HIR1/HIR2 bulb. Before replacing the
bulb with the new one, make sure to check the markings on the old bulb. Make sure there is no
problem before continuing.
● On some vehicles (including imported models) a warning lamp may go on indicating that the bulb
has burned out or some other type of abnormal indication may occur. This phenomenon is common
to LED products. In addition, in order for the system to sense that a bulb has burned out, a minute
amount of electric voltage continues to flow even when the switch is turned off. Therefore, please
be aware beforehand that when the bulb is replaced, the LED bulb may light up slightly but this is
not a product malfunction. (The amount of voltage that is consumed when the LED lights up is
minimal. The amount is equal to what is used to power the vehicle's clock and will not lead to a
sudden drop in battery power.)
● Because LEDs have a different luminescence process from H.I.D. or halogen bulbs, even if the light
color is the same it may look different when seen from a human eye. In addition, depending on the
lamp setting, the light color may change. (Even when installing a bulb with the same color
temperature in a lamp housing, the color variation may vary.)
● With regards to this bulb, turn on the light after switching the engine's ignition to the "ON" position.
In the case of hybrid engines, switch the engine's ignition to the "READY-ON" position. (If the
engine's ignition indicates "Engine-OFF" or in the case of hybrid vehicles, "READY-OFF", the light
may not turn on in some cases. The light will go on normally if the ignition indication reads
"Engine-ON" or "READY-ON)
● When using this product in vehicles that have idling stop systems or have weak battery power, the
light may fail to light up or may flicker when starting the engine.
● If this product is installed and used in a lamp fitting that has deteriorated after extended use, the
functional performance of this product may not have the originally intended effect. As a result, there
is a possibility that it may not successfully pass the required automobile inspection. If this is the
case, replace it with the original bulb.
● When installing this product on vehicles that have "corner sensors" (sonar), there is a possibility
that these type of sensors may not operate properly. Make sure to install the controller
approximately 20cm or more away from the sensor.
Precautions for Use
● Do not touch the LED bulb directly as it is extremely hot when it is illuminated and also retains
considerable heat immediately after turning it off.
● Do not look directly at the lamp for extended periods of time while it is illuminated. This may cause
pain to the eyes and may cause adverse effects to your eyesight.
● If there is abnormal vibration or sound when the vehicle is in motion, immediately stop the vehicle in
a safe location and inspect the vehicle.
● Do not disassemble or modify the unit in any way. Doing so may cause damage, fire or result in
bodily injury.
● Keep the product out of reach of infants. Otherwise infants may swallow or break the product,
leading to injury.
● When the lamp is lit, the lens becomes hot. Do not wash the vehicle while the lights are on or
immediately after turning them off.
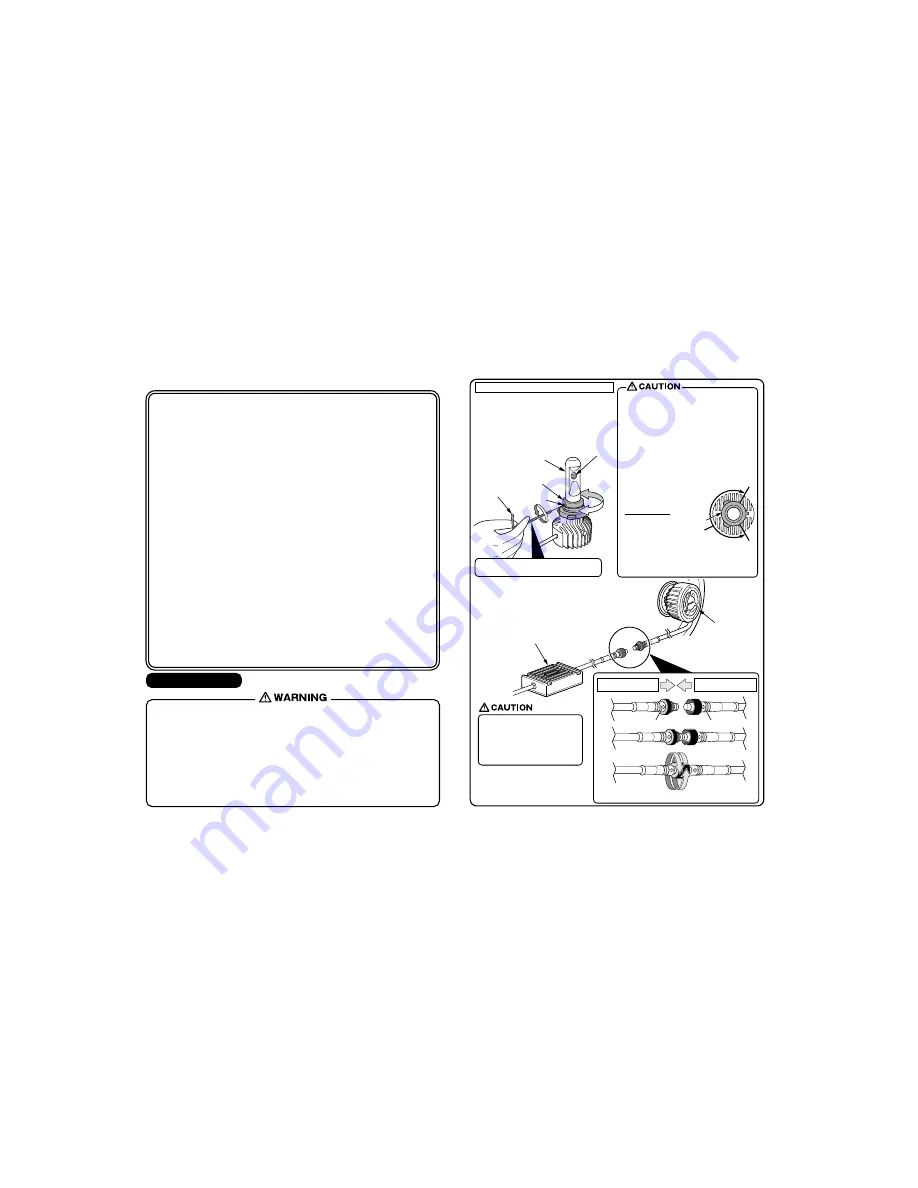
(4)Connect the LED bulb (part ①) and the controller (part ②).
● Insert it straight into the unit
according to the arrow mark
indicated above the connector,
other wise, it may not illuminate
properly.
controller (part ②)
Turn the screw firmly and properly fix it in place.
Use the hexagon wrench (part ④) that is
attached and loosen the set screw on the
LED bulb (part ①) by turning it half way to
a full turn. This will allow you to adjust the
metal cap. After adjustment, tighten the sets
screw and fix the metal cap in place.
● Do not loosen the set screw more the one full turn
because if the set screw is loosened too much it will
cause it to come off.
● As shown in the illustration below, the movement range
of the metal cap is limited. If the set screw is loosened
too much, the metal cap will turn and subsequently
exceed the movement range. If the set screw is
tightened while in that position, the setting position
of the metal and LED bulb will misalign and the set
screw will pop out. If this happens, the bulb itself
cannot be installed into the lamp unit.
Therefore be careful not to
over-tighten the set screw.
●
If you tighten the set screw too strongly when setting
it into position it may damage the set screw as well
as the LED bulb. Therefore use the short end of the
hexagon wrench to carefully tighten it in place.
LED bulb (part①)
Adjusting the position of the light-emitting section
metal cap
Set screw movement range
Truth plan view
The metal cap will move when the set screw is
loosened one half to full turn.
Light-emitting part
hexagon wrench
(Part ④)
Small screw
Small screw
LED bulb
assembly(part①)
LED bulb's connector
controller's connector
Arrow mark
Arrow mark


