background image

QUESTIONS AND ANSWERS

62

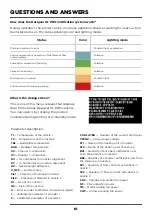
How to find the printer serial number?

What operations can I perform during printing?

What is the material profile?

Through the menu “Settings > About”. The number is printed on the back of the printer, 
next to the power button.

To open the menu while printing, press the joystick. Without stopping printing, you can 

change the speed mode and the nozzle z-offset (only when printing the first layer). In the 
pause mode, you can change the material profile and perform some service operations: 
filament replacement and load, hot filament unload, and nozzle service.

Material profile is a set of parameters for working with material. It includes printing 
temperature, load and unload temperatures, flow ratio, as well as the operation level 

of the Designer XL PRO blower and cooling fans during operation . A complete list of 

profile parameters is available on the Polygon X menu «Configuration > Filament profile 
manager».

A print task prepared in Polygon X describes only the geometric parameters of the future 
model, excluding the material used and the print speed. Therefore, the same task can be 

printed with various filaments using different speed modes.


The basic set of profiles is stored in the Designer XL PRO and Polygon X memory by 
default. Each profile has been pre-tested by our print engineers. When upgrading the 
Polygon X software or the Designer XL PRO firmware, the list of standard profiles can be 

changed.

Identical materials from different manufacturers may require different profiles. Create 
a new profile for each filament you use. For detailed profile parameters contact your 
filament manufacturer.

Summary of Contents for Designer XL PRO

Page 1: ......

Page 2: ... for using the device Key information is highlighted with frames This Manual uses hyperlinks or quick and easy access to sections Please read the entire User Manual before using Designer XL PRO For any technical issues please contact us by e mail eu support picaso 3d com The pictures used herein are part of the product s graphical image and may differ from the actual appearance of the device The d...

Page 3: ...LOADING CONNECTION TO PC NOZZLE REPLACEMENT SET UP Z OFFSET CALIBRATION OF THE CLEANING SYSTEM SET UP X Y OFFSET PRINTER FIRMWARE UPDATE ERROR LIST PRINT SPEED MODES REMOVING AND REPLACEMENT THE HEATING UNIT QUESTIONS AND ANSWERS 61 61 61 UNPACKING 11 18 26 41 PRINTER CONTROL BASICS OF WORKING WITH DESIGNER XL PRO SERVICE FUNCTIONS 4 6 8 10 12 13 14 17 19 24 27 29 34 37 39 42 45 47 50 52 53 56 58 ...

Page 4: ...no filament flow and or I hear clicks in the printhead What shall I do if the filament cannot be loaded What shall I do if the spool has run out and how to replace it during printing What printer parts are consumable What type of USB drives can I use Why shall I calibrate the cleaning system Why does DESIGNER XL PRO often pause for a short time Why are magnets of different sizes What kind of servi...

Page 5: ...lace During its operation the device may produce a specific smell of molten filament This is a feature of the printing process We recommend using the 3D printer in a well ventilated area Do not leave the working printer unattended Designer XL PRO is not intended for use by the disabled unless they are supervised by a person who is responsible for their safety It is forbidden to use Designer XL PRO...

Page 6: ...operation Do not use non original spare parts and do not attempt to repair it on your own this can lead to device failure Do not seek third party s advice on the operation of the 3D printer Our official contact details are eu support picaso 3d com technical support sales picaso 3d ru sales department marketing picaso 3d ru media enquiries info picaso 3d ru for general enquiries ...

Page 7: ... 6 Designer XL PRO operates under the FFF technology fused filament fabrication The principle of the technology is to melt a thermoplastic polymer filament and to build a layer by layer model based on a previously prepared task ...

Page 8: ...ormats stl obj 3ds or amf The model should be uploaded into the software on a personal computer PC Polygon X supplied free of charge which converts it to a printing task file in plgx format with a set of control commands to operate PICASO 3D printers To start printing on Designer XL PRO you should save the plgx file to a USB stick supplied in the starter kit File recording can be made remotely usi...

Page 9: ...tially clogged during printing the material flow is stopped or impeded Designer XL PRO will detect a change in the uniform flow pause printing and start an automatic nozzle high temperature cleaning algorithm If the nozzle cleaning is successful printer continues printing otherwise printing is paused and Designer XL PRO informs the user about the problem The Profile System stores parameters for wo...

Page 10: ... on a PC screen when working via network An adaptive air circulation system uses data from material profiles to create optimal conditions for printing and to avoid the temperature gradient inside the 3D printer chamber The printing surface control system in most cases provides for possibility to detect the weakening of adhesion of the printed model to the platform or the presence of a foreign obje...

Page 11: ...umption 1 3 kW Interfaces Ethernet USB 2 0 USB stick in starter kit P R I N T I N G M A T E R I A L S Formax ABS CF Ultrax PA CF PEEK PA PC TPU TPE PP ASA SBS PETG ABS PLA PVA HIPS and others P H Y S I C A L C H A R A S T E R I S T I C S W I T H O U T B O X Printer dimensions 985 x 645 x 565 mm Weight 75 kg M E C H A N I C S Casing Aluminium composite Frame Steel 3 mm Heated bed construction Alumi...

Page 12: ...UNPACKING ...

Page 13: ...place for at least 24 hours do not plug it to power supply prematurely Ambient temperature 15 to 30 ºC 59 to 86 F Relative humidity 30 to 65 Atmospheric pressure 720 to 790 mm Hg Ventilation availability Solid horizontal surface to withstand at least 30 kg load Lack of direct sunlight on the 3D printer Power supply 220 V 15 50 Hz with grounding ...

Page 14: ...f your 3D printer Available in the Designer XL PRO Toolkit Power cable Filament spool Adhesion glue 0 5 mm steel nozzle x2 Temperature unit 400 x2 8 mm glass Screwdriver Torx TX TR Slotted screwdriver Nippers Box cutter Pliers Nozzle change key Hex key 1 5 Hex key 2 Hex key 2 5 USB drive 0 5 mm steel nozzle x2 1 The type and configuration may be changed by the manufacturer without user s consent w...

Page 15: ...MAIN COMPONENTS OF DESIGNER XL PRO 14 Front view Front doors lid Chamber circulation fan Glass ejector Top lid Display Joystick USB A port Build plate with glass ...

Page 16: ...MAIN COMPONENTS OF DESIGNER XL PRO 15 Side rear view Side door Motherboard box Container Power button Power adapter connector Ethernet port USB B port Camera cooling fan Drivers cooling fan ...

Page 17: ...MAIN COMPONENTS OF DESIGNER XL PRO 16 Inside view Printhead PH Cleaner Cleaner Nozzles Flap Filaments feed tubes Filaments feed tubes PH cooling fan Model cooling fan Printhead PH Cable chain ...

Page 18: ...15 60 Hz in compliance with used electricity network standard Switch the power button to position 1 the display and lighting turns on the printer beeps We recommend to keep the original box and pallet for further possible transportation of the printer Never plug the Designer XL PRO into a power socket without grounding2 2 PrinterName has a heating components with a 220 V supply Also it equipped a ...

Page 19: ...PRINTER MANAGEMENT ...

Page 20: ...with the settings of the selected profile Filament replacement Alternately runs filament unloading and loading algorithms Hot unloading Starts the algorithm for filament unloading out of PH using the flow motor with heating the nozzle up to the operating temperature in compliance with the settings of the selected profile Printlists Displays a list of tasks in the active printlist5 with ability of ...

Page 21: ... by 10 degrees and the loading algorithm is repeated You can repeat the algorithm increasing temperature not more than 3 times In some cases this function allows to eliminate nozzle clogging during printing Low temperature PH cleaning Starts the algorithm for filament unloading out of PH without using the flow motor at the unloading temperature in compliance with the settings of the selected profi...

Page 22: ...ct work of the algorithm load the same filaments into both nozzles Reset errors Clears the errors list Build plate position Allows to move the printing platform build plate to one of the three positions upper 10 mm from the nozzle middle 305 mm from the nozzle transporting 405 mm from the nozzle and lower 600 mm from the nozzle Diagnostics Configured by default Use it in the event of lighting or b...

Page 23: ...e filament flow control system End of Filament control ON by default activates end of filament control system Check for non critical errors Check for non critical errors if ON 3D printer starts response to non critical errors algorithms If OFF information about errors are saved in the printer memory without running the algorithms Error indication ON by default if ON 3D printer displays an error co...

Page 24: ...ttings manually or get them automatically via DHCP Network settings Auto settings for heating system Calibrated by default Use it only if the heating unit is replaced or in case of factory reset when updating the firmware Starts the temperature calibration algorithm of the heating element for stable operation of the heating system Verification code Displays verification code and printer serial num...

Page 25: ...ings Allows to make amendment to profile settings After the current task is completed there is an option to save the amended profile Adjust z offset Allows to adjust the nozzle z offset while printing the first layer Use if unoptimized z offset is noticed D E B U G S C R E E N Starts heating the nozzle up to the standby temperature and the printing platform to the operating temperature in complian...

Page 26: ...splay brightness Activates the night mode settings To switch to the debug screen while printing turn the joystick clockwise S E T T I N G S S T O P D E B U G s c r e e n N I G H T M O D E available only when pause mode is on S E R V I C E Nozzle service Load filament Replace filament Hot unload Error list Reset errors ...

Page 27: ...BASICS OF WORKING WITH DESIGNER XL PRO ...

Page 28: ... platform the far groove is under clamp the central magnet is in the hole there is no air gap and foreign objects between glass and platform Level the build plate each time the printer is moved or transported You don t need to adjust it before each printing Magnets on the glass have different sizes The large magnet is centering it is designed for the correct glass positioning on the platform The s...

Page 29: ...ure is reached the printhead starts an algorithm to measure the platform level at four points in the corners of the workspace If the height difference of any pair of measured points exceeds 80 microns Designer XL PRO adjusts the level of the build plate and starts measurements again After alignment of the platform a corresponding message appears The build plate leveling is completed Press the joys...

Page 30: ... manufacturers this can cause the 3D printer operation to become unstable and additional maintenance and repair costs To load the filament into Designer XL PRO follow the step by step instructions Select Filament Load filament on the printer menu To load the material into both nozzles select 1 2 Make sure the filament feed tube is fixed in the side holder Select the material profile s based on the...

Page 31: ... message is displayed 4 Unpack the spool and fix the end of the filament in the side holes of the spool 5 Do not interfere with movements of the 3D printer mechanisms during operation this can result in personal injury or damage to the device Do not touch the nozzle or platform during operation they heat up to high temperatures Touching them can cause burns Please make sure the filament end is not...

Page 32: ...the side door with the spool in the 3D printer 6 Remove the filament end from the spool holes and insert the filament into filament feed tube 7 Always hold and fix the filament end when installing and removing the spool into out of the printer Prevent filament tangling in the spool this can cause an abnormal stop during printing and damage the printer ...

Page 33: ...ush the filament through the tube until it appears at the printhead side 8 9 Insert the filament end into the extruder hole against the stop Hold the filament until you feel it is loaded inside The loading status is displayed on the screen This procedure takes approximately one minute 10 When the filament availability is detected by the end of filament sensor the load algorithm starts ...

Page 34: ... the PH against the stop Make sure that the tube is completely inside the printer and press the joystick In case the material is loaded into both nozzles the printhead moves to the position for loading it into the second right nozzle To load the second material repeat all the steps from 5 to 12 The printhead moves to the parking position the far left corner The filament loading is completed 11 12 ...

Page 35: ...e the cooled glass There is no need to apply glue in a thick layer PICASO 3D brand glue is thermosetting it features the necessary adhesive properties at temperatures from 45 ºC 113 F When cooled to 30 ºC 86 F the adhesion decreases Do not spray glue inside the printer This will result in premature wear and damage to the mechanical components of the printer To start printing do as follows Insert t...

Page 36: ...proximately 1 360 of a standard spool The nozzle and the platform are heated up to the operating temperature The printer starts an automatic calibration of the workspace coordinates and starts printing a model such printing takes no more than an hour The current status and estimated print timing will be displayed on the screen Pay special attention to first layer printing The optimal z offset and ...

Page 37: ... on the official website Carefully take off the model from the glass If you can t take off the model with your hands use the box cutter supplied with the starter kit When the model is taken off install the glass back into Designer XL PRO Make sure the glass is firmly fixed on the platform the far grooves is under clamps the central magnet is in the hole there is no air gap and there are no foreign...

Page 38: ...lect Filament Unload filament on the printer menu 1 Remove the filament feed tube and filament out of the extruder Cut the filament end with the pliers supplied It is needed to prepare for loading the filament next time 3 The printer starts the algorithm for unloading the material out of the PH along with heating up to the unload temperature in compliance with settings of the selected profile 2 Do...

Page 39: ...e door and roll up the filament by rotating the spool on the holder While doing it hold the filament end and then fix it in the spool holes Remove the filament spool and close the side door Press the joystick to complete the filament unload algorithm 4 5 6 Always hold and fix the filament end while installing and removing the spool into out of the printer Prevent filament entangling in the spool T...

Page 40: ...tings on the printer menu enable DHCP to automatically assign IP addresses or set the IP address manually If DHCP is active the IP address is obtained within 2 5 minutes Select the Network tab on the Settings Appearance and Network Network menu in Polygon X Click Search Polygon X shows a list of all 3D printers connected to this subnet Select check box next to the used 3D printers Press Close 1 2 ...

Page 41: ... Open the Polygon X Network tab to track the status of connected 3D printers In this window you can pause printing and start new printing tasks 4 For network operation you also need to install a USB stick into the printer ...

Page 42: ...SERVICE FUNCTIONS ...
Page 43: ...nozzle hole which distort the filament flow If you require a nozzle of a different diameter or made of a different material 10 To replace the nozzle follow the step by step instructions Select Service Nozzle service on the menu The printer starts algorithm for the nozzle heating up to the operating temperature in compliance with settings of the selected profile Follow the menu prompts on the scree...

Page 44: ...the PH switches to the corresponding position for service 5 Do not unscrew the cooled nozzle This can damage the heating unit Do not perform replacement procedures beyond the PH service position for the corresponding nozzle During replacement the nozzle key must be installed vertically from the bottom Do not use additional tools to tighten the nozzle Tighten the nozzle against the stop but without...

Page 45: ...the screen In case of a big difference you need to correct it following the tips on the screen If the height difference is acceptable press the joystick Follow the tips on the screen install the flap and tighten the 2 screws on each of the PH side walls Select the diameter of the installed nozzle from the list on the screen Press OK 6 7 8 ...

Page 46: ... visible defects and have a steady contact with each other Provides for the correct adhesion of the first layer to ensure high printing quality Weak z offset weak adhesion lack of contact between printing lines Causes the model to detach off the platform and poor printing quality The optimal value is set individually for each 3D printer Improper z offset settings affect the printing quality and pr...

Page 47: ... z offset value The recommended change pitch is 0 03 The numerical value weakens the z offset and vice versa the lower the value the stronger the pressure Z offset can be optimized by printing of templates rank from the menu Service Set up z offset Print the template In this case you have to select a number of the best printed template ...

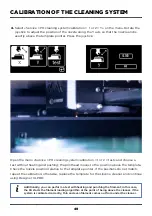
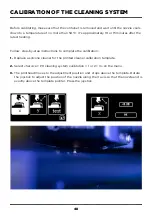
Page 48: ...e you need to print Cleaner calibration template plgx file from the supplied USB drive If you use a container check its contents after at least every 2 printing procedures and clear if necessary Calibrate the cleaning system in the following cases If the cleaning system does not work properly Filament does not enter the hole of the silicone cleaner and accumulates on the nozzle which leads to defe...

Page 49: ...enu The printhead moves to the adjustment position and stops above the template Rotate the joystick to adjust the position of the nozzle along the X axis so that the nozzle end is exactly above the template pointer Press the joystick 1 2 3 Before calibrating make sure that the container is removed and wait until the nozzle cools down to a temperature of no more than 50 ºC it s approximately 10 or ...

Page 50: ...hout heating and pushing the printhead moves to the position above the template Check the nozzle position relative to the template pointer If the positions do not match repeat the calibration otherwise replace the template for the silicone cleaner and continue using Designer XL PRO Additionally you can perform a test with heating and punching the filament in this case the PH starts the filament lo...

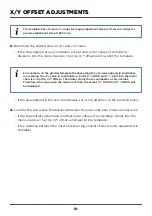
Page 51: ...structions To align nozzles if there are offsets when printing with two materials The filament from the second nozzle is overlapping or is overlapped with the filament from the first one which can result in a defect on the model outer surface To set nozzles offset coordinates after printer firmware update with a factory reset After such an update the x y offset coordinates will be reset To align g...

Page 52: ...me the values X 0 000 and Y 0 000 will be displayed If the lines aligned at any coordinate except zero enter values of coinciding divisions into the menu Service Set Up X Y offset and re print the template If the lines aligned in the zero coordinates turn your attention to the printed circles If the big central circles have an offset enter values of coinciding circles into the menu Service Set Up ...

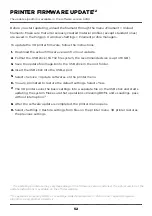
Page 53: ...rinter menu You are prompted to restore the default settings Select Yes After the software update is completed the printer menu opens Select Settings Restore settings from file on the printer menu 3D printer restores the previous settings The 3D printer saves the basic settings into a separate file on the USB stick and starts updating the system Make sure that operations Cleaning ROM and Loading p...

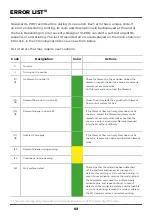
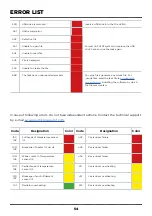
Page 54: ...measure its diameter at several points Cut filament end and re load the filament None The error starts the algorithm for filament flow control system for fix it If the filament flow control system does not fix the error unload the filament and measure its diameter at several points Make sure that the spool is easily unwound and filament threaded into the PH without difficulty If the filament flow ...

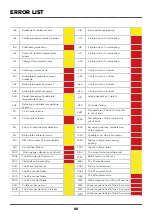
Page 55: ...axis driver failure E axis driver failure X axis driver overheating Y axis driver overheating Z axis driver overheating Code Code Designation Designation Color Color 441 500 443 501 502 503 504 888 USB reading error USB drive is removed Insert a USB stick into the the USB A Defective file Unable to open file Unable to read file FIle is damaged Unable to create the file The task has an unsupported ...

Page 56: ...t movement in mechanisms Strain gauge voltage is out of limit X axis driver failure The strain gauge is jammed Defect of radiator temperature sensor E axis driver overheating Failure due to X overheating Failure due to Y overheating Failure due to E overheating Short circuit on X driver Short circuit on Y driver Short circuit on Z driver Short circuit on E driver The Z1 encoder error The Z2 encode...

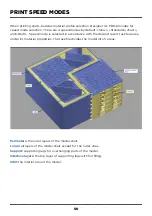
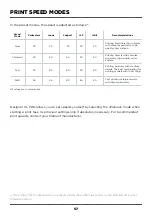
Page 57: ...elected in accordance with the desired result task features and print material properties The task file divides the model into 5 areas Perimeters the outer layers of the model shell Loops all layers of the model shell except for the outer ones Support supporting legs for overhanging parts of the model Interface layers the top layer of supporting legs with full filling Infill the interior area of t...

Page 58: ...20 20 20 20 Standard 20 60 60 20 60 Fast 30 80 80 30 80 Draft 60 80 80 60 80 Perimeters Loops Support Infill Recommendations Printing small objects or objects with complex geometry High quality outer surface Printing objects with complex geometry High quality outer surface Fast printing of large models with simple geometry Printing products with medium details The best combination for printing mod...

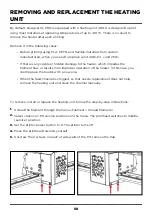
Page 59: ... unit 400 for unit 250 If there is any visible or hidden damage to the heater which impedes the filament flow or results in an improper operation of the heater In this case you shall replace the heater with a new one When the feed channel is clogged so that nozzle replacement does not help remove the heating unit and clean the channel manually Unload the filament through the menu Filament Unload f...

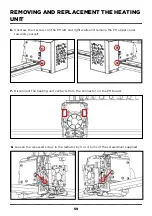
Page 60: ...the 4 screws on the PH left and right walls and remove the PH upper cover towards yourself Disconnect the heating unit contacts from the connector on the PH board 6 7 Loosen the recessed screw in the radiator by 3 or 4 turns of the screwdriver supplied 8 ...

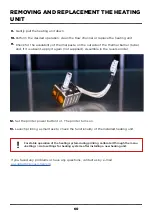
Page 61: ...ply it again not supplied Assemble in the reverse order 9 10 11 If you faced any problems or have any questions contact us by e mail eu support picaso 3d com Set the printer power button to 1 The printer turns on Launch printing a small task to check the functionality of the installed heating unit 12 13 For stable operation of the heating system during printing calibrate it through the menu Settin...

Page 62: ...erature of the nozzle 2 TBL Build plate temperature RAD Radiator temperature 0X Cleaner X coordinate 0Y Cleaner Y coordinate DX X coordinates for nozzle 1 alignment DY Y coordinates for nozzle 2 alignment DZ Nozzle height difference Z_OFF Z offset value FIL1 Presence of filament in nozzle 1 FIL2 Presence of filament in nozzle 2 N1 Size of the nozzle 1 N2 Size of the nozzle 2 K Flow encoder coeffic...

Page 63: ... ratio as well as the operation level of the Designer XL PRO blower and cooling fans during operation A complete list of profile parameters is available on the Polygon X menu Configuration Filament profile manager A print task prepared in Polygon X describes only the geometric parameters of the future model excluding the material used and the print speed Therefore the same task can be printed with...

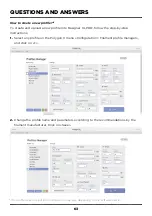
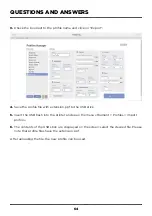
Page 64: ...tep by step instructions 15 The profile creation algorithm in Polygon X may vary depending on the software version Select any profile on the Polygon X menu Configuration Filament profile manager and click on Change the profile name and parameters according to the recommendations by the filament manufacturer Click on Save 1 2 ...

Page 65: ...extension ppf to the USB stick Insert the USB flash into the printer and open the menu Filament Profiles Import profile The contents of the USB stick are displayed on the screen select the desired file Please note that profile files have the extension ppf 4 5 6 After uploading the file the new profile can be used ...

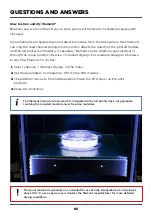
Page 66: ...nction Service Filament drying For example Designer XL allows to dry PVA filament To do this Select Service Filament drying on the menu Set the parameters Temperature 90 ºC time 180 minutes The platform moves to the middle position Place the PVA spool on the print platform Close the front door The spool material is generally not intended for use at high temperatures For drying at above 100 ºC use ...

Page 67: ...VA the build plate temperature will be taken from the PVA profile 45 ºC as the lowest one this will not be enough for the ABS adhesion to the platform What is a printlist 16 Printlist is a list of several print tasks It can include up to 20 different tasks the repetition number of each task is arbitrary After creating a task in Polygon X you can add it to the Local folder this is a local task base...

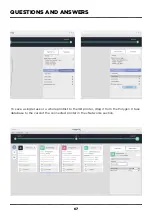
Page 68: ...QUESTIONS AND ANSWERS 67 To save a single task or a whole printlist to the 3D printer drag it from the Polygon X task database to the card of the connected printer in the Network section ...

Page 69: ...ough the smaller diameter hole Make sure that the selected profile matches the filament being loaded Replace the nozzle with a new one and repeat the load The print profile shall match the threaded filament The same material produced under the brand of different manufacturers has different characteristics each of them requires an individual printing profile Filament shall have a uniform diameter o...

Page 70: ...nting a model short cleaning is performed to maintain the layer surface quality and the outer shell of the model The filament control system tracks the filament end and pauses printing After that you open the side door on the side of the finished material and remove the empty spool Replace the spool and perform the load operation In the menu select Service Load filament and Designer XL PRO will sq...

Page 71: ... the printhead is pulled away from the model and the extruder feeds some filament for cleaning If it s not possible to restore the flow during the first cleaning the algorithm starts again with increased temperature If the flow is not restored in three iterations Designer XL PRO pauses printing until user s intervention To avoid such pauses several models can be printed at once to increase the tot...

Page 72: ...ner not supplied with the printer to clean the control unit and the casing fans from dust and fine dirt The maintenance frequency depends on operating conditions Check the condition of the printer units and perform appropriate maintenance as necessary at least once a year ...

Reviews: