SPOOLING
WIRE ROPE PREPARATION
NOTE:
The first use of your winch must be a test
run during a non-recovery situation. During this
trial run begin to recognize the sound of a steady
pull, a heavy pull, load jerking or shifting.
• Spool the wire rope.
• Wear leather gloves while spooling.
DO NOT
allow the wire rope to thread through your hand
without a glove.
•
Unwind the wire rope carefully along the floor
to avoid kinking.
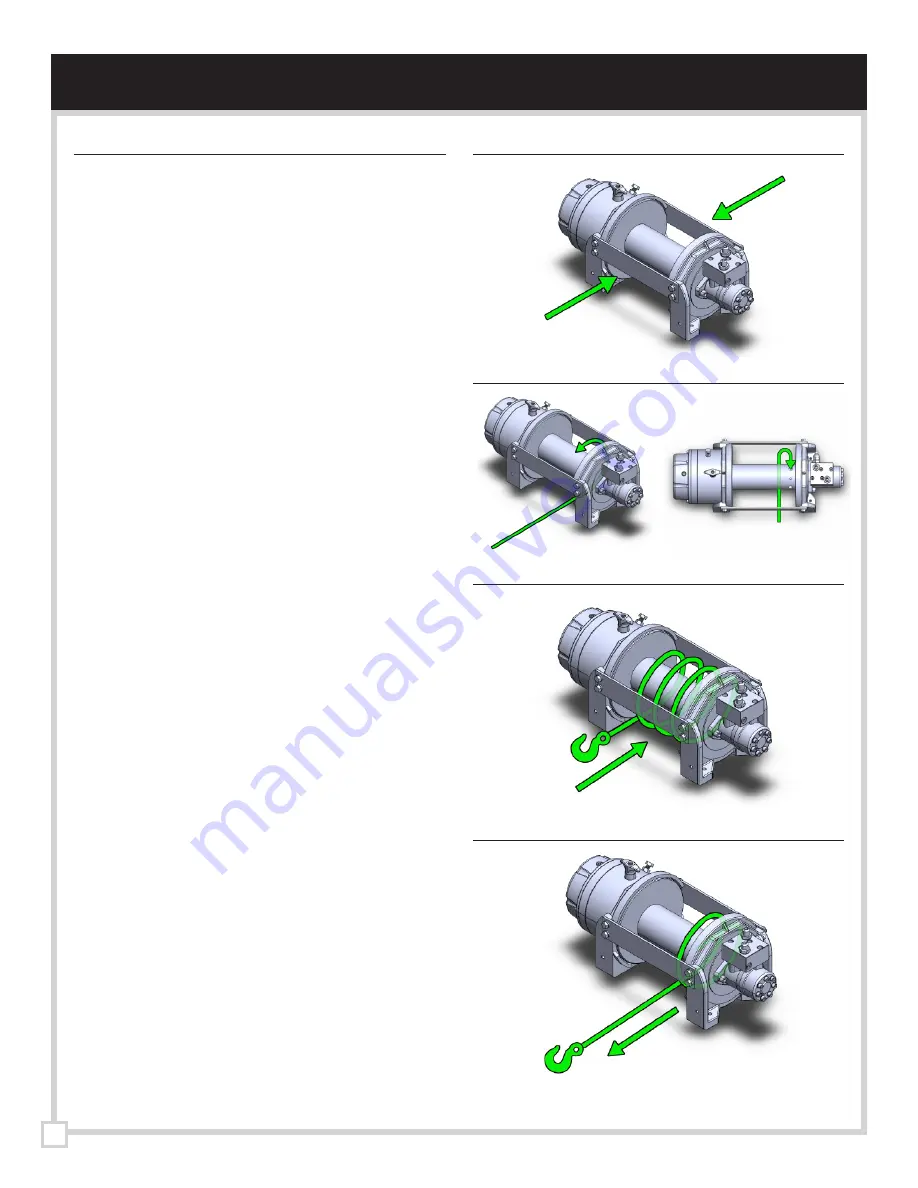
• Step 1 Make sure the winch is facing the proper
way. with the clutch side being the left side of
the winch and the motor side being the right.
(See step 1)
• Step 2 Thread the end of the cable from the
front, UNDER the drum, and up the back side
placing the end of the wire rope in to the hole at
the end of the drum. The wire rope will protrude
½”- 1”. Tighten the set screw to hold the cable in
place.
• Keep a slight load on the wire rope while
spooling. If you are facing it from the front the
drum will spin down TOWARDS you. Spool the
wire rope until the red cable is fully spooled at
approximately five wraps.
•
Under a load of 500 lbs (230 kg) finish spooling
the wire rope. This will stretch the new wire
rope and create a tight wrap around the drum.
• If there is a rope pile-up on one end of the drum,
reverse the winch to relieve the load and move
your anchor point further toward the center of
the load. Then you can re-wind for a neat layer
of the rope.
• Spool the wire rope on to the drum until the
load is recovered. During operation, make sure
the wire rope lays smoothly on to the drum
without spacing or overlapping.
STEP 1
STEP 2
STEP 3
STEP 4
Front
Back
6
Summary of Contents for PSHDH20000
Page 2: ...2 ...
Page 9: ...PSHV10000 FOOTPRINT 41 3mm 1 63 8 Ø11mm 0 43 YOU MAY REMOVE THIS PAGE 9 ...
Page 10: ...28 5mm 1 12 28 5mm 1 12 114 3mm 4 50 32 5mm 1 28 303 5mm 11 95 10 ...
Page 11: ...PSHV15000 PSHV18000 FOOTPRINT 32 5mm 1 28 8 Ø16mm 5 8 YOU MAY REMOVE THIS PAGE 11 ...
Page 12: ...28 5mm 1 12 28 5mm 1 12 114 3mm 4 50 41 3mm 1 63 291 6mm 11 48 12 ...
Page 19: ...19 ...


